
This page last updated
Sunday, September 18, 2005 08:31 PM
More than a
few VN750 riders have been cursed by a failing
stator, including
myself. Here are some details of what we had to do in order to fix it
ourselves.
Note: Electrosport used to be called Electrex.
From: "G. Brian Thomas" <gthomas@cscc.edu>
Sent: Friday, October 22, 1999 11:27 PM
To: Todd.Davis@apex.com
Subject: Re: RE: Stator replacement
Todd,
Don't know if you got to your stator project yet, but I got
mine done and
am more than pleased with the results. I'm getting 13.5 volts to
the battery
at an idle (1000 rpm) with two spot lights, two rear
running lights and the
high beam on along with the normal electrical system. At
cruising speed
(4000 rpm) it jumps up to 15.2 volts. I now have more juice than
I need!! : )
One little tip I can give you...... Make sure you replace the
O-ring on the
outer stator cover and on the three screws that hold it on.
I tried to save a
few bucks and reuse the old one. No dice.....wound up with
an oil leak.
Thank God I can get to that one with the engine in place.
Let me know how things go with yours.
Brian
~V~1891
From: "G. Brian Thomas" <GTHOMAS@cscc.edu>
Date: Sat, 23 Oct 1999 02:52:32 -0400
Subject: Stator project
JR,
I finally got the damn thing done. All went well.
Slow........but, well
I now have more juice than I need. To test the new charging
system I
turning everything on creating the maximum drain possible.
Here are the
battery conditions:
Fresh charge, ignition off - 12.8 volts
Idle (1000 rpm) - 13.5 volts
Cruising down the road - 15.2 volts
(4000 rpm)
The ammeter shows a slight drain at idle but balances to
"0" at about
1800 rpm. (I can't be as specific with the amps as the
volts because my
digital multi meter has a 10 amp max rating so I use a regular
automotive
ammeter to check the amps with.)
I am quite pleased with the results. The job wasn't all
that difficult,
just time consuming. My wife sent the film out today.
I had her order
them on disk also so when they come in I will e-mail them to you
and you
can do what you want with them. I'll include
descriptions/details with
the pics when I send them.
Until then........Ride safe (& warm)
Brian
~V~1891
From: "G. Brian Thomas" <gthomas@cscc.edu>
Date: Sat, 06 Nov 1999 23:36:58 -0500
Subject: Pictures
Well, here are some of the pictures I
took. Unfortunately, not all of them though. They all
didn't turn out. Several were out of focus. The ones
that really pissed me off were the close up pics of the burned
out stator. I don't know what went wrong with the
camera. It's supposed to be idiot proof. Anyway, here
is what came out pretty good. Sorry they didn't come out so
well but the ones that did do show a little bit. Below is a
brief description for each pic. They are in no particular
order.
Left side of engine with stator cover off
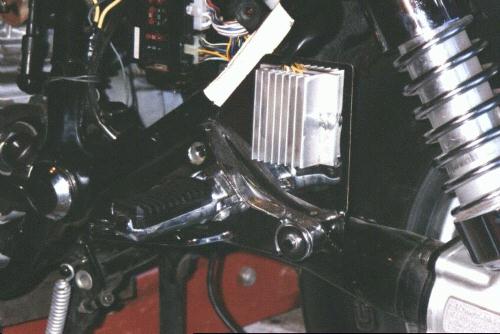
Electrosport regulator relocated from under the battery box to behind the left passenger foot peg for better cooling

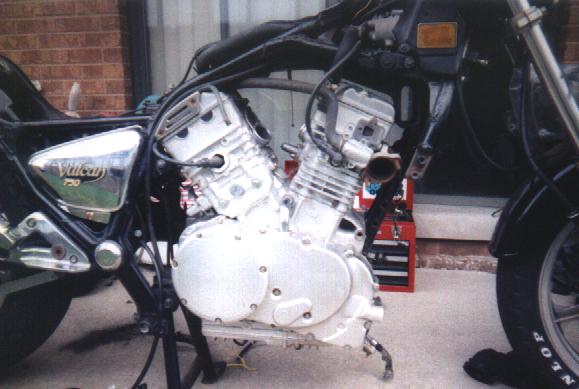
Shaft, still attached, slid forward with the engine


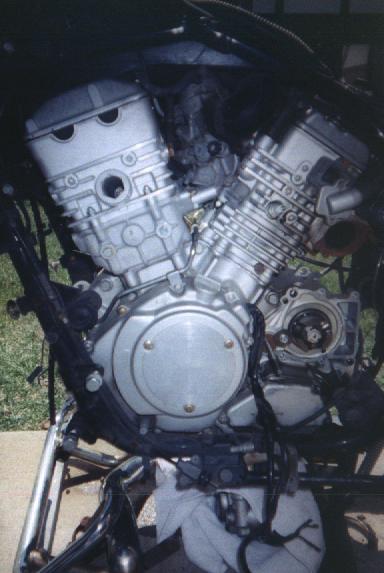
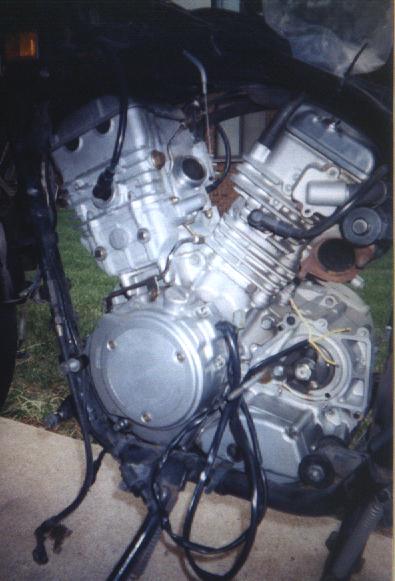
(Left) Top-left view of engine showing necessary clearance to remove cover (Right ) Top view showing engine "cocked" to the right. (note: throttle cables still attached)
From: Todd Davis <ktdavis@aa.net>
To: "'G. Brian Thomas'"
<GTHOMAS@cscc.edu>
Cc: "'jrallas@juno.com'"
Date: Mon, 1 Nov 1999 10:46:10 -0800
Subject: RE: RE: Stator replacement
Happy Day! Well, on Friday night, I put it up on the
stand and drained the
fluids. Saturday morning removed the gas tank, ears, and exhaust.
Then my
buddy showed up and we both proceeded to disengage and remove
everything
else.
Trying to get the engine out was a major pain in the ass. I
discovered that
the top-rear right motor mount has to be taken off before the
engine will
move. I also had to totally remove the front bevel gear case in
order to
drop the rear of the engine enough to rotate it to clear the
shift spindle
from the frame.
Hammer and small 2x4 got the inner cover off and there it was:
the old
stator had obvious shorts and pieces melted together from when
the regulator
was malfunctioning. Then came the only tool shortage: I didn't
have an allen
wrench that fit the stator mount-screws perfectly. And boy were
they in
tight. Ended up using an 'almost' big enough hex driver attached
to the end
of my impact driver. Regular hammer didn't do anything except
start mangling
the screw. So I got out a hand sledge and after 3 whacks each,
the bolts
popped loose. I just hand tightened them back in, but used
non-permanent
thread-lock on them.
Assembly went pretty fast, except for trying to remount the
engine. After an
hour of struggling, we finally decided to leave the front bevel
gear case
off until after the engine was mounted. Things went *much* faster
after
that. By 5pm, everything was back on and filled up and ready for
testing.
Started first try!!!! You never seen anyone more relieved at that
point!
Exhaust leaked out of the pipe connections, so I warmed it up,
then cooled
it off, and retightened them. No leaks now.
Checked the battery voltage at idle - 13.3 volts. Much better!
Rode it
'around the block' (17 miles - I live in a rural area) on Sunday
and it was
great. Riding in to work this morning - everything's fine and
suddenly I
hear a squealing noise - coming from the radiator fan. Well, I
had spray
washed the radiator to remove gunk, but I hadn't taken off the
fan.
Obviously I drove some water past the seals into the motor
housing and we
had a frost last night......
Oh well, at least it's easy to replace.
OK, sorry for the rambling - I get this way when something
works right for a
change. I meant to take pictures - document the whole
thing, but got caught
up in trying to get it finished in one day and totally forgot.
Thanks for your help - between the two of you, I worked up the
courage to do
this on my own and saved myself some mondo bucks from the shop.
Thanks
again!
Todd Davis
#2466
From: "Ed Clark" <eclark3@bellsouth.net>
To: "J.R. Allas"
Subject: Re: 1986 VN750 alternator question
Date: Wed, 4 Oct 2000 20:04:31 -0400
Hey-
Thanks for posting the pic. Here's what I ended up doing: I
purchased a
new used stator from a company called "Cycle Recyclers"
in Chico, CA for
$100.00 (they have all kinds of VN750 parts). After spending alot
of
time checking the ohms and checking the voltage regulator, I was
getting
nowhere so finally I dropped the engine so I could have a
"look see" -
what seemed like a daunting task in the manual really wasn't so
bad and
took approx 16 hours of labor.
I removed the old stator coil from the engine and it looked
really
carbon black- the "used" one was a clean yellowish
epoxy color. I
compared the rotor I have in my engine with the "used"
one I bought
using a piece of steel to see if the rotor was still magnetized
& had
about the same amount of pull- As near as I could tell they were
Identical- so no worries there.
To check the stator assembly, I chucked the new rotor up in my
drill
press using a bolt and nut as an arbor. I then made a mounting
for the
stator coil on a block of aluminum and dropped the rotor down
onto the
stator and locked the quill of the drill press in
place.Then I had to
adjust the table of the press to make sure that the stator was
not
rubbing anywhere on the rotor. I set the belts of the drill press
to
turn 1000 RPM's (approx normal vulcan idling speed) and measured
the AC
output of the coil between the yellow terminals. For the old
stator coil
at this RPM range I was hardly getting 8 volts AC between any two
terminals. This comes nowhere near close to driving the voltage
regulator (voltage on any regulator circuit in a power system
typically
has to be at almost twice as high as the required regulator
output to
make the necessary current). Increasing the RPM's on the drill
press to
2500 increased the AC output to 12 volts. On top of this, the
stator
coil began to get so hot it smoked - the reason it was probably
black in
the first place. My only conclusion was that the stator must have
some
sort of internal short & the clymer manual tests won't detect
that
unless you have access to a very sensitive ohmmeter.
I repeated the results for the "new" stator coil and
got 19- 20 Volts AC
at 1000 RPM and 40 volts at 2500 RPM.
So I replaced the stator coil only, put the bike back together
taking
the opportunity to clean it in places I may never have access to
again,
checked the battery voltage (now 14-15 like it should be), and
now I'm
back cruisin'.
Keep the shiny side up,
ED
Now for my story... It took me a bit longer, but the overall result was an extremely happy guy!!! - JR Allas
First the motor had to be prepared for
removal.
I removed the Bevel Gear case and all wires,
cables, hoses...
Also, the radiator, right side frame-rail, and
anything attached to it had to be removed.

My friend, John, helped me get the motor out,
and the left side cover was removed.

Here is the old stator. It didn't look
bad, but all three windings measured zero ohms to the frame.
I installed the new Electrosport stator with the
wire harness routed through the old grommet
because the Electrosport stator does not come with one. I had
to split the old grommet open
with a razor blade, pulled the old stator wires out of it and
pushed the new wires through
each of the three holes. I then sealed it with gasket
compound to keep it from leaking.

After the motor cover was re-installed, weeks
later, John helped me lift the motor back in.


As G. Brian Thomas did above, I went one step
further and relocated
the new regulator/rectifier from under the battery box.

to a home-made bracket mounted next to the left
passenger foot-peg. The new Electrosport
regulator/rectifier has a wire harness attached to it, which
lends it easily to relocation
as there will then be slack in the harness, seen in the 2nd
picture..
(pictures courtesy of Warren "Sundial" Jorgensen - VROC
#5052)


---
I finished the above installation in early September, 2001. Unfortunately,
my
new Electrosport stator failed on May 10th, 2002, when I rode from New Lenox, IL
to Minneapolis, MN without checking the battery before, or after the trip.
I had less than 3,000 miles
accumulated on the new stator.
When the problem began, the first thing I noticed was
that my turn signal indicators were
flashing very slowly and dim. I instantly knew what the problem might be,
and made my
way to the shoulder. I removed the battery caps and could not see any
electrolyte in
any of the six cells. I added water to the battery, jump started it, but
the battery would
not charge. I found the stator coils were all shorted to each other, but
not to the frame.
Needless to say, I was disappointed in myself for not being more careful.
The following is what I did to keep this from happening again... (I hope)
Stator - Regulator/Rectifier replacement
Part Two
JR Allas
Of course, I had to do all the same steps as above to get the
motor out of the frame, so
there's no point in rehashing the same info again.

When I removed the left side generator
cover, I found that the Electrosport stator
had melted its insulation off and it
coated the inside
of the rotor magnet.

I very carefully chipped the plastic from the inside of the rotor magnet.


Here's the melted Electrosport stator next to the new one.

The new stator installed in the generator cover.

Pass the new stator wires through the original grommet. I sealed the
perimeter with high-temperature RTV and used silicone in the wire holes.

With the stator in place, then the Regulator/Rectifier has to be mounted.
Here's a better
photo of the home-made relocation bracket I used in the above write-up.

Instead of a built-in socket, the new Electrosport Regulator/Rectifier has a wire
harness.


Some have asked me how these plugs are wired... Here are the male and
female connectors...

and... The Regulator/Rectifier mounted and connected.

At Radio Shack, I picked up three of these inline fuse
holders to install 20Amp fuses in the stator wire harness
to protect
the stator from over-current in the future.

Here's what the fuse holder looks like with the cap open.

Closing the cap should keep water out of the fuse holder.

Here's all three fuse holders installed using 18 gauge butt-splices.

And, to top it off, I installed a volt meter to monitor the voltage at the
battery leads.
The battery is a maintenance free WestCo 12V14L-B. I obtained the digital
5-function
volt meter from www.bigbikeparts.com
(part# 4-239).
It can also be found at www.jpcycles.com
(part# ZZ73218)
After the bike broke down the 2nd time, I walked away from it in disgust.
Fortunately, I couldn't be kept
away from riding for too long. In early August 2003, I tore into the bike,
pulling the motor, replacing the
stator and reassembled in a little over two weeks. The bike was back on
the road on August 22nd, 2003.
I had a few other problems that I had to deal with since then, but nothing
major. Again, I'm a happy
guy and was able to rack up about 750 miles before the Chicago Winter grabbed
hold.
JR Allas
Check the Web Links page for Electrosport Inc. for more
information
on a replacement stator and
regulator/rectifier for most bikes.
Please send any comments, corrections, or
suggestions to
jrallas@yahoo.com