
This page last updated
Sunday, September 18, 2005 06:13 PM
VN750 Engine
Removal/Installation
JR Allas
During a trip out West, I was doing some
pretty hard riding on my 1990 VN750. The morning after a
rather extended period of riding at 100+ mph on Hwy 395 in
South-central Oregon, I found that I had developed a coolant leak
at the base of the right side of my front cylinder.
Needless to say, I eventually had to get the head gaskets
replaced. This is the story of what transpired during my
psychotic episode in which I decided to do the repairs myself (to
save money).
Well, first of all, looking at the DOHC 2
cylinder engine in the VN750 made it look much easier than it
was. I wrongfully assumed that all I would have to do is
remove the cylinder head covers, cylinder heads, and cylinders,
replace the gaskets from bottom to top, and I'd be done.
After closely inspecting the bike, and consulting my Kawasaki
Vulcan VN750 Twin Motorcycle Service Manual, I came to the
conclusion that the engine would have to come out of the frame to
allow for the heads to come off. Read the steps carefully
before beginning. I'm speaking from experience, and I
learned a lot of lessons performing this work.
Steps to remove engine:
These diagrams will better help you locate and identify some of the parts mentioned above. First, from the right side, Note how close the top of the front cylinder cover is to the surge tank. The surge tank is not mounted to any structure. It is held in place by the ducts that connect to it. When removing the engine from the frame, the surge tank will want to fall out of the top frame member, so you may want to strap it in somehow. The suggestion above concerning removal of the front cylinder head cover is easy to understand now. The surge tank will easily move downward, but upward movement is not possible. If the cover is not removed from the cylinder head, it will make it much more difficult to remove the engine from the frame, but not impossible.
In this diagram, you'll notice that the Front Bevel Gear Case has been removed. This makes it much easier to remove the engine from the frame. Otherwise, the final drive shaft will have to be manually slid off the Gear Case's output shaft as the engine is being maneuvered. I found this out the hard way.
Since my original intention was to replace all the head gaskets, you're probably wondering why I removed the engine side covers in the picture below. Since the VN750's engine is a Dual Over Head Cam setup, two chains are used to drive the cams. One chain drives an intermediate sprocket from the main crankshaft, and a second chain drives the cams from the intermediate sprocket. Unfortunately, Kawasaki made it next to impossible to remove the intermediate sprocket from the drive chain channel of the cylinder head. No matter how I tried, I could not get enough slack in the lower drive chain to allow the sprocket to come out so the cylinder head could be removed. The only way to do this was to remove the engine side covers so the chain could be removed from the crankshaft, and lifted upwards out of the drive chain channel in the cylinder head. This required the removal of the flywheel on the left side, and the clutch hub and clutch basket on the right side. Removal of the clutch basket is difficult, as the basket has to be held still while the locknut is broke loose with an impact wrench. I had to resort to an impact screwdriver with a socket on it because the threads were peened over, which may have been done on purpose to keep the nut from working loose.

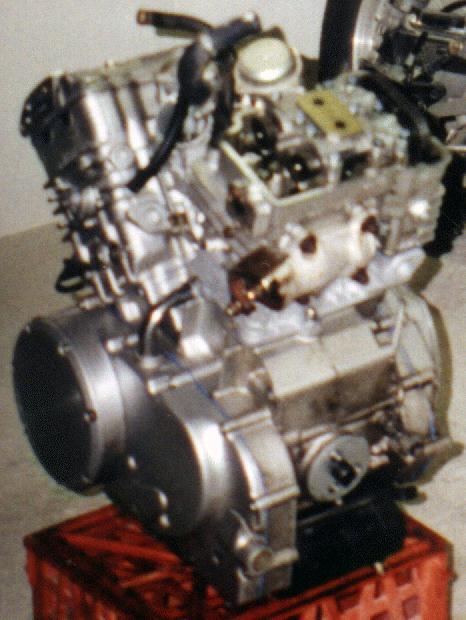
In this picture, you'll see a large gear on the left side. That is the balancer gear, and although it can not be seen in this picture, there is a mark on it that must line up with the corresponding mark on the flywheel, which goes on the shaft in the center. Fortunately, I caught this at the last moment before reinstalling the left side cover. I'm sure it would make for some unwanted shaking and/or vibration if this is not lined up. Also, you can see that I placed the intermediate sprocket in the picture to give an idea of approximately where it is located when the engine is assembled. Fortunately, when reassembling, I found that the cylinder walls have a chamfered lead-in on them so it is very easy to get the piston rings to slip back inside the cylinder when putting the cylinder back on. I didn't even need a ring compressor.
This is the engine in the
same state as the pic above, but at a slightly different
angle.
Sorry about the image quality...


You'll notice the coolant flow chambers in the cylinder head, not far from the cylinder area. You can see why a bad gasket could cause some problems. When I drained my oil, I found a slight amount of coolant in the oil, but when I drained the coolant, I could definitely see traces of oil in the coolant. It's a good thing I decided to fix this thing... Who knows what could have eventually happened.
Here is the bike, ready to assemble. Note that the carburetors are back on the engine. When they were removed, they were taken off as a pair, and not separated. When I reassembled the engine, I left the front cylinder head cover off to allow for clearance under the surge tank, and then installed the carburetors. One mistake I did make was to put the Front Bevel Gear Case back on before putting the engine in the frame. This made for a much more difficult reassembly, and I wish I had read the manual more closely before doing so. Trying to maneuver the engine back into the frame and mounts while trying to line up the output shaft with the final drive shaft was a three man job which caused me to create many four-letter words that previously didn't exist.

You can see, by this close-up picture, that I sealed all the new gaskets with high temperature blue RTV. The engine has not leaked one drop of oil yet, and I waited some time before pealing the excess RTV away from all the gasket joints.
Engine Installation Notes:
Because of the distance between my home,
and the location where my bike was stored during this work,
I wasn't able to work on it as much as I wanted to. I left
my bike in my friend's building the first weekend of October,
1996. I started working on it in April of 1997, and did not
get finished until August 10th, 1997. Overall, I spent
about $250 on gaskets and parts, but I saved a lot of money on
labor. Although, I was not able to ride the bike all
summer... A lesson well learned, and I probably won't ever
do it again.
Fortunately, after installing a brand new
battery, the engine started up on the first try. It was
actually kind of scary. I almost expected something to go
wrong, but that was over two years ago, and I've been riding it
ever since, just like I always have, and no problems yet - knock
on chrome!
If there are any questions or concerns concerning the above information, please contact me at jrallas@yahoo.com