|
| |


Infantry Tactics
Movement /Squad formations
| To
survive on the cyber battlefield, stealth, dispersion, and
security must be enforced in all tactical movements.
The players and mission commanders must be skilled in all
movement techniques.
|
| Formations are arrangements of players/ soldiers in
relation to each other. Squads
are put in a formations for control .Leaders are where they
can best control the formations.
All soldiers in the team must be able to see their
leader .
|
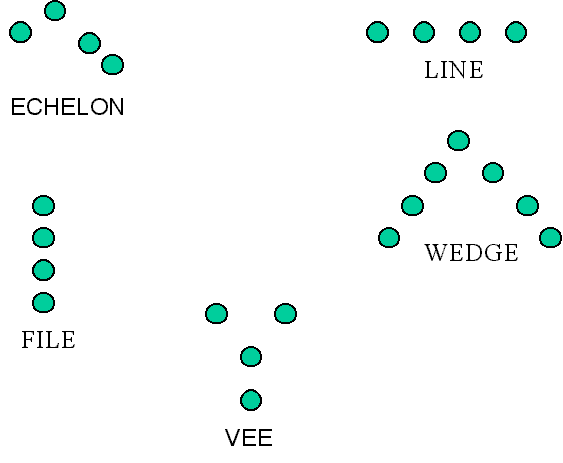
above are some standard formations
| A movement technique is the manner a unit uses to
traverse terrain. There are
three movement techniques: traveling,
traveling overwatch, and bounding overwatch.The selection of a movement
technique is based on the likelihood of enemy contact and the need for
speed. Factors to consider for each technique are control,
dispersion, speed, and security. Movement
techniques are not fixed formations.
They refer to the distances between soldiers, teams, and squads
that vary based on mission, enemy, terrain, visibility, and any other
factor that affects the control of the unit /squad. Soldiers must
be able to see his next level leader.
The platoon leader should be able to see his lead squad leader.
Leaders will control with voice comm. in the game and if needed
text typing but only as a last resort. |
Traveling
| Traveling. In the traveling technique, the distance
between individuals is about 10 meters with 20 meters between squads.
It has the following characteristics |
 | More control than traveling overwatch but less than
bounding overwatch |
|
| Minimum dispersion |
|
| Maximum speed |
|
| Minimum security |
|
Traveling Overwatch
| Traveling Overwatch.
The traveling overwatch technique is the basic movement technique. |
| The distance between individuals is about 20 meters,
between squads about 50 meters platoons. |
| In company traveling overwatch, the lead platoon must
be far enough ahead of the rest of the company /companies to detect or
engage any enemy before the enemy observes or fires on the main body. However, it must be close enough to be supported by the company's
small arm’s fires. This
is normally between 50 to 100 meters, depending on terrain, vegetation,
and light and weather conditions. |
| In a company/companies column formation, only the lead
platoon should use the traveling overwatch; however, if greater
dispersion is desired, all squads may use it. |
| In other formations, all squads use traveling overwatch
unless the mission/company commander specifies not to. |
| Traveling overwatch has the following characteristics |
| Good control |
|
| Good dispersion |
|
| Good speed |
|
| Good security forward |
|
bounding overwatch
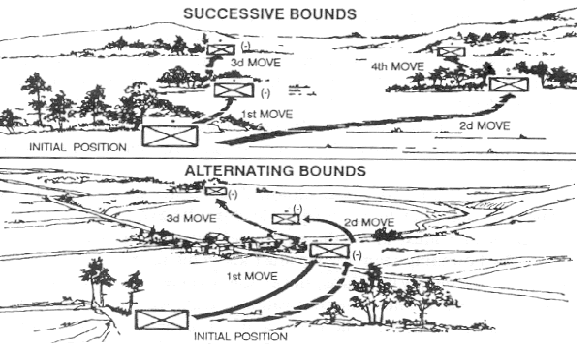
| In the bounding overwatch technique, the distance
between players remains approximately 10-15 meters.
The distance between squads and platoon/companies varies. |
| The platoon has a bounding element( a squad) and
an overwatch element (remaining squad).
The bounding element moves while the overwatch element occupies
an overwatch position that can cover the route of the bounding element
by fire. Each bound is
within supporting range of the overwatch element. |
| Before a bound, the platoon .company commander gives
the following instructions to his subordinates. |
| Direction of the enemy if known |
|
| Position of overwatch elements |
|
| Next overwatch position |
|
| Route of the bounding element |
|
| What to do after the bounding element reaches the next
position |
|
| The characteristics of bounding overwatch are |
|
| Maximum control |
|
| Maximum dispersion |
|
| Minimum speed |
|
| Maximum security |
|
Multi companies Bounding

| the above is controlled by the mission
commander |
VERY Important for leaders that tell units were to bound to
| Movement Considerations. When deciding where to move
the bounding element, consider: |
| Where the enemy is likely to be |
|
| The mission |
|
| The routes to the next overwatch position |
|
| The weapons ranges of the overwatching unit |
|
| The responsiveness of the rest of the unit |
|
| The fields
of fire at the next overwatch position
|
|
Danger areas/how to cross and secure them
| A danger area is any place on a unit’s route
where the leader’s estimate his unit may be exposed to enemy
observation or fire. Some
examples of danger areas are open areas, roads and trails,
villages, enemy positions, and obstacles such as , streams, and wire
obstacles. Avoid danger
areas whenever possible. If
they must be passed or crossed, use great caution.
|
Reason for taking this action :
- The unit prevents the enemy from surprising the main
body.
- The unit moves all personnel and equipment across the
danger area.
- The unit prevents decisive engagement by the enemy.
|
STEPS TO TAKE:
|
- Designate near and far side rally points
- Secure near side, left and right flank, and rear
security
- Recon and secure the far side
- Cross the danger area
- Plan for fields fires (when possible
|
After flanking security are set a squad or platoon crosses and recons the
area after checking and securing the area leaves a security squad /player across
to insure that no enemy force moves in etc and
then inform the rest of the unit to cross in small sections so as to limit any
danger crossing as a whole group/force.
|