Substrates and Cycle: ( FEEL FREE TO THINK OF A BETTER TITLE )
The following is the third in a series of articles covering the basics of keeping freshwater tropical fish. These articles are designed with the beginner in mind, although there certainly maybe some good information in this series for more experienced hobbyists as well. If you are considering entering one of the most popular hobbies in the United States, and have never kept live fish before (or if you have just have had problems keeping your fish alive), then this series is written for you!
Last month we covered types of filtration. If you haven't read that article yet, click here to read it first.
This month's topics are Substrate and the dreaded Cycle.
First I will cover a bit about some of the different substrates you can use in your aquarium. Then I will talk a bit about chemical cycles in your water, and how unseen events can influence how your fish's health.
Substrate:
Substrate as defined by Webster's dictionary is the base on which an organism lives, or a substance acted upon ( as by an enzyme). For most aquarium hobbyists, it simply means the stuff on the bottom of your tank. There are a few options of substrate like soil, sand, laterlite, gravel, glass, beads, marbles, etc.
The most common substrate found in today's pet stores is colored or natural pea sized gravel. For the majority of aquariums this works very effectively. What the substrate does, is provide a home for bacteria to grow and thrive, as I will discuss in the second half of this article, most aquariums need a place for good bacteria to grow. What type should you go out and buy for your aquarium? Well I will leave that up to you, since after all it is your tank, and you should make it look the way you want to. I will cover some different options here for you , as well as provide some warnings.
Lets start with good old pea gravel, it comes in a wide range of shapes, sizes, colors and is readily available. When you go out to the store to select some gravel, do yourself a favor and avoid any epoxy/resin covered gravel. This gravel is in most pet shops, but can be very bad for your aquarium. What happens is over time, from maintenance, or fish digging through it, the coating will wear off, and the pH levels of your water can rise significantly, enough to even cause fatalities. So before you buy, ask the clerk for a sample of the gravel you are considering buying, and scrape it with a knife blade or fingernail, if a plastic comes off of the rock, make an another selection. Now some pet stores only carry this plastic coated gravel, so you may have to go over to a home improvement center and pick some up.
When you get your substrate home, you will need to rinse it prior to adding to your new aquarium. This process can take a while, but the fastest way I have been able to do it is to get a large plastic garbage bag, a colander and set up a little production line at my kitchen sink. What I do is get some gloves on, run the kitchen sink water as hot as I can, placing the colander under the running water I take a cup or two of gravel out of the bag it came in, and place it in the colander, rinse thoroughly for a minute or so under the running water, turning the gravel with my hands, when the gravel is rinsed completely I move this clean rock into the plastic garbage bag and repeat the process with the next cup or so of gravel, until I am all done. When finished, I then move the clean gravel to my aquarium. Why rinse it? Well you want to get rid of any dust, dirt, or anything else that was inadvertently placed in the bag when it was manufactured.
Now take the gravel to your tank, and spread evenly over the bottom and your done. Place your decorations in the tank and fill with water, wait a few days ( as outlined in the first article ) and you are ready for your first fish to come home with you.
Now that you know about the basic gravel I will move onto some different substrates.
Bio-Beads: Small colored balls with dimples, like a golf ball, only much smaller. Ideal for small 1 gallon and under tanks, commonly seen with Betta bowls.
Glass: Larger sections of stone smoothed glass in a variety of colors, looks great, but NOT for tanks with bottom dwelling species, such as eels, catfish, Michaels or gravel eating species like the Jurupari.
Marbles: Available in a variety of colors, and can be attractive, Do NOT use with larger substrate digging species, ( Cichlids, etc. ) the marbles can actually crack aquarium glass, best if just used with species like goldfish and mollies.
Soil: While it can look great, especially with planted tanks, unless you are used to dealing with aquariums, I would not recommend using soil your first time out.
Sand: Needed for some species, especially freshwater stingrays and eels, but caution must be taken as to set up the tank properly, or sand particles can find their way into your filter motor and do some real damage.
Now the above is just a few of the more popular substrates among the many that are available, but I want to go into one of my favorite blends of substrate more in depth. The following is an inexpensive and one of the best looking ways to do a substrate, especially if you are considering keeping live plants in your tank. This simple low-cost method was introduced to me by a DaFishDude's Club Member, "Dennhelm".
Here's what I do for a cheap and fantastic looking planted tank.
Get some larger gravel, ½ inch in size, some plain kitty litter/oil soak ( plain Georgia Clay ), plant fertilizer tabs, play sand and some plants or bulbs.
This system works great, especially if you are using an under gravel filter system with a power head. Place the under gravel filter plates in your aquarium, insert the lift tube(s). Now place ½” to 1” of the large gravel covering the bottom of the tank. Now add a ½” to 1” layer of plain, non-clumping, non-scented kitty litter on top. Oil-soak from your local auto parts store will also work well. You are looking for just plain Georgia clay, with no additives. Caution, when adding the clay/kitty litter, you will get a lot of dust, this is normal. Next add a plant fertilizer tab, one about every square inch along the top of the clay. Finally add a ½” to inch layer of play sand on top. You can get this very inexpensively from any home improvement center. Place a plate or pie tin in the aquarium and begin to fill the tank, pour the water slowly into the plate, this will prevent your new substrate from being disturbed during the filling process. When the tank is full of water, remove the plate/pie tin. Start up the power head for your filter. The tank will look like a brown mud puddle for a few hours, but it will clear. Once the tank is all clear, place the plant bulbs or rooted aquarium plants as desired into your tank. Fertilize the water once a week with a liquid fertilizer like Tetra's Flora-Pride and you are all done!
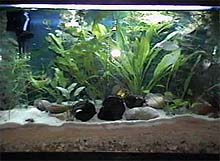
Above is what the end results looks like.
Cycle:
The second part of this month's article will cover some of the unseen forces in your water, commonly referred to as the “Cycle”.
The "Cycle"!
So you have been reading around different sites, and talking to that kid at the pet store and everyone is talking about this "Cycle". Well what the heck is it? And what does it mean to me? Here I will attempt as easily as possible to answers those questions.
This "Cycle" can be explained as follows:
The drawbacks of biological filtration are mostly associated with startup. What is popularly known as new tank syndrome or The Cycle , there is a lag between the time the fish are placed in the tank and the time the populations of bacteria are large enough to process the ammonia and nitrite.
When a tank is new, it has nothing in it (except for water, etc.) but nothing biological (living organisms). Now you add fish, these fish eat, and thusly they produce fecal matter (fish poop) as well as urinary waste. Any excess food and nearly all the fecal matter will fall to the bottom of the tank and into the substrate. Once there, this matter begins to break down. The first thing is that a bacteria field begins to grow and feed off of this matter. This bacterium breaks down the matter into toxic ammonia (NH3). Ammonia is quiet deadly to fish (I don't like it much either myself). In new tanks, there simply isn't enough bacteria growing yet to break down everything that is thrown at it, as quickly as it needs to. One way of speeding this process up a bit, is by adding commercially grown a bacteria culture, generally available at your local pet stores. I do not recommend this course of action for beginners, but with a bit of experience behind you, this can be a rather effective way of “jump starting” an aquarium before actually adding fish. One word of caution here, many of these products ask you to add the bacteria weekly. Once you have your fish in the tank, stop using this product, all you are doing is lining the pockets of the retailer and manufacture, your fish will provide enough matter for your existing bacteria field to thrive. This is known as the first 3rd. of the "Cycle".
The second 3rd, of this "Cycle" is that as the bacteria grows it feeds not only off of the excess waste, but the toxic ammonia (NH3) as well. This toxic ammonia (NH3) is converted to another toxic compound called nitrite (NO2) by the Nitrosomonas species of bacteria. Nitrites are also quiet deadly to fish, even in small amounts.
The third portion of this "Cycle" is when the bacteria continues to break down this nitrite (NO2) into relatively harmless nitrate (NO3) by the Nitrobacteria species of bacteria. This process is known as Nitrification . Nitrate is removed from the tank through small frequent water changes.
So if you were to look at the graph, you would start at day 0, then as you added fish, a curve would start to grow upwards. The more fish and/or waste food you have the taller the curve. As time goes on, this curve tapers off and begins to fall. This is the 1st portion of the "Cycle” (Ammonia). At the same time this curve starts to fall the next curve (Nitrites this time) begins to climb. This may also go as high as the first curve did. Now the first curve is tapering off near the bottom of our graph, the second curve is beginning to crest and head back downwards a third curve starts upward, but not to the extent the first too did, this is the harmless Nitrates.

So this graph is over a period of 30-40 days, the first 10-15 your tank can be deadly with Ammonia, the bacteria grows, breaks down the Ammonia, bringing the deadly levels down, but the Nitrites now climb and can become deadly, this is the second 10-15 days. And the last 10-15 days the Nitrites and Ammonia has settled down and the Nitrates are on the rise.
This is why I stress throughout my site that for new tanks, go very sparingly on adding fish, usually no more than 1-2 inches of fish added per ten gallons of water for the first 15 days. These fish (commonly called "starters") start the whole cycling process. Afterwards when things calm down in the water, you do not want to add anymore than 3 fish in any 7-day period of time to avoid these problems repeating themselves. When this happens it is commonly called "Spikes" or "Spiking". The sudden heavy increase in fecal matter, the bacteria field that breaks this fecal matter down is not large enough to combat the sudden increased load, thus ammonia shoots up for a period of several days, then the Nitrites will soon follow.
Red gills, fins or under bellies you see is generally due to excess Nitrites, a water change of 20-25% is in order, and again in 48 hours. Another great way of dealing with excessive nitrites/nitrates is to add absorption pillows to the tank. These pillows are relatively inexpensive and best of all, reusable. Nitro-Sorb is the brand most popular in the U.S. Try not to disturb the gravel at all, especially do not try to "clean" the gravel. If the fish survive the next week or so, you should have smooth sailing after that. I know its tough not to suddenly stock a tank full of fish, but one thing this hobby teaches us, patience, patience, patience.
See you next issue when we discuss how to go about testing the water for different chemicals like pH, ammonia, nitrites etc. And what to do ( and not do ) when we find them.
All written material and ideas expressed are sole ownership of DaFishDude, and used with permission exclusively for allpets.com and DaFishDude.Cjb.Net 2000 and may not be used, copied in part or whole without prior written permission.
