Lesson 4:
A Peyote Stitch Lighter Cover
1. See the last lesson:
Please take a look at the last lesson. Make sure you understand and have practised peyote stitch.
2. Find a Design:
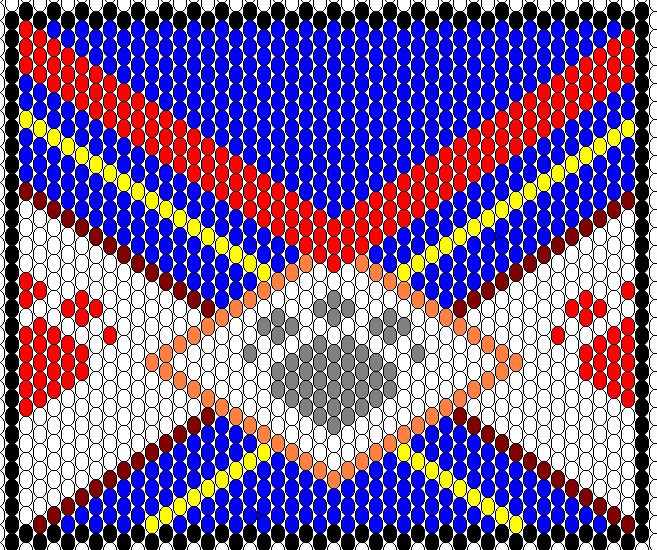
The design is an important factor of any lighter cover. You can make your own lighter cover design by downloading the peyote stitch graph paper at Emily Hackbarth's site. Here is a design that I whipped out in about five minutes, just so that I'd have something to stick up here to work off of. You can certainly use it, or come up with your own design. Anyway, here is mine:

3. Start Beading:
Lighter Covers are very simple and easy to do, once you have the hang of peyote stitch. Start out with your bottom row of the pattern. But, when you come to the end, instead of adding another row above the first, go through the first bead you strung on, and then start adding the above row.

Now, keep going, adding one row on top of the other. You will never have to "turn around" in your stitching; that is, you'll be beading in a spiral. Just keep going up until you're done!

To get the right size for the many different lighter sizes there are, start your first "circle" on the actual lighter. Here's where it comes in handy to make your own designs. Make sure you know how many beads it takes to make one row around the lighter before you start drawing your design. It's also good to have a design that can extend on the top or bottom, when you realize you have beaded out your entire design, and still have half a lighter left to cover!
The design is an important factor of any lighter cover. You can make your own lighter cover design by downloading the peyote stitch graph paper at Emily Hackbarth's site. Here is a design that I whipped out in about five minutes, just so that I'd have something to stick up here to work off of. You can certainly use it, or come up with your own design. Anyway, here is mine:

3. Start Beading:
Now, keep going, adding one row on top of the other. You will never have to "turn around" in your stitching; that is, you'll be beading in a spiral. Just keep going up until you're done!
To get the right size for the many different lighter sizes there are, start your first "circle" on the actual lighter. Here's where it comes in handy to make your own designs. Make sure you know how many beads it takes to make one row around the lighter before you start drawing your design. It's also good to have a design that can extend on the top or bottom, when you realize you have beaded out your entire design, and still have half a lighter left to cover!
Lighter Covers are very simple and easy to do, once you have the hang of peyote stitch. Start out with your bottom row of the pattern. But, when you come to the end, instead of adding another row above the first, go through the first bead you strung on, and then start adding the above row.
