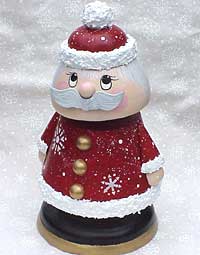
Bobbing Santa
Things to Do | Crafts

Please rate this site!

This funny little "bobbing" Santa
is easy to create with the kids. Make this as a gift or for
holiday decorating.
MATERIALS
Delta Ceramcoat® Acrylic Paints:
- Black (02506)
- White (02505)
- Drizzle Grey (02452)
- Tompte Red (02107
- Lisa Pink (02084)
- Santa's Flesh (02472)
- Gleams Kim Gold (02602)
Delta All-Purpose Sealer
Delta Gloss Interior Spray Varnish
Delta Stencil Magic "Bah Humbug" small (95 640 0012)
Delta Decorative Snow
Delta Stencil Sponge
Brushes:
- Eagle's Kids Are Painters Too!
- Super 7 Value Pack
- Eagle Millennium, Series 775 3/8" rake
Other Supplies:
- Bobbing Santa, if not available at your local craft
supply store, contact Creative Express, 295 West
Center, Provo, UT 84601-4430 (800) 563-8679
- 80-100 grit sandpaper
- Tack cloth
- Palette paper or a paper plate
- Water container
- Old toothbrush
INSTRUCTIONS
Helpful Hints
Stenciling Tips for Success
- When stenciling a project with younger children, I suggest
that you hold the stencil in place while the child sponge
paints the design. This will prevent the stencil from moving
while the kids are sponge painting.
- Care must be taken to avoid the potential of the paints
seeping underneath the edges of the stencil. The only rule of
thumb is that you use very little paint. Too much paint
applied at one time will result in the paint seeping
underneath the edges of the stencil. I recommend that you
place a small puddle of paint onto your palette. Dab a corner
of the sponge into the paint and blot off any excess color
onto your palette, blending the paint over the surface of the
sponge before applying color onto the stencil. If a more
intense shade of color is desired, allow the paints to dry and
carefully add another layer of paint.
- Use a piece of scrap paper to cover parts of the stencil
design you do not want sponge painted a particular color while
painting the design.
- When changing colors rinse the sponge thoroughly under
running water and wring out all of the moisture from the
sponge. Any water left in the sponge can cause the paint to
become more liquid and increase the possibility of the paints
going underneath the edges of the stencil. I have my students
place the cleaned sponge in a paper towel and then squeeze,
removing any trace of water that may still be left in the
sponge, before they continue painting.
Before You Begin
Sand the entire project and remove any dust created with the
tack cloth. Apply a coat of wood sealer and allow the piece to
dry. Re-sand.
Painting Instructions:
- Paint the face and hands of the piece Santa's Flesh.
- Thin Lisa Pink with water creating a very transparent shade
of color and add cheeks to the face underneath the mustache.
Using this same mixture add a Lisa Pink highlight to the top
of the nose.
- With a pencil draw 2 ovals for the eyes onto the face next
to the nose and basecoat White. Determine in which direction
you want Santa looking and add smaller Black ovals to the eyes
for pupils. With a liner brush, thin Black slightly with
water, roll off the extra paint and outline each eye adding
lashes.
- Paint the mustache Drizzle Grey.
- Place a small puddle of Drizzle Grey onto your palette and
thin the paint with water. Load a rake brush with the mixture
and add several wavy lines to the sides and back of the head
for hair.
- Repeat step 5 substituting White, and add several wavy lines
on top of the previous coat of color on the head allowing the
previous coat of gray paint to show through. Add several White
lines to the mustache using either a liner brush or the rake.
- Paint the top of the hat and the coat Tompte Red.
- Paint the tassel, the fur around the hat, the cuffs on the
sleeves and bottom of the jacket White.
- Paint the base under Santa's jacket Black and the rim around
the bottom of the base and underneath Kim Gold.
- Paint the buttons on the jacket Kim Gold.
- Using the snowflake stencil, selecting your favorite
snowflakes, sponge paint them White on the jacket. With the
end of a brush handle add several White dots between the
stenciled snowflakes. Dry.
- With a toothbrush thin White slightly with water and speckle
the jacket and hat.
- Apply the Decorative Snow texture to the white painted areas
of the piece using a flat brush.
- Allow the paint and texture to dry and add 2-3 coats of
varnish to the entire project.
![]()


