|
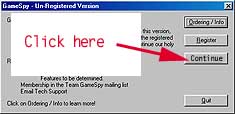
Once you have installed gamespy and run it you will get to this screen. Click on Continue and don't worry about the rest for now. You will be taken to the Gamespy starting dialogue window. Here you will be presented with a couple of options, one of them being create a "New..." profile. Click on this button to continue. |
![]() |
The WFA gamespy tab should be located in your quake3/wfa/ directory. Its called Q3-WFA.qst.
To install the WF tab you need to click on "View"|"Custom Tab"|"Import...". Then browse to the "Q3-WFA.qst" file you just located and click "Open". Next in the "Only show these servers:" drop down list make sure to select the WF tab. Now right click on the WF tab and select "Properties" by clicking on it.
|
In the properties window that appears, check the "Don't remove items when they fail tab filters" box, then click "OK". Now before you want to click on the *Do note that this is a SS from the q2wf tab, but the form will look the same. |
![]() |
Now that you have a list of the WFA servers that you want, you only need to
click the
icon
to refresh this list. A task that takes probably a minuet at most. From there
write down the address and start up Quake 2 and type 'connect <ip>' or
double click the server to have gamespy connect you. If you are going to be
using gamespy as you primary way to connect, it is good to get to know the interface
well so that you can eliminate any frustrations that come with using this program.
|
Here is a list of the little icons you will see next to the quake symbols and what they mean. You will want to look for the servers that don't have any icons like these in the beginning of your use of gamespy. If you look above at the main window diagram you will notice that DBN Fast #1 and DBN Fast #3 are such servers. Have fun fragging! And if you wish to add anything to this instruction list or have a better way of telling how to use gamespy then email me. |
© 2000 HellBringer [IH]