|
Please do not copy this tutorial to any
web site without my written permission as I, Copyright 2000 © Kanded Kreationz,
all rights reserved, own this tutorial. I don't mind if you share in online
groups to learn PSP as that's what I write them for ~ Enjoy If you have any
questions please email me at Kanded
Kreationz©
Making
An Envelope & Card Tutorial
Done
in PSP 7
Open
up a NEW TRANSPARENT IMAGE 400 x 400.
Add a NEW LAYER.
Click on your SELECTIONS TOOL ICON  . .
In the TOOL OPTIONS BOX make sure it is set for RECTANGLE.

Draw
a RECTANGLE of any size on your transparent Image.

Next
click on your FLOOD FILL ICON  . .
Go to the COLOR PALETTE and pick a Foreground color and a Background color of
your choice.

Then
go to SELECTIONS, SELECT NONE.
Add a NEW LAYER.
Click on your SELECTIONS TOOL ICON  . .
In
the TOOL OPTIONS BOX make sure it is set for TRIANGLE.
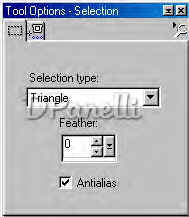
Now
draw a TRIANGLE make it the same WIDTH as the RECTANGLE.
Next click on your FLOOD FILL ICON  . .
And
Fill the TRIANGLE.
This is what mine looks like.
Now
Go to SELECTIONS, SELECT NONE.
That will take away the MARCHING ANTS.
Click on the MOVER TOOL ICON  . .
Move your TRIANGLE so it is up against the RECTANGLE.

Then
go to LAYERS, MERGE, MERGE VISIBLE.
Now ADD A NEW LAYER.
Choose a different color for the inside of the ENVELOPE.
Click on your SELECTIONS TOOL ICON  . .
In
the TOOL OPTIONS BOX make sure it is set for TRIANGLE.

Now
draw a TRIANGLE slightly smaller than the first TRIANGLE.

Now
go to SELECTIONS, SELECT NONE.
Now go to EDIT, COPY, EDIT PASTE AS A NEW LAYER.
Now you will have your 2nd TRIANGLE.
Now go to IMAGE, FLIP.
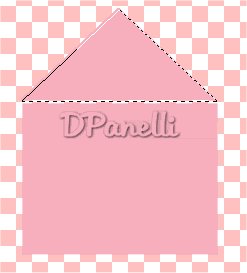
You should have something similar to what I have shown below.

You
can leave it like this or cut the BOTTOM of the 2nd TRIANGLE off.
To cut the BOTTOM off make sure that the LAYER for the BOTTOM TRIANGLE is the
ACTIVE LAYER.
Click on your SELECTIONS TOOL ICON  . .
In
the TOOL OPTIONS BOX make sure it is set for
RECTANGLE.
Then draw a SMALL SQUARE at the bottom the the LOWER TRIANGLE.
See Pix Below:
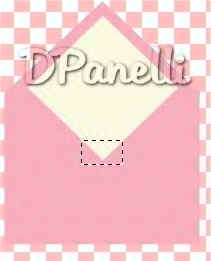
Then
HIT your DELETE key.
It will remove it like so.
Then
go to SELECTIONS, SELECT NONE to take away the marching ants.
You should have something similar to what mine looks like.

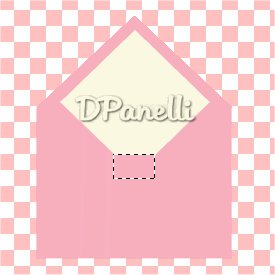
For
every line I drew I would add a NEW LAYER that way if I need to move it I could.
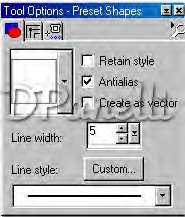
Now click on your DRAW ICON  . .
These are the setting I used.

Use
a SLIGHTLY Darker or lighter color for your lines.
This is what mine now looks like:

Now
go to LAYERS, MERGE, MERGE VISIBLE.
Now
for the Card.
Add A NEW LAYER.
Click on your PRESET SHAPES ICON  . .
Now if you want a BORDER around your card make sure that the FOREGROUND color is
set to a Different color than your BACKGROUND Color.
Make sure that in your TOOL OPTIONS BOX, you have it set as a RECTANGLE, ANT ALIAS
checked.
Now draw a RECTANGLE for your card.
Not to BIG.
Now go to IMAGE ROTATE.
I used these settings:

Then
Click OK.
Now
we need to Erase part of the corner of the card so it appears behind the
envelope.
Make sure the ACTIVE LAYER is your card.
Click on your MAGNIFYING GLASS  . .
Zoom in on the part you need to ERASE.
Click on your ERASER TOOL ICON  . .
You can change the size of the ERASER in The TOOL OPTIONS Box.
Then just start erasing the areas you do not want in there.
Your image should look something like what I have.

Now
go to LAYERS, MERGE , MERGE VISIBLE.
Now you can export it as a PICTURE TUBE and reuse it over and over again.
Here is my FINAL ENVELOPE.


All Web Graphics And Design By: Dazee's
Attic of Treasures©
Copyright 2000, Kanded
Kreationz©, All Rights Reserved.
| 