|
Please do not copy this tutorial to any
web site without my written permission as I, Copyright 2000 © Kanded Kreationz,
all rights reserved, own this tutorial. I don't mind if you share in online
groups to learn PSP as that's what I write them for ~ Enjoy If you have any
questions please email me at Kanded
Kreationz©
See Through Text Tutorial
Done in PSP 7
Open up a new TRANSPARENT IMAGE.
700 x 300. You can crop and resize later.
Add a NEW LAYER.
Click on your TEXT TOOL ICON  . .
Click on your BLANK TRANSPARENT IMAGE.
You will get a box that looks like pix below:

Next you want to pick the font and the size you want to use.
Make Sure FLOATING & ANT ALIAS are checked.
Type in your TEXT in the TEXT BOX & click OK.
This is what mine looks like:

While you have the ants marching around your text go to your LAYER PALETTE and make sure the FLOATING SELECTION is the ACTIVE LAYER.
See Pix Below:

Then go to LAYERS, Then Click on DELETE:

Now your color should be gone and and the only thing you should have is your name in marching ants.
See Pix Below:

Next click on your FLOOD FILL ICON  . .
Click on your FOREGROUND COLOR and make it any color you want. As you can see I have mine a yellow.
Make sure your BACKGROUND color is LOCKED.
See Pix Below:

Now go to your TOOL OPTIONS BOX.
These are the settings I USED:
See Pix Below:

The Lower the NUMBER for the OPACITY the More TRANSPARENT your text will appear.
Now FLOOD FILL your TEXT. It will be a very light color and you should be able to see through it.
See Picture Below:

Now go up to SELECTIONS, INVERT.
Now go to EFFECTS, 3D EFFECTS, DROP SHADOW.

Make sure your FOREGROUND COLOR you used originally is the color that appears in the COLOR BOX.
Then click OK.
Now apply another DROP SHADOW with the exact same settings as above but change the VERTICAL & HORIZONTAL to a -10.
Next go to SELECTIONS, INVERT.
Now go to EFFECTS, PLUG INS, EYE CANDY, INNER BEVEL,
These are the settings I used:

Then click on the CHECK MARK in the upper right hand corner.
This is what mine now looks like:

Go to SELECTIONS, SELECT NONE to take away the Marching Ants.
Next find a tube you would like to use.
You may want to size it down enough to make it look like it will be no bigger than your text.
After you have it resized you are going to want to do EDIT, COPY, then make your TEXT IMAGE the active image and do an EDIT PASTE as NEW LAYER.
See Picture Below:
Click on your MOVER TOOL ICON  . .
Position your tube where you would like it to be.
Then go to LAYERS, ARRANGE, SEND TO BOTTOM.
Now if you would like to add more tubes follow the above steps for each tube you want to add.
Then go to LAYERS, MERGE, MERGE VISIBLE.
Resize it to your liking and sharpen then save it as a .JPG.
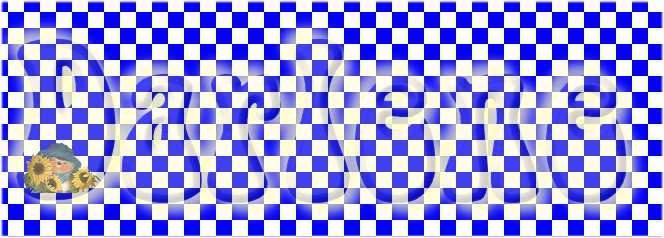
Here is mine plus a few others I have Done:


All Web Graphics And Design By: Dazee's
Attic of Treasures©
Copyright 2000, Kanded
Kreationz©, All Rights Reserved.
| 