|
Please do not copy this tutorial
to any web site without my written permission as I, Copyright 2000 ©
Kanded Kreationz, all rights reserved, own this tutorial. I don't mind if
you share in online groups to learn PSP as that's what I write them for ~
Enjoy If you have any questions please email me at Kanded
Kreationz©
Creating Silver Text in PSP 7
Open a New Image 400x400
Transparent.
Click On your Eye Dropper Icon  go to Your Color Palette. go to Your Color Palette.

With Your Eye Dropper Icon Click
in the Middle of the Gray Box.
(See Picture Below):

Then You Will Get a BOX Like the
One Below:

Under Current Color Change the
numbers in the RED to 192, Blue 192, Green 192. Then Click OK.
Next Click On The TEXT Tool  Place it in the center of your Image. Next you get a Box like the Picture
Below. Select The Size You want and the Font Type. Place it in the center of your Image. Next you get a Box like the Picture
Below. Select The Size You want and the Font Type.
Under Styles on the Left Hand side you also want to make sure those settings
are like the ones Below:
It is hard to see the colors under STYLES because the Gray blends in but
make sure STROKE is GRAY and Fill Is Gray.

Now with the Marching ants still going around the text go to EFFECTS, 3D
Effects, Cutout.
See Picture Below:

Use These Settings: Vertical 4, Horizontal 4, Opacity 100, Blue 4
Shadow Color should be White and Fill Box Should be Check and the Fill
Color should be Gray.

Now Click On the Swap Color Black Arrow on the Color Palette
See Picture Below:

By clicking on the Black Arrows it
will swap the Colors.
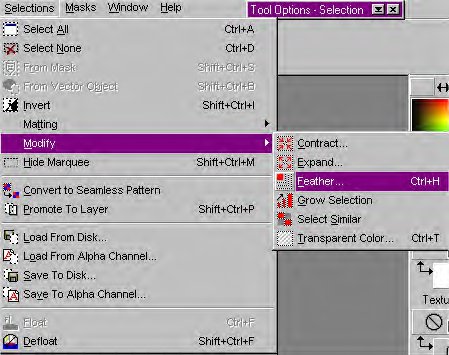
Now Go To Selections, Modify, Feather.
See Picture Below:
Then a Box like this will appear.
See Picture Below:
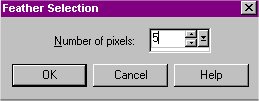
Make sure the Number of Pixels is
5.
Then Click OK.
This is what it should Look Like:

Now go to EFFECTS, ARTISTIC EFFECTS, HOT WAX COATING.
Click On HOT WAX COATING.
See Picture Below:

Now your Image Should Look Like This:

Lets finish this up shall we.......Next go to COLORS,
BRIGHTNESS, CONTRAST.
See Picture Below:

Use the settings Below:

Then Click OK. No Go To EFFECTS, SHARPEN, Click on SHARPEN MORE.
See Picture Below:

Now Go To Selections and Select None.

This will take Away The Marching
Ants.
Now we are going to add a drop shadow.
Got To EFFECTS, 3D, DROP SHADOW.

Use the Following Settings
VERTICAL 2, HORIZONTAL 2, OPACITY 80, Blur 4 Make Sure that in the color
Box the color that is chosen is black.

And this is What it Should Look Like Depending upon the Font you choose:

Now you can Decorate it up how ever you like with tubes or what ever or
just leave it plain.
When You are Finished decorating it, go to LAYERS, Then MERGE ALL.
That's It Your Done.
Here Is My Finished Tag!!


All Web Graphics And Design By:
Dazee's
Attic of Treasures©
Copyright 2000, Kanded
Kreationz©, All Rights Reserved.
|
