|
Please do not copy this
tutorial to any web site without my written permission as I,
Copyright 2000 © Kanded Kreationz, all rights reserved, own this
tutorial. I don't mind if you share in online groups to learn PSP
as that's what I write them for ~ Enjoy If you have any questions
please email me at Kanded
Kreationz©
How To Make A Simple Tag
Tutorial
1. Open The Image You Want to Use.
Make a Duplicate of your Original By holding Down your SHIFT KEY
and the LETTER D. (Hint Always Make Duplicates of The Originals)
Here's The Image I will Be Using For This Tutorial:

2. Select colors for your Foreground &
Background.
Just Click on The EYEDROPPER ICON  Then Click on your Foreground color then Chose the color you want
to use. Do The Same for The Background Color. (Hint: You can use
Your Eye Dropper and go to your image and pick out a color from
there if you would like to match colors). Then Click on your Foreground color then Chose the color you want
to use. Do The Same for The Background Color. (Hint: You can use
Your Eye Dropper and go to your image and pick out a color from
there if you would like to match colors).

I Chose Yellow as my Foreground Color (I Used
the Eye Dropper to pick up the yellow in the Umbrella) And This
Will be The Color of My Text.
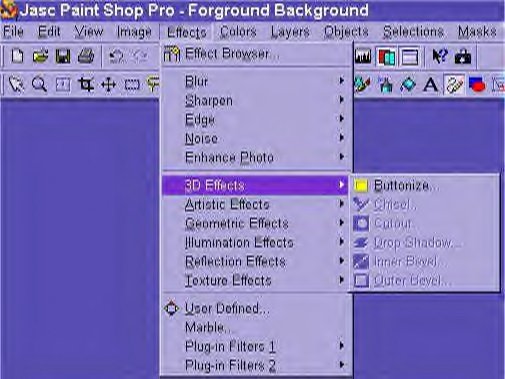
3. Go To Effects, 3D Effects, And Then Buttonize.
See Picture Below:
Play Around with the Settings until you come up
with something you like. Here is the Settings I will be Using:
After You decide on your settings Click OK.

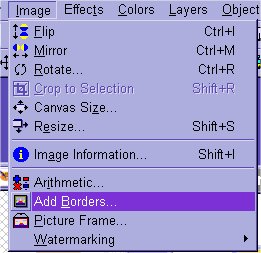
4. Next We are going to add a Border.
Go To Image, Then Add Borders.
See Picture Below:
This is the Screen you get:
This is just an example of what I used you can use whatever
settings you like.
Settings: 0, 0, 0, 200
See Picture Below:

This is what your Image Should now look like:

Next You will want to Buttonize it again.
5. Go To Effects, 3D Effects, And Then Buttonize.
I Used the Same Settings as in Step #3
6. Next Choose the Text Tool (It is  on the Toolbar) on the Toolbar)
Then Click on The Center of your tag and the picture below is what
appears in PSP 7:
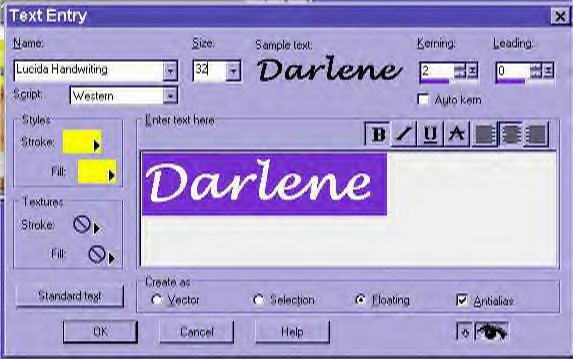
Here you can change the size of the text, the
Font, Color.
Just play around with the different settings until you come up
with something you like.

After you click "OK" you should see
the text appear on the tag with the "MARCHING ANTS arount it.
At this point you can click on your MOVER TOOL  and move the text anywhere you want on your tag. and move the text anywhere you want on your tag.
7. Next you can add a DROP SHADOW to your text. Go To
Effects, 3D, Buttonize.

Play around with Settings & color and see
what you like best.
These are the settings That I Used:
Vertical 4, Horizontal 4, Opacity 100, Blur 7.
Then Click Ok.
This is What it Should Look Like Now:

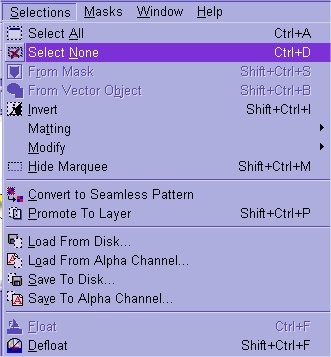
8. Next Click on Selections On The Toolbar, Then Select None. This
will take away the Marching Ants.
See Picture Below:
This is What my Tag Looks Like:

You can decorate your tag with tubes or however you like or leave
it just the way it is.


All Web Graphics And
Design By: Dazee's
Attic of Treasures©
Copyright 2000,
Kanded Kreationz©, All Rights Reserved.
|
