|
Please do not copy this tutorial to any
web site without my written permission as I, Copyright 2000 © Kanded Kreationz,
all rights reserved, own this tutorial. I don't mind if you share in online
groups to learn PSP as that's what I write them for ~ Enjoy If you have any
questions please email me at Kanded
Kreationz©
Wavy
Name Animation Tutorial
Open up a NEW TRANSPARENT IMAGE.
The longer your name the longer you will want the length to be.
Mine I am using 400 x 250.
Click on the TEXT TOOL ICON  . .
Then click on your blank image. Pick the font and size you want to use.
Then click OK.
Next click on your FLOOD FILL ICON  . .
Now with the marching ants around your text pick the color or gradient or
pattern you would like to fill with.
Here is what mine now looks like:

Now you can add any effects to it your want, inner bevel, drop shadow, whatever
you would like.
I am going to use BLADE PRO.
After you have add your effects go to SELECTIONS, SELECT NONE.
This is what mine now looks like:

Now
go to FILE, SAVE AS and give your tag a name and save in PSP format.
Next you want to open up the ANIMATION SHOP.
Go to FILE, JASC PRODUCTS, LAUNCH ANIMATION.
 
Now your ANIMATION SHOP should be open.
Go to FILE, ANIMATION WIZARD.

This is what will appear:
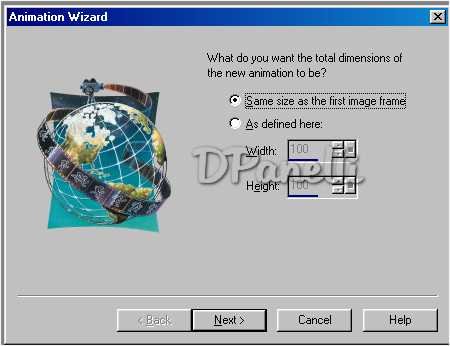
Make
sure the box that is checked is: SAME SIZE AS FIRST IMAGE FRAME.
Then click next.
A Box Like this will Appear:

Make
sure the OPAQUE box is checked.
Click NEXT.
Now this Box Appears:

Boxes
that should be checked are:
CENTERED IN THE FRAME,
WITH THE CANVAS COLOR,
SCALE FRAMES TO FIT.
Then
click Next.
Now this Box Appears:

This
is where you can adjust the SPEED of your animation.
The smaller the number the faster it will be. So I have mine set at 25 but play
with the settings to your liking.
Also make sure box checked is the one that says, Yes, repeat the animation indefinitely.
Then click NEXT.
The next box is where you are going to add your images.
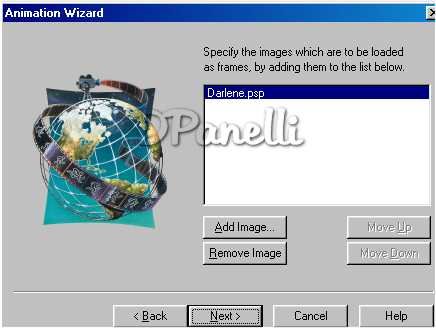
Click
on ADD IMAGE.
Go to where you saved your image and highlight it so name of your image appears
in WHITE BOX.
As you can see mine says DARLENE
See PIX below:

Then
click NEXT.

Now
click FINISH.
Now you will have a box like this appear the only thing different will be your
TEXT.
Next go to EFFECTS, INSERT IMAGE EFFECTS.

A
Box like this will appear:
Click on the little black ARROW under EFFECTS.

Here
is where you can pick the WAVE effect or any kind of EFFECT you want.
Also to the left where it says DEFINE EFFECTS you can play with the sliders to
get different effects also. The higher the number the more frames it will
be and it will have a longer time to load when it is in e-mail.
After you get your settings where you want them click OK.
Then you will get box like this:

Now
to see how it looks animated. Go to VIEW, ANIMATION.

If
you do not like the way it looks you can just go to EDIT UNDO and try something
different.
Make sure when you are all done you save it as a .gif.
Here is my FINAL PRODUCT.

Get Your Free Counter From: www.digits.com
All Web Graphics And Design By: Dazee's
Attic of Treasures©
Copyright 2000, Kanded
Kreationz©, All Rights Reserved.
| 