Excerpt from " GIMP for Textile Design
" by Frederick L Chipkin ISBN: ISBN 978-0-9727317-2-0
A step by step tutorial on how to use GIMP to create Textile Designs
To order " GIMP for Textile Design " click the leaf
We've provided these sample to give you a feel for some of the basic techniques taught in our book "GIMP for Textile Design". To see a list of more advanced textile design techniques covered click on the leaves above. Please note that even the more advanced textile design techniques in the book are taught in this clear and easy to follow manner. Included with the book is a CD with practice textile images and color charts. With these tools in hand you should be up and running in a very short time.
21.Repeats
Using Copy to make a Temporary Pattern
The first repeat I’m going to show you is used for putting small simple patterns into a square repeat.
Open up the design RETRO CIRCLE from the folder PRACTICE IMAGES on the enclosed CD. Double click on the Rectangle Select Tool from the Main Toolbox and make sure that there is nothing checked in the Tool Options.
Locate a motif (choose a single dot) in the design that you would like to repeat, then using the Rectangle Select Tool draw a square box around it.
On top of the image window go to Edit →copy.
Then click one Select →None.
Now create a new image window by going to File →New →OK.
Next if you go to Dialogs →Patterns (in the image window) the Patterns dialog bow will pop up.
In the Patterns dialog box choose the pattern in the top left hand corner. This will be the image that you just copied.
Now go to the image window and go to Edit →Fill with Pattern. Like magic your image window should be instantly filled with the image you had just copied.
This is a wonderful quick technique however it will only work with small patterns. I usually use it for making small repeats for designs like dots or foulards in men’s ties. If you copy anything over a few inches your pattern will become cropped. I’ll show you at the end of the next exercise how to use the Pattern dialog box to create larger patterns.
14.Coloring your design using the color charts on the CD
After you’ve mastered the techniques in the chapter “Changing colors” you’ll need a way to match colors accurately. This is the reason why we included the color charts on the CD that came along with this book.
1. The first thing I want you to do is print out all the color charts found in the folder called COLOR CHARTS that’s found in the enclosed CD. You must do this first step because the colors you have on your screen are not the same as the colors that you print on your printer.
2. Then I want you to open a design that has already been color reduced into Indexed color mode. You can also just open the design SIMPLE TROPICAL from the folder PRACTICE IMAGES on the enclosed CD.
3. Now on top of your image window I want you to click on Dialogs and drag down to Colormap. When you do this the Colormap dialog box will pop up.
4. Double click on one of the colored squares in the Colormap dialog box. When you do this the Edit Colormap Entry dialog box will pop up.
5. The Edit Colormap Entry dialog box is where you actually mix the colors. What you are concerned with here are the numbers that are next to the letters H, S and V. Or in other words Hugh, Saturation and Value.
6. Look at one of the pages from the color chart you had printed out. Find a nice bright color that you want to place into this color position.
7. In the Edit Colormap Entry dialog box enter the number values of the color you like. When you’re done click on the OK button on the bottom of the dialog box.
8. That’s all there is to it. With the printed out color charts and using the Colormap dialog box, you should have the tools you need to both match colors and get them into your design. To clarify things further see the illustrations below.

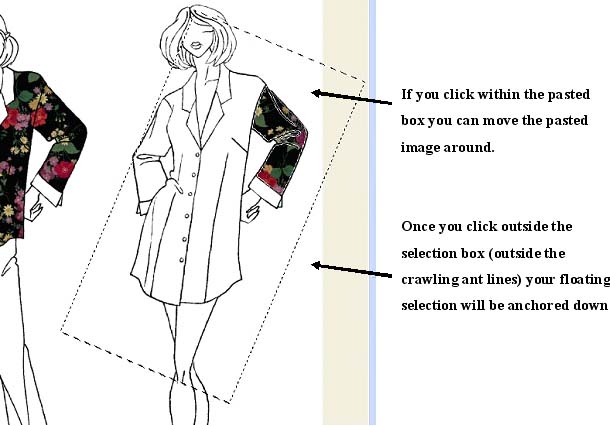
Placing a bias textile pattern into a sketch
1. Start with a sketch that has been scanned in, cleaned up and color blocked.
2. Click on View and make sure that Show Selection is checked.
3. Open a textile design that you want to place into this sketch. Click on the top of the textile pattern to make sure that it’s active.
4. In the textile design window (not the one with the body) go to Image→ Scale Image. In the dialog box that pops up change Interpolation to Cubic and make sure that next to Width and Height that percent is selected. Change the numbers next to Width and Height to 15.00 and then click on the Scale button on the bottom of the dialog box. The resized pattern should be larger then the area of the fashion sketch that you are placing it into.
5. Save the **********************************