Perfect Patterns Style 73
Coat and Bonnet for a Little Girl Doll
~Lesson 2~
Coat Front, Upper Back, and Sleeves
With photos and instructions by Marsha Olson
(printout is 8 pages)
You will need pattern pieces 3, 4, 5, and 6
Please cut out the coat pieces and the lining pieces separately.
Having trouble telling which side of your fabric is the right side or wrong side on a cut piece? Gently pull a corner of the piece on the bias, the fabric will curl towards the wrong side.
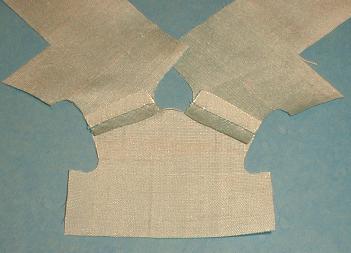
1. Right sides together, sew the Coat Front (3) to the Coat Upper Back (4) at the shoulder seams. Press the seams open.
2. Staystitch and clip the neckline and armholes.
3. Staystitch the sleeve (5) cap. Clip the the underarm curves.
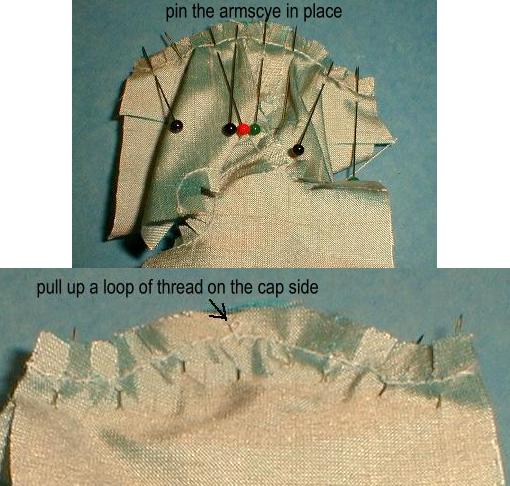
4. Right sides together, lay the armhole on top of the sleeve cap and spread the clips to fit the armhole to the cap. Start pinning from the two side edges and working in towards the center. When you have all but about 1/2" of the center pinned, use the tip of a pin or needle to pull the stitched thread of the cap center to gather it slightly down to fit the armhole and smooth it out as much as possible. Pin in place.
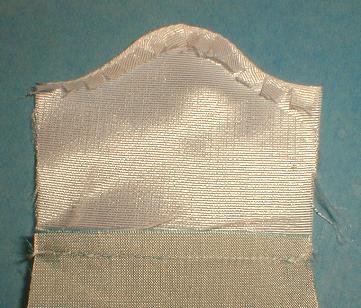
5. Sew the armhole to the sleeve cap from the armhole side. If any of the staystitching shows on the right side, pull out the threads. Your piece should look like the photo below when this step is done.
6. Staystitch the cap of the sleeve lining (6) and clip the underarm curves.
7. The sleeve is longer than the sleeve lining so that the sleeve hem folds to the inside to form a narrow hem of the coat fabric, similar to a facing. Right sides together, sew the sleeve hem edge to the lining hem edge. Press the seam towards towards the lining.
8. Very carefully, using the staystitched line as your guide, press the seam allowance of the sleeve lining cap to the inside.
9. Right sides together, sew the side seam, sleeve seam, and sleeve lining seam.
10. Reverse the sleeve lining, folding it up over the sleeve and bringing it up to match the seams. The hem edge of the sleeve will end up folded slightly to the inside, about 1/16", creating a hem facing. Using a padded dowel or wooden pencil, press the hem edge of the sleeve to make a sharp crease that will hold it in place.
This style of facing can be done on any lined sleeve pattern by adding 1/4" to 1/2" to a sleeve hem and eliminating the same amount from the sleeve lining hem. Creating a facing in this way solves the problem of the seam on the edge and the lighter colored lining showing on the outside. This same method also works well on dress hems and back openings to eliminate the seam on the edge.