Visitor Number:

The lower skirt section completed in Lesson 4 will be gathered to fit the upper skirt section and two elastic insertion methods will be noted. Use the method you like best.
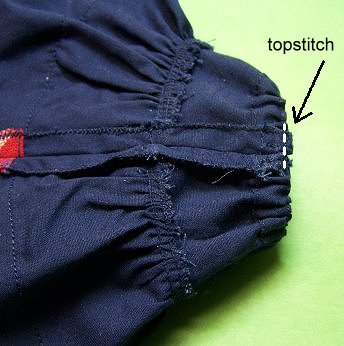
1. Following the instructions on the Skirt Top Section (5), press the casing into place on the waist edge of the skirt.

2. To secure the casing, topstitch along both the folded pressed edges.

Elastic Tip:
I suggest using a 4" piece (but start with a 6-7" piece) of elastic for this particular skirt, but the length of the piece of elastic really depends on how much it stretches. To ensure a good snug fit at the waist, measure the widest part of the hips with stretched elastic and add 1/2" of unstretched elastic to that measurement.

The elastic has to fit not just the waist but have enough stretch to fit over the hips and the extra 1/4" in each seam allowance. Where the elastic crosses, mark the two points plus 1/4" with pencil dots, leaving an extra inch or so of elastic at each end. Now that you have your elastic marked it will be easy to thread into the casing the exact amount you need. Note: this elastic tip makes it easy to thread elastic into a waistband with multiple rows of casings and still get each and every row exactly the same.

3. Using a very small safety pin or tube turner (recommended), thread the elastic through the casing until a pencil dot shows at each end.
4. Sew across the casing at each end to catch the elastic and hold it in place.
5. Trim off the excess elastic ends and discard.

Note: If you prefer, 1/4" rather than 1/8" elastic may be used. For this particular style I personally prefer the more casual look of the 1/8" elastic which does not entirely fill up the casing and gives a slightly softer appearance.
6. Using a double row of gathering stitches, gather the top edge of the Lower Skirt Section (6) to fit the skirt to section and sew it into place.

7. Fold the skirt top and bottom sections in half. Mark the center front of the bottom section with a pin. Separate out the bobbin threads and pull all of them at the same time to get even gathers.

8. Sew the bottom section to the top section evening out the gathers as you go. Trim the seam down to eliminate any frayed threads. Clean finish with a zigzag or serger. Press the seam up.

9. Clean finish the center back seam edges indivually with a narrow zigzag.

10. Sew the center back seam and press open.
11. Topstitch the open center back seam along the waist edge to hold it open neatly and eliminate any bulk. The skirt will fit smoothly in the back.

| HOME | CLASSES | CLASS 86 INDEX | LESSON 1 | LESSON 2 |
| LESSON 3 | LESSON 4 | LESSON 5 | LESSON 6 | LESSON 7 |