"How to Make Left Scrolling Stationery Using Outlook Express"
I would print this for ready reference
For this Tutorial you will need some sort of program so you can
get the correct size of an Image you want to use.
If you don't know the CORRECT SIZE, you will have a jumpy scroll.
If you don't have a program, then go to this URL
and download 20/20. This should be FREE and is real easy to use.
Go here to learn the Basic's of 20/20
Go here to download. Save it to your Desktop.
When download is complete, hit Open for the installation to begin.
Here is another one to download
~~~~~~~~~~~~~~~~~~~~~~~~~~~~~~~~~~~~~
Save your Images and Midi's that you want to
use, in your Stationery Folder.
C:\Program Files\Common Files\Microsoft Shared\Stationery
It will make things work proper
OH BY THE WAY!!!!
For the people that only think this is a left scroll, the whole stationery scrolls.
With a solid color background, how can you see if the background scrolls. Hahahahahahahaha!!!!
~~~~~~~~~~~~~~~~~~~~~~~~~~~~~~~~~~~~~~~~~~
Now let's get started!
In Outlook Express go up to Message/New Message Using/Select Stationery.
Pick out one of my Left Scrolling one's that you have downloaded
If you haven't done so already, then grab one from any of my pages.
In fact, here is the Exe and Zip Files for the below stationery
so you will have the same script as this to use
Click on above to download
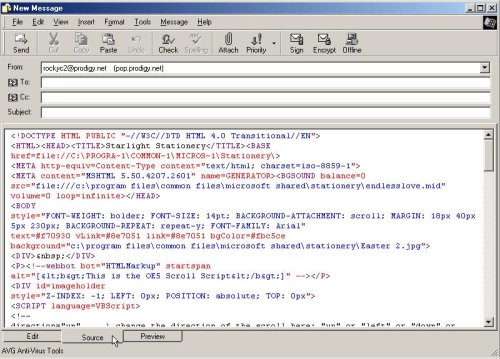
After you select the stationery, you will see this below.

Notice at the bottom where the little arrow is.
You should have 3 tabs there.
If you don't, then go up to the top where it say's VIEW.
Click on View, then click on Source Edit.
You will only have to do this one time.
Anyway click on the Source Tab and you will see this below

This is the script that you will be changing
REMEMBER!!
EVERYTHING has to be EXACT!
Even a period out of place will mess you up.
Below in RED is what you will be changing
Line 06:Change the name of the Midi. (Exactly as it is spelled in your Stationery Folder)
Don't forget to take out the name that's on the stationery you open up.
In the line, you will probably see something else besides C:\Program Files\Common Files, and etc. If it's different, take it out and type in what is above. C:\Program Files\ and etc.
Line 09: Change the FONT-SIZE to what you want to use
Line 10:Change the text margin where I have 230. That is the width of your image plus 15 pixels extra. Then change the FONT-FAMILY to what you want to use
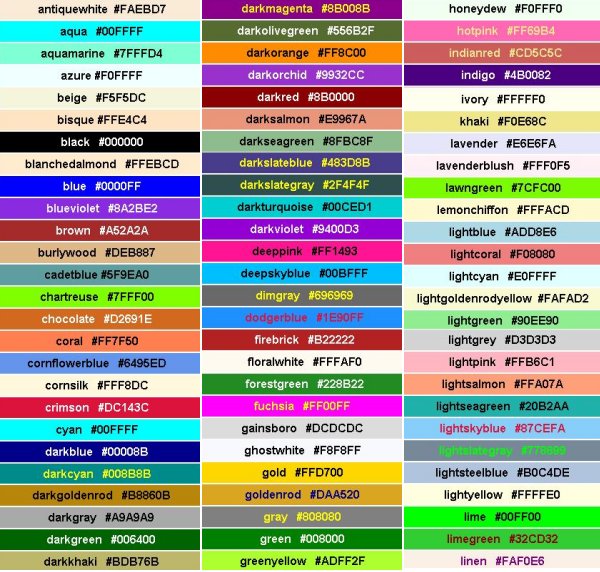
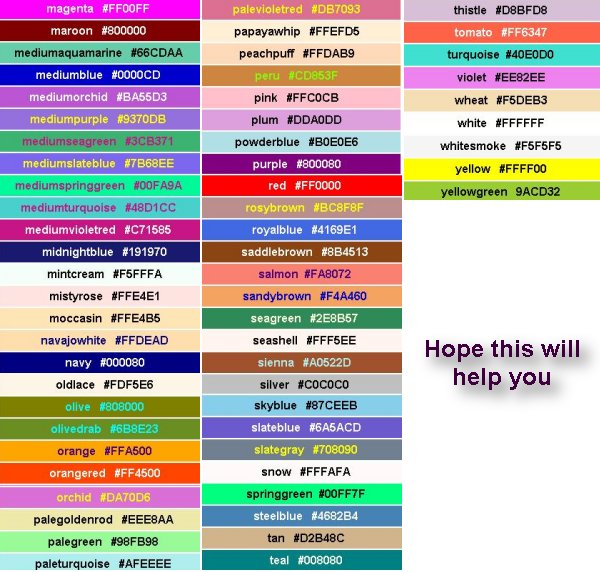
Line 11:Change the text color and background color you want to use. For any one that doesn't
have a color chart, go to the bottom of this page. Write down the # of the color you want to use, and type it in for Text, or Background. The Color Chart's are at the bottom of the page.
Line 12: Now put in the name of your Image you want to use. (Exactly)
Of course you will have to take out the name of what's in there.
If you are using an animated image, then change jpg, to gif
In this line, you will probably see something else besides C:\Program Files\Common Files, and etc. If it's different, take it out and type in what you see. C:\Program Files\ and etc.
Line 20: You can change where it say's UP to down if you want it to scroll down.
OR! If you don't want to bother about the size of your image or don't know the size, you can use this script for nonscrolling by just taking out the UP.
Line 21: In this line you will see 850. That is the width of the whole stationery. Some Stationery makers use 1024. You can use either one. I would go ahead and put in 1024.
Line 22: Now in this line is the height of you image. This is VERY Important. If you don't have the EXACT size, you will have a Jumpy Scroll
Line 63: I have Starlight Stationery. This is your ticker that shows up at the bottom of
your stationery. Take that out and type in what ever you want to show. Be sure and leave these thingy's in " " Just take the name out. PLEASE!! If you use someone else's script, then please take
their name out and put in something else.
Leave everything below line 63 alone.
~~~~~~~~~~~~~~~~~~~~~~~~~~~~~~~~~~~~~~~~
01:<!DOCTYPE HTML PUBLIC "-//W3C//DTD HTML 4.0 Transitional//EN">
02:<HTML><HEAD><TITLE>Starlight Stationery</TITLE><BASE
03:href=file:///C:\Program Files\Common Files\Microsoft Shared\Stationery\>
04:<META http-equiv=Content-Type content="text/html; charset=iso-8859-1">
05:<META content="MSHTML 5.50.4207.2601" name=GENERATOR><BGSOUND balance=0
06:src="Files://C:Program Files\Common Files\Microsoft Shared\Stationery\endlesslove.mid"
NOTE: You may see this instead of the above line.
src="cid:00e201c1d635$aa074b20$37f1fc3f@oemcomputer" volume=-283 loop=infinite>
Take out what I have in red above and put this in
src="Files://C:Program Files\Common Files\Microsoft Shared\Stationery\endlesslove.mid"
07:volume=0 loop=infinite></HEAD>
08:<BODY
09:style="FONT-WEIGHT: bolder; FONT-SIZE: 14pt; BACKGROUND-ATTACHMENT: scroll; MARGIN:
10:18px 40px 5px 230px; BACKGROUND-REPEAT: repeat-y; FONT-FAMILY: Arial"
11:text=white vLink=#8e7051 link=#8e7051 bgColor=brown
12:background="C:\Program Files\Common Files\Microsoft Shared\Stationery\Easter 2.jpg">
NOTE: You may see this instead of the above line
background=cid:00e101c1d635$aa074b20$37f1fc3f@oemcomputer>
Take out what I have in red above and put this in
"C:\Program Files\Common Files\Microsoft Shared\Stationery\Easter 2.jpg"
13:<DIV> </DIV>
14:<P><!--webbot bot="HTMLMarkup" startspan
15:alt="[<b>This is the OE5 Scroll Script</b>]" --></P>
16:<DIV id=imageholder
17:style="Z-INDEX: -1; LEFT: 0px; POSITION: absolute; TOP: 0px">
18:<SCRIPT language=VBScript>
19:<!--
20:direction="up" ' change the direction of the scroll here: "up" or "left" or "down" or "right"
21:sizew=850 ' enter the width of the scrolling image here
22:sizeh=300 ' enter the height of the scrolling image here
23:nail=0
24:source=document.body.background
25:tall=((screen.height\sizeh)+1)*2
26:wide=(screen.width\sizew)+1
27:if direction="up" then
28:max=tall
29:axis=sizeh
30:placement=0
31:reset=0
32:elseif direction="left" then
33:max=wide
34:axis=sizew
35:placement=0
36:reset=0
37:elseif direction="down" then
38:max=tall
39:axis=0
40:placement=-sizeh
41:reset=-sizeh
42:elseif direction="right" then
43:max=wide
44:axis=0
45:placement=-sizew
46:reset=-sizew
47:end if
48:document.write "<pre>"
49:for temp=0 to max
50:if direction="up" then
51:document.write "<img id=pics"&temp&" src><br>"
52:elseif direction="left" then
53:document.write "<img id=pics"&temp&" src>"
54:elseif direction="down" then
55:document.write "<img id=pics"&temp&" src><br>"
56:elseif direction="right" then
57:document.write "<img id=pics"&temp&" src>"
58:end if
59:document.all("pics"&temp).src=source
60:next
61:document.write "</pre>"
62:document.body.background=" "
63:window.status=" Starlight Stationery "
sub scroll()
if nail=1 then
exit sub
end if
if placement < axis then
setTimeout "move", 1
else
placement=reset
setTimeout "move", 1
end if
end sub
sub move()
if direction="up" then
imageholder.style.top=-placement
elseif direction="left" then
imageholder.style.left=-placement
elseif direction="down" then
imageholder.style.top=placement
elseif direction="right" then
imageholder.style.left=placement
end if
placement=placement+1
setTimeout "scroll", 1
end sub
sub imageholder_()
if nail=0 then
nail=1
else
nail=0
end if
scroll()
end sub
scroll()
-->
</SCRIPT>
</DIV>
<P></P></BODY></HTML>
~~~~~~~~~~~~~~~~~~~~~~~~~~~~~~~~~~
WHEW!
Think you can do this?
After you have changed everything, click on the Preview Tab
to see what you have done. Hoping that everything is fine.
If it is, then click on the EDIT Tab.
NOW!
Go up to File/Save As
In the Name box, type in
Name of Stationery
of course you won't put that name in. haha
Save it to the folder of your choice.
Such as My Stationery Folder.
Walla! You have just made an Eml File.
When you want to use it, just open up that folder an click on the
name of the stationery.
It's now ready to use.
Hope you can understand all this. haha
From Rocky in Antlers, Oklahoma USA
~~~~~~~~~~~~~~~~~~~~~~~~~~~~~~~
COLOR CHART'S

~~~~~~~~~~~~~~~~~~~~~~~~~~~~~~~~~~
