Flash2Advance Linker Review Text and photos by Pavel K. (EMAIL ME!).
|
||||||||||||||||||
|
Well here it is, after a 3-week wait (as opposed to the 1 week as the Game Gizmo site has listed) I finally received my Flash2Advance Linker. After opening it and basking in its “new electronics” smell, I immediately tried it out! What was in the package: 1 Flash2Advance Linker 1 64M Flash2Advance
cartridge 1 CD-R full of demos +
linker software My “rig”: Original white GBAFresh batteries (IMPORTANT!) Opening the box: At first, I was surprised to
see how small the actual package was. The whole package weighed very little and
was just a plastic bag of sorts (not the regular kind, special kind for
mail). Inside were two thin cardboard boxes, one for the linker + CD, another
for the cartridge. The linker was contained in a thin plastic snap-together
case, and the CD was on the bottom. Upon opening the smaller box I was
treated to a small tin (?) case (which slides out), in which the actual
cartridge was contained (padded with foam).
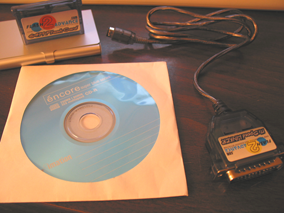
Figure 1:
Everything I received
Figure 2: The metal cartridge case and 64m cartridge
Figure 3: Linker package
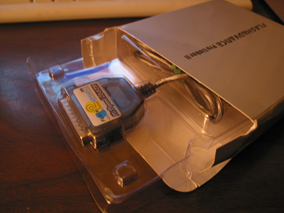
Figure 4:
Metal cart case in its box CD
contents, software + usage: The CD has lots of demos
downloaded from GBADev.org (Up to June 20th, 2002), the linking
software, manuals (English and Chinese), and finally the Matrix™ and Ice Age™
movie trailers in .gba format. The manual was fairly concise and had
step-by-step instructions and useful tips, and was easy to understand (minimal
broken English). The linking software is
completely identical (interface-wise) to the regular official Flash Linker
software from Visoly, the only
difference being the file names (f2aw*.exe instead of faw*.exe), the window titles, and the cartridge pics. Both
Windows 9x/Me and NT versions were included (the version on my CD was 1.1,
the latest (11-Aug-02) is
1.2). To burn a game onto the cart,
you have to press START+SELECT on the GBA when you see the logo (during GBA boot,
before it loads a game). This brings it into multiboot mode (normally used
for linking in multiplayer games). After that, all that has to be done after
selecting your games is to click the “Write Flash” button, and off you go! A
menu appears on the GBA (giving an “i.Linker” logo, cart type, and flash
progress). Everything else works the same way as in the classic Flash Advance
Linker, except you have to put the GBA into multiboot mode before you can do
anything). Flashing a 32m game takes about 55 seconds, a 64m game or two 32m
games takes about 160 (it takes time to write the preboot menu). Note: The manufacturer
claims that no power supply is required. While this is technically true, be
sure to use fresh batteries or an AC adapter with your GBA, as the flashing
process needs lots of power. Cart Features:
Conclusion: This version of the linker is more compact and also costs less (in some online stores) than the regular linker. If you are looking to get your first backup unit for your GBA, I would recommend this linker versus the regular one. Rating:
CLICK HERE FOR MORE PICS! Have several nice days! Legal: This review and photos are copyright ©Pavel K. None of
the contents of this article or the included photos may be reproduced without
express written permission from Pavel K. All rights reserved. Keep
away from flame. Made with 100% recycled electrons.
|