
|
So far we've been creating pages and displaying them one at a time. Using frames it's possible to split the screen into
sections and display a separate page in each section.
The first step in using frames is to decide how you want your page to be split. Let's suppose that we want a layout with a
frame at the left in which we can display a menu. The rest of the screen will be used to display the current page. The
screen will therefore be split roughly like this:
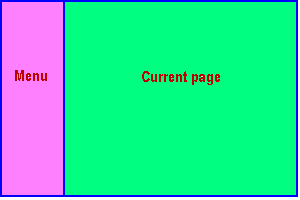 As you can see, the page is split into two unequal parts by a vertical line. We can define this split by using <FRAMESET>...</FRAMESET> tags in which we specify the number and size of the rows and columns in the frameset. Note that when using <FRAMESET> tags, we must not but <BODY> tags into our document. In the present case there is only one row, split into two unequal columns (I've assumed that the "Menu" section will occupy 20% of the width of the screen):
<FRAMESET ROWS="100%" COLS="20%,*"> You'll see that I haven't specified a width for the right-hand part of the screen -- the asterisk (*) means that this part of the frameset will utilise any space which remains after the 20% has been allocated. We can now specify the page which will be displayed in each of the two sections by adding <FRAME> tags:
<FRAMESET ROWS="100%" COLS="20%,*"> The <FRAMESET> tag must specify the size of the ROWS and COLS. Certain browsers also allow you to specify a BORDER=nn attributes for the border width, but other browsers will not recognise this attribute. The <FRAME> tag must specify a source for the page (SRC=) and can also use other attributes. The frame can be given a name (NAME="...") which can be used in links to specify which frame the page should be displayed in. Other optional attributes are:
<FRAMESET> tags can be "nested" one inside another. We might want, for example, to split the right-hand section of our page so that we could display a site heading at the top:
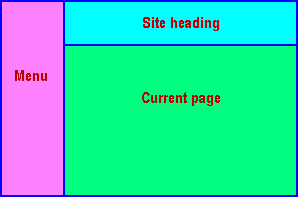 In this case we would insert an extra <FRAMESET> tag as shown below:
<FRAMESET ROWS="100%" COLS="20%,*"> Well, that's the end of this introductory tutorial. You should now be able to create reasonable pages for your web site. Of course, there's always more to learn and I hope over the next few months to be able to add more tutorials covering the more advanced side of HTML and web page creation. But for now, good luck with your web pages, and don't forget to try for our "Good Start" Award when you've got your first page up on the web.
|
|||||||||||||
|
|
 Last major revision: 18 August 1998 at 23:15 BST Minor revisions: 22 August 1998 at 02:29 BST |
a member of  |