Balloon Tips
Inflation | Tying | Storage
Inflation
There are few things more disappointing than a party decorated with underinflated balloons. I don't know about you, but when I inflate balloons, I want to get the most for my dollar. Balloons that are not fully inflated aren't the right shape or the right color, and never have the shine that properly inflated balloons do (see Rubber Chemistry 101 for why).
So no matter your particular interest in balloons, perfect inflation is the most important tool available to you. First of all, let me offer a quick visual inflation guide. I'll refer to these levels of inflation as I continue.
These three pictures are all the same balloon: a 12" Unique.
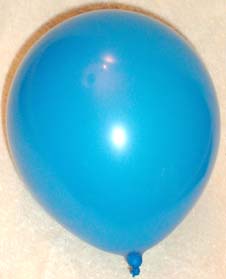
This balloon is clearly underinflated. Note the round shape and long uninflated neck. It's also not very shiny. Not useless though: games that require sitting or stomping on balloons to pop are made more interesting by underinflated balloons. Crushing an underinflated balloon will displace air into the uninflated neck portion, and most of the time, the balloon can redistribute its stresses without popping. | 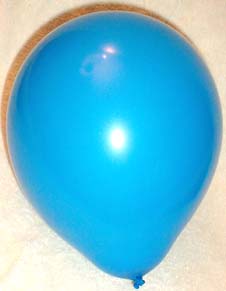
This is a fully-inflated balloon--not underinflated, not overinflated. The right size for most games and decorations. Full inflation is defined as the point at which it becomes preferable for the neck of the balloon to take any additional air, rather than the round "bulb." This gives rise to a tear-drop shape. One less blow, and the balloon is underinflated; one more, and a neck will form.
The balloon begins to feel tight to the touch. | 
For those who enjoy an occasional thrill, balloons can be overinflated like this one. Many balloon enthusiasts won't tie a balloon unless it has so little neck left that it's nearly impossible to do so. Note how shiny this balloon has become and how long the neck is.
The balloon is very tight and may ring when tapped. New balloons inflated to this stage (if they make it this far) are sometimes unpredictable and can spontaneously pop. |
Inflation falls into several stages-- which can be described as distinct regions on the balloon's stress-strain curve (see Balloon Physics 101): stretching, constant-volume blowing, constant-pressure blowing, neck inflation, and overinflation. The description I'll give relates mainly to round balloons-- airships and other shapes are not that different, but they (usually) lack an appreciable neck to speak of.
- Stretching. A new balloon should be
stretched several times before attempting to inflate it for the first time.
Stretch the balloon once lengthwise and once crosswise-- just grasp it
between your fingers and thumbs and give it a good tug or two. Finally,
stretch the neck of the balloon a couple times.
- Constant-volume blowing. Put the lip
of the balloon between your own lips (between your teeth if you need) and
blow. The breath should originate from the lungs and have the force of your
diaphragm behind it. Don't puff out your cheeks, keep them tight.
This inflation stage involves blowing up the balloon to a point where the
uninflated balloon snaps "to attention" but does not begin to
stretch yet. For round balloons, the transition from this stage to the next
is very easy. However, balloons like 260s are
notoriously difficult to inflate at this stage.
- Constant-pressure blowing. Once
adequate pressure builds up in the unstretched balloon, it begins to stretch
and expands at a constant pressure as you blow more air into the balloon. As
you blow, keep an eye on the drip point (the thick portion opposite the
neck) and keep a hand on the balloon's side to gauge how tightly stretched
it's becoming. And if you're inflating a large balloon, be careful not to
pass out! Continue blowing until the balloon tightens underneath your hand,
or until the drip point becomes small enough. Also, watch the neck of the
balloon-- when the neck first begins to inflate, you'll be able to tell.
Move on to the next step when this happens.
At this point, you may stop and tie your balloon--
this is the full-inflation stage, defined as the point at which the
balloon's neck first inflates. To take the balloon to overinflation, the
rest of the neck must be inflated. Caution: overinflating a balloon can
be an unpredictable process. For your protection, it is advisable to wear
protective eyewear. A pair of sunglasses or goggles will work.
- Neck inflation.
First, stretch the balloon's neck a few times. It works best if,
rather than pinching the neck with both hands, one hand tugs the
rolled lip while the other lightly squeezes the inflated portion of
the neck. After
stretching the balloon's neck several times, slowly blow more air into
the balloon. The neck will inflate toward your lips. With your free
hand, continue to test the tightness of the balloon's body as you
inflate. See below for more neck tips.
If at any point the balloon becomes
significantly more difficult to inflate, stop and tie the balloon off--
it is as inflated as it is going to be. If you still want a bigger, tighter
balloon (or if you're taking this balloon "all the way" so to
speak), continue with extreme caution. Otherwise, tie
the balloon off and put it to use.
- Overinflation. The balloon
will now be much more difficult to inflate, especially so with larger
balloons (24" and larger are the most difficult). Often, the neck is
inflated so completely that holding the balloon between your lips will be
next to impossible. This is the point of the stress-strain curve at which
the balloon does not expand any further but gets tighter (constant-volume
and increasing pressure-- the vertical area of the stress-strain curve). A
balloon inflated this far can pop at any moment, so if you decide to blow
any more air into the balloon, do so with caution.
This guide
works well as a walkthrough, but remember that each balloon is different-- some
balloons are thin enough that their
tightness is never established; some contain synthetic rubber making them harder
and tighter sooner than balloons made with 100% natural latex. The best way to
figure out how a balloon will behave is to just inflate one as a trial and see
what develops.
As far as
balloons popping during inflation, it is a very rare occurrence, especially with
higher-quality brands. At one extreme, there are brands that are of sufficiently
high quality to have only one defective balloon per gross, or less; at the
other, there was once a bag of airship-shaped balloons I bought in which none of
the balloons inflated past halfway without popping. They were drug-store
balloons however; if you stick to major, reputable brands, you'll not have to
worry too much.
Neck It Up!
A round balloon has two major portions: a bulb and a neck. (See the glossary for definitions.) Because of the geometry of a round balloon,
the bulb will usually fill up first when the balloon is inflated, because the strain can be more evenly distributed on the spherical surface than on the cylinder of the neck.
But when the bulb is strained enough, it becomes physically favorable for the cylindrical neck to begin to grow rather than to stretch the bulb any more. This transition occurs,
by definition, at the point of full inflation of the balloon. Beyond this point, the neck will expand, and the bulb will grow very little, if at all. Only when the latex of the
neck is maximally stretched will the bulb continue its growth; the balloon will usually pop soon after.
Because necks indicate maximal overinflation, many balloon enthusiasts prefer the look of "necked-up" balloons. Here are some tips on blowing up balloons to get maximal neck size.
There are two ways to develop a neck on an inflated balloon: natural and artificial. The difference is that the natural method relies on the inelasticity of the bulb to
give birth to the neck, bringing the stress of the bulb up to the level that is necessary to develop a neck, while the artifical method first weakens the neck so that the stress
required to maintain a neck is lower. The artificial method allows you to blow up balloons with necks that are less than fully inflated, which is a cop-out of sorts. The natural method allows
for necks only at maximal inflation of the balloon.
Notes: Neck methods work best on "virgin" balloons, fresh out of the bag. Balloons that have been stretched and inflated before will in general develop shorter necks and larger bulbs
than fresh ones (see hysteresis in the physics page). Also, balloons that are completely necked up will be next to impossible to tie using conventional methods:
you might use the rubber-band method described below in the tying section. | 
Overinflated 12" Unique |
Natural Necks
This method is not for those who don't enjoy balloons popping every so often - some balloons will pop before they develop natural neck. For those that do, especially large balloons
(fluted balloons especially) have such sharp transition from bulb to neck that the transition never becomes favorable.
- Inflate the balloon to full inflation.
- When the neck begins to expand, stretch it a couple times before each breath. You might want to gently squeeze the place where the neck meets the bulb once in a while to ease the transition.
- Repeat until there is no neck left. Once the inflated neck touches your lips, if it makes it that far, there are not many breaths left until the balloon pops. (Though with large balloons, there may be more than you think!)
| 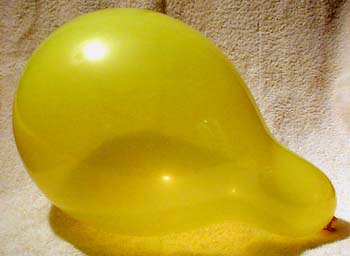
Overinflated 12" Unique |
Natural necks are "stable," that is, the balloon is so tight that the neck will never decompress into the bulb. In fact, squeezing the neck of a naturally-necked balloon will often pop the balloon quickly.
Artificial Necks
Artificial necks are great for the non-popper, since it raises the possibility that any balloon can have a long neck, regardless of how tightly inflated it is. However,
artificial necks can be "unstable" on balloons that have been stretched or inflated before: one squeeze on the neck can cause most or all of it to decompress into the bulb.
 | - Stretching the neck is key. Before you blow up the balloon all the way, blow one breath (or less) into the balloon
while holding the bulb in your hand. Force the neck to inflate all the way to the lip of the balloon, and as high up as the transition to the bulb. Seal off the balloon (you probably won't be able to tie it) and let it sit for a little while.
- Sitting
on the bulb portion of the balloon at this stage can stretch the neck
even more.
- Now deflate this balloon, and continue.
- Blow a breath into the balloon and pinch it off as close to the lip as possible.
- Stretch the neck while squeezing as much air from the bulb into the neck as you can, inflating the neck all the way to the lip again.
- Repeat the last two steps until the balloon is as full as you want it. You may find that the squeezing step becomes unnecessary after a couple breaths, especially with a new balloon.
|
Uses for Certain Balloon Inflations
 | Don't
ever let me catch you decorating with underinflated balloons, heh heh heh...
but they can be of use. In any balloon game requiring sitting, stomping,
or otherwise crushing balloons until they pop, underinflated balloons can
make the game much more challenging. Due to their large uninflated neck,
they can take a lot of abuse and simply transfer any displaced air into
the neck, making them very hard to sit-pop or stomp-pop. For any other
purpose, however, do yourself a favor and inflate at least to the full
size. |
 | Fully-inflated
balloons are truly multipurpose. They're just the right size or shape to
decorate with, play with, or pop by whatever means you wish (quality
balloons can take quite a lot of abuse, even at full inflation-- you'd be
surprised). Especially for decoration, make sure your balloons are at
least this full-- it brings out the color and shine of the balloon just as
the manufacturer intended. |
 | Balloons
that have been "necked-up" or overinflated are great fun to have
around. Try using them in any balloon game in which popping balloons is
undesirable-- these balloons make it hard not to pop them if subjected to
rough handling. Because of their mirror-like shine, feel free to use
overinflated balloons to decorate-- just be sure the room doesn't get too
hot, because often these balloons are just looking for an excuse to pop
when you least expect. And if you ever do a small balloon drop at a party,
or any other decorating that involves loose balloons laying around the
floor, try overinflating them. These balloons are likely to be popped
during the party anyway, so might as well have them as big as they can be
before they do!
There are also safety reasons to overinflate balloons occasionally: when doing a balloon drop, you have to expect people to be stepping and jumping on the balloons to pop them.
So make sure your balloons are at least fully inflated, if not overinflated. If you do a drop with underinflated balloons, people might step on the balloons and slip if the balloon doesn't pop. You don't
have to neck-up the balloon all the way like this one, but at least try for some neck.
|
Balloon Tying
One
of the most common obstacles to balloon play is often tying a knot in the darn
thing's neck. There are many schools of thought on this, but only one goal of
course: to hold the air inside the balloon to keep it nice and tight.
In the
enthusiast's world (well, mine at least), knots fall into two categories:
permanent and temporary. I'll cover both kinds here.
-
Permanent knots are the most
commonly known knots to tie balloons, and there is really only one type of
permanent knot: the simple overhand. Permanent knots are usually pulled
tight so they are not un-tieable (hence, their name). When playing any
balloon game that requires balloon popping, be sure to stick with permanent
knots.
-
Temporary knots have
traditionally been used only by enthusiasts who intend to deflate and
re-inflate their balloons. There are numerous temporary means by which a
balloon's air can be trapped, such as tape, twist-ties, rubber bands, and so
on. Here, I will cover two methods: the half-knot, the most widely
used temporary knot, and the ring-knot, an invention of yours truly.
A simple loose knot can be employed, using the same technique as the
overhand but taking care not to tighten the finished knot.
Permanent Knot: The Overhand

Knotted 16" Qualatex
(Fully inflated) |
- Inflate the balloon (duh). For best
results, inflate so that 3/4 of an inch to an inch of uninflated neck
remains-- overinflated balloons are difficult to tie.
- Hold the balloon's neck as close to
the inflated body as you can, in your left hand. Stretch the neck of
the balloon with your right.
- Wind the balloon's neck around two
fingers (or three if you have the length to spare) and secure the neck
against your index finger using your thumb.
- Tuck the rolled lip of the balloon
under the loop around your fingers.
- Grasp the lip and pull through the
loop. Extricate your left hand fingers from the loop and pull the knot
tightly.
- Important: When pulling the
knot tight, it is advisable to slide the knot toward the
balloon's body, and not away. Sometimes, especially with older
balloons, the friction of pulling the knot will tear a hole in the
balloon's neck-- if the hole is on the balloon side of the knot, air
will leak out.
|  |
Temporary Knot: The Half-knot

Half-knotted 18" Qualatex
(Full to overinflated) |
- Inflate the balloon. Again, leave enough
uninflated neck to make the job easy, though this won't be quite as
important here.
- Hold the balloon's neck as close
to the inflated body as you can, in your left hand. Stretch the neck
of the balloon with your right.
- Wind the balloon's neck around two
fingers (or three if you have the length to spare) and secure the neck
against your index finger using your thumb.
- Tuck the rolled lip of the balloon only
halfway under the loop around your fingers.
- Grasp the half of the lip you just
tucked through with two fingers to prevent it from untying, and
carefully extricate your left hand fingers from the loop.
- To tighten, pull the rolled lip on
either side of the knot outward. This is not a necessary step.
- To untie, simply locate the half of
the rolled lip that is "attached" to the rest of the neck
(it'll usually be pretty obvious) and pull it back out of the knot.
|  |
Temporary Knot: The Ring-knot
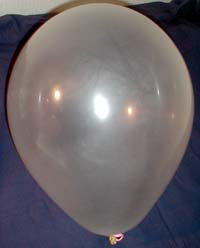
Ring-knotted 18" Qualatex
(Fully inflated) |
- Cut the rolled lip off an old or popped balloon
to serve as the ring. A small rubber band (such as are used in dental
braces) will work also.
- Inflate the balloon, leaving enough uninflated
neck to tie.
- Hold the balloon's neck as close
to the inflated body as you can, in your left hand. With your right
hand, stretch the ring around the uninflated neck. Stretch the neck of
the balloon with your right hand, making sure the ring is suspended
from it.
- Wind the balloon's neck around two
fingers (or three if you have the length to spare) and secure the neck
against your index finger using your thumb. The ring will be between
the loop and your finger.
- Tuck the rolled lip of the balloon
under the loop around your fingers.
- Grasp the lip and pull through the
loop. Extricate your left hand fingers from the loop and pull the knot
gently to tighten a little bit. The ring extends through the body of
the knot.
- To untie, pull up on the ring to open
up the knot, and push the rolled lip back through and out of the knot.
|  |
One nice aspect of the ring-knot is that it gives the balloon its own loop to hang it on hooks, around your finger, or around, say, a champagne bottle for special occasions? Also, the ring-knot is less likely to leak than the half-knot, but slightly harder to untie.
Temporary Knots: The Coin-knot
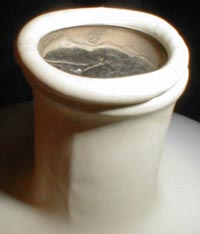
Not really a knot, but a good way to store balloons for short periods of time. The advantage is that the rubber of the neck is kept away from other rubber, so the neck of the balloon can't stick together and tear when it's undone.

Coin-knotted 16" Qualatex
(Underinflated) |
- Inflate the balloon. For the coin-knot, extra neck is almost unnecessary, though it does make matters easier.
- Grasp the uninflated neck of the balloon as close to the inflated part as you can, and twist several times to prevent air from escaping. Try to hold the twist with two fingers as you continue.
- Take a coin (depending on the size of the balloon, you may need up to a half-dollar size. 16" usually take quarters, 11" take nickels). Insert one end of it directly underneath the rolled lip of the balloon neck.
- Stretch the rolled lip around the rest of the coin and rearrange it so that the coin fits snugly against the inner side of the lip of the balloon.
- Untwist the balloon neck and rearrange coin if necessary.
|  |
Temporary Knot: The Twist-Band Knot
This isn't really a knot either, but it is usually the only option when a balloon has been completely necked-up and you don't have any spare latex to work with. If improperly done, this knot will leak air.

Band-knotted 12" Unique
(Overinflated) |
- Twist the neck of the balloon several times - the more, the better the seal; too many, and it encroaches on the stretched latex, and can pop the balloon if it's badly overinflated. A small amount of untwisting will happen anyway while you're completing this knot.
- Pinch the twisted portion with one hand to prevent untwisting.
- Take a small rubber band in your free hand. Stretch the twisted portion out (away from the neck) to expose the twists.
- Slip the rubber band around the twists. Put one loop of the band through the other and pull tight to lock.
In principle, this knot can be untied, but it can be difficult if the rubber band is pulled too tight.
|  |
Storing your balloons
When you amass a large collection of balloons, as many enthusiasts do, you'll want to have a few tricks under your belt in order to keep them for as long as possible. Here are a few tips.
Storing inflated balloons
Those who want to stretch their balloons to their limits will often want to inflate and re-inflate to achieve the largest size. The best stretch a balloon can get is a good tight inflation, held for hours or days or longer. So when you're in the process of stretching a balloon with this method,
you'll want to store it in an inflated state. Here are some important considerations.
- Degradation. Rubber has many natural enemies, some of which live inside your house. The biggest is direct sunlight; next is probably ozone; water is another. Thus it follows that inflated balloons should be stored away from sunlight, in fact, the darker the better. Sunlight and ozone combine to oxidize the
surface of the balloon, making it less shiny over time, and slightly thinner and weaker. Some oxidation is inevitable, but these are the steps you can take to slow down the process. In fact, some balloons are at their stretchiest (hence largest) after a little oxidation. Also, store the balloons somewhere with a relatively constant moisture level. Water vapor
dissolves ever so slightly into latex, increasing its elasticity; but if the humidity suddenly drops, a balloon that was tightly inflated in humid conditions can lose that elasticity and pop. In other words: avoid bathrooms or breezeways.
- Temperature. Inflated balloons can be surprisingly responsive to temperature changes. A tightly inflated balloon blown up in the heat can shrink and become soft in the cool weather; conversely, a tightly inflated balloon blown up in cool weather can suddenly pop in warmer conditions. Helium, because of its greater coefficient of volumetric expansion, are more susceptible to these changes, even
more so since the helium
coming out of a tank is usually cooler than the surrounding air to begin with (thanks to Bernoulli's
principle, as the pressure plummets, so does the temperature). So keep your stored inflated balloons at as constant a temperature as you can.
- More practical concerns. Don't store inflated balloons in with your sewing supplies. While you won't do anything that foolish, you may miss what amounts to veritable sewing-drawers full of tiny sharp points on any surface. Carpet is
best suited to cradle your balloons; hardwood, tile, or linoleum floors aren't so great. Small sharp points, grains of sand, fingernail clippings, misplaced straight pins, any of these can lurk on your floor without your knowledge, just waiting to pop that awesome balloon you've been prestretching for days. In any case, vacuum the surface your balloons will sit on thoroughly before storing inflated balloons on them. Cover hard floors with a soft blanket or towel.
- Adhesion & cohesion. Balloons can and do stick to themselves and to each other, especially when they're
inflated and especially in the presence of moisture. This leads to a couple
points:
- Adhesion is a balloon sticking to itself. In inflated balloons, the biggest culprit is the knot with which the balloon is sealed. Balloons that are inflated by mouth will be moist on the inside near the neck, and when the balloon is tied, the latex of the knot can (and usually does) stick to itself. A little adhesion isn't so bad, but if it persists, an adhesion can tear the latex when it's pulled apart. If you can, use non-adhering knots such as the coin-knot to seal balloons if you're concerned about adhesion.
- Cohesion describes stored balloons sticking to each other. The one rule is: don't tightly pack your balloons! Give them room to breathe. Also, storing balloons tied in clusters can (and usually does) make the balloons stick to each other at the neck. You'll be able to tell if when you pull two balloons apart, you hear a little "tick" sound (or a loud "pop" sound if it's really stuck together). Store balloons individually.
- Another practical concern. If you're going to store tightly inflated balloons, you probably don't want to do it in your bedroom. Think about the rude awakening possibilities! If it's unavoidable (say you're living in a studio apartment), just be sure not to tightly inflate balloons that you're going to store overnight. Let a little air out before you go to bed, then blow it back in (and more) when you wake up. I've used this method to stretch many balloons to their maximum size over a period of a week or so.
Storing uninflated balloons
The same rules apply to storing uninflated balloons, but are slightly less important, as everything will have a more profound effect on stretched latex than unstretched. Additionally, there are a few other concerns about adhesion you should think about:
- Fresh-from-the-factory balloons have a thin layer of talc powder on the inside - it's what causes the bitter taste you sometimes get when you first put your lips on it. This thin layer is specifically designed to prevent balloons from sticking to themselves during shipping. Once you've blown up a balloon by mouth a few times, the talc will dissolve and be washed away by your condensed breath, so you can (if you want) re-dust the inside of your balloons with talcum powder. The best way to turn a balloon inside-out is to take the eraser end of a pencil and, holding the balloon lightly in your hand, press the drip-point end into the neck and out. In any case, make sure the inside of the balloon is relatively dry before shoving it back into the storage bin.
- Storing away from light, heat, humidity, and other extremes is always a plus. Some professional balloon twisters store their balloons in the refrigerator.
- Try not to pack your uninflated balloons too tightly, either, as this will make it easier for moisture in your storage container to cause balloons to stick together.