1.Set the bridge pickup 3 to 2.5 mm's from the pole piece to the bottom of the string on BOTH the bass and treble sides of the pickup. (Some people like to slant the pickup so that the treble side is much closer to the strings, but if you want your head to remain ON your shoulders, I advise against it) Now play some chords across all six strings on various places on the neck. Listen carefully to the balance between the bass and treble strings. If the bass strings are noticably louder than the treble or vice-versa, raise or lower the appropriate side until a nice balance between high and low strings is achived.
2.Now that the bridge pickup is set, its time to deal with the middle pickup. Compare the output of the middle pickup with that of the bridge and raise or lower it until the output is the same. Again adjust the pickup until a balance between the high and low strings is achieved.
3.Now the neck pickup. Much the same as points 1 and 2-get the output the same as the middle pickup, than adjust for correct string balance.
Hopefully you will now have all the expected strat sounds at your disposal. Also, if you want to increase the 'quackiness' of the in-between tones AND/OR you rarely use the middle pickup, screw it down low and you will achieve the desired effect.
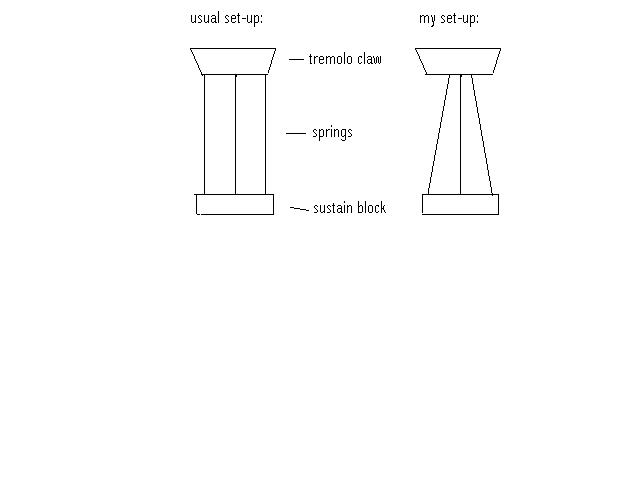
1.Carefully remove the tremolo backplate on the back of your strat.
2.Observe how many springs are installed in the cavity-if there are 5, remove the 2nd and 4th ones, if there are less than 3, don't remove any more. Now tune to pitch and check if your tremolo now floats. If so, go to point 3. If not, you will now need to adjust the tremolo claw-that thing which the wire is soldered onto. Turn the screws which go into the body of the guitar counter-clockwise until the claw has moved out a few mm's. Now tune to pitch and check if the trem is now floating. If it is not, just continue adjusting until it does, making sure you are tuned to pitch.
3.When at last your trem is floating, you need to set the tip up angle-the distance between the end of the tremolo and the top side of the body. The gap should be around 3mm. To set this, adjust the tremolo claw, tightening the screws if the gap is more than 3mm, loosening them if its less than 3mm.
4.Now replace the backplate, tune to pitch and enjoy your new-found pitch shifting abilites.
CLAMPED: This is advisable if you don't use or like the trem as it will give you a bit more sustain and the ability to bend strings without the other ones dropping in pitch.
1.Remove the backplate and observe how many springs are installed in the cavity. If there are 3 or less, add more until all 5 are installed AND/OR Turn the tremolo claw screw clockwise until the trem sits flat to the body at concert pitch. Personally I prefer the adding-springs method, as you only have to remove them again if you want to have a floating trem.
2.Now replace the backplate and enjoy that tad more depth and sustain.
1.You need to remove the scratchplate and position it so that you can work at the cavitiy easily.
2.Now cut the aluminium tape into sections that will cover the entire surfaces of the cavity, making sure there are no gaps left anywhere, and that all separate pieces of tape overlap.
3.Earth it all by placing a few centimetres of abare wire underneath a section of tape and covering it FIRMLY for a good connection. Solder the wire from the tape to a pot to complete the circuit. A longer piece of wire is best so that you don't have to desolder it if you remove the scratchplate. The noise should now be signifigantly reduced, making your strat much more suitable for high-gain applications.
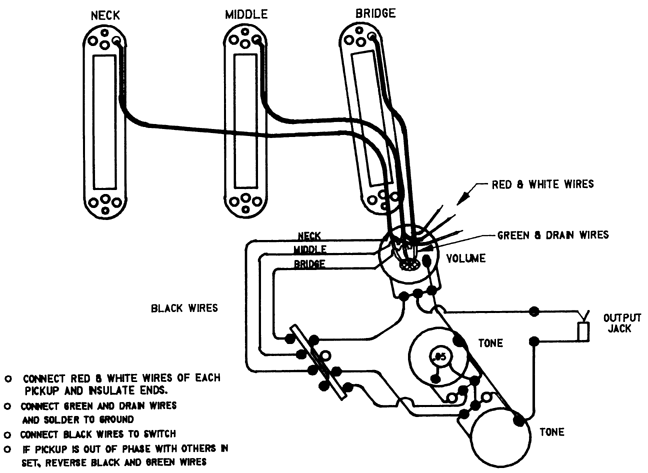
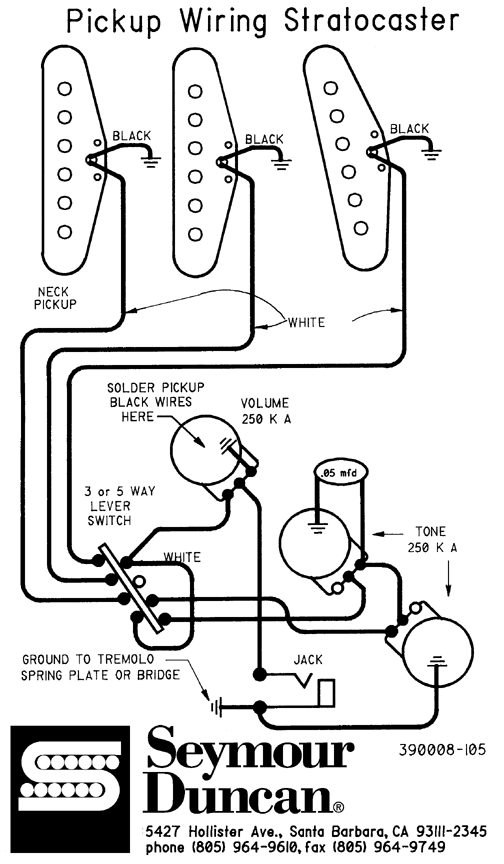
Kent Armstrong hot rails can be wired as follows: There should be five wires-red,green,black and white and a thick unshielded earth wire. To wire it up as a full output humbucker and nothing else you should do as follows: Solder together the black and white wires and insulate them. Solder both the thick earth wire and the green wire to the volume pot (ground) finally, solder the red wire to the selector switch.
I can't speak for any other brands, and I am not going to get into the complications of coil tapping or anything else. If you want to try this stuff get in touch with somebody who knows about pickups. This is a good mod if you want to get a really hot overdrive. It does eliminate the bridge/middle sound however, but you can't have everything without doing some more extensive wiring. Consider this if you have ever wondered how Kurt Cobain got a really heavy distortion from Fenders. I think that this mod on a good Strat is far better than the Jagstang model or the like. The Strat, unlike some more eccentric Fender designs has decent sustain and is well designed. I am not putting down Jaguars, Mustangs etc. I'd own them all if I could, but the Strat is just a foolproof design.
Always remember that there are many things that can go wrong apart from simply a wire coming loose. In cases like this, where all the connections are correct, you are always better to take the guitar to a good tech, who will be able to tell you what exactly is wrong.