
I was really pleased with how much cleaner the rear of my car looked after I did this modification. Total cost to do this was again less than $20. I used a total of two cans of Testor's Candy Apple Red spray model paint that a local hobbyshop carried. Some performance shops sell a type of paint for this but the Testor's is quite a bit cheaper. I also used about half of a can of Krylon Crystal Clear spray paint. I originally used Testor's clear paint but it cracked and looked like crap after a month or two.
To do this mod simply remove the taillights  and
mask off all the parts you don't want to paint, then just paint them.
Placing the Testor's paint in some warm water for a few minutes before
painting seems to make the paint come out in a finer mist. Allow
the red paint to dry for about 20-30 minutes between coats and before applying
the clear coat I allowed two hours for the red to completely dry.
After everything's dry just replace the taillights. I have heard
that painting over the brake lights will reduce their effectiveness but
I wasn't able to tell when I let somebody else drive my car while I followed
them. If the police do decide to bring it up I know that Raybrig
makes brighter replacement bulbs for brake lights too.
and
mask off all the parts you don't want to paint, then just paint them.
Placing the Testor's paint in some warm water for a few minutes before
painting seems to make the paint come out in a finer mist. Allow
the red paint to dry for about 20-30 minutes between coats and before applying
the clear coat I allowed two hours for the red to completely dry.
After everything's dry just replace the taillights. I have heard
that painting over the brake lights will reduce their effectiveness but
I wasn't able to tell when I let somebody else drive my car while I followed
them. If the police do decide to bring it up I know that Raybrig
makes brighter replacement bulbs for brake lights too.
To remove the crappy looking Testor's clear coat I used 1500 grit sandpaper to sand down to the red paint, used some rubbing compound to smooth the red out, then just sprayed on the Krylon clear coat. Since then I've applied wax twice and have had no problems whatsoever.
I also have rewired my taillights so that the
turn signal lamps will illuminate with the parking lamps. To do this
I purchased replacement brake-light bulbs and rewired the turn signal socked
to accomodate the parking lamp wire in addition to the turn signal wire. 
To Rewire your turn signal socket first you must pull out the metal
connection inside of the socket. You only need to pull out the side
with the green wire Just squeeze the tabs holding it in flat and the connectors
pull out. After you have the connector exposed, you must snap it
on the 90 degree bends so you now have three pieces. Solder a short
length of wire to the shorter tab that was on the outside of the connector. 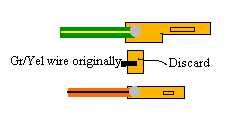 Attach
this wire to the red/black wire going into the brake light socket.
Solder the green/yellow wire to the longer piece and discard the center
piece that the green/yellow wire was originally connected to. Reassemble
the socket assembly and plug in your bulbs and make sure that the low (5w)
filament comes on with the parking lamps and that the high (21W) filament
flashes with the turn signal. Put the
Attach
this wire to the red/black wire going into the brake light socket.
Solder the green/yellow wire to the longer piece and discard the center
piece that the green/yellow wire was originally connected to. Reassemble
the socket assembly and plug in your bulbs and make sure that the low (5w)
filament comes on with the parking lamps and that the high (21W) filament
flashes with the turn signal. Put the  sockets
back in the housing and you're done.
sockets
back in the housing and you're done.