The steps below will show you how I made headlight decals for my 1/4 scale trucks.
You will need a camera or at least good pictures of the headlights you want to make. If your taking the pictures a digital camera works best because you can look at the pictures as you take them and you will know when you have good pictures to work with.) You will need a printer. ( A color printer will work best but you can also use black and white). You will need white label paper and also clear laminating paper. (both self stick type) Scissors and a very sharp knife.
 I took three pictures of my truck headlights and downloaded them to the computer. Then I sized them to fit my 1/4 scale truck. To do this print the headlight on plain paper and then resize it until it fits like you want. When your getting the size correct just use plain paper until you have it right.
 Once you have the right size. Copy and paste that image in a new window. Then you can flip the image to make a right and left. Now your ready to print one of each.
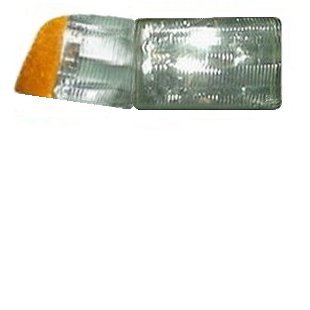
 Here you can see the headlight as it is printed.
 Now I am ready to print one for the other side.
 Now take the scissors and cut out the headlight.
 Then place the headlight on the body starting at the grill and working to the other end.
Now you can protect the label paper with the clear laminating sheet. Cut a strip just a bit larger than the decal.
 Again, starting at the grill and working to the end apply the clear laminating sheet over the decal. As you can see here the decal looks GREAT and the laminating sheet really brings it to life.
 Then cut the laminating sheet about 1/16 of and inch outside of your decal.
 Here is a close look at the finished decal.
You can make other decals the same way. Just print them on plain white labels and after you stick them on cover them with the laminating sheet and trim it to the decal. Just remember to leave 1/16 of and inch all the way around your decal. This helps seal the decal.
NOTE: You must save the images as .bmp of .jpg The size will change if you save them as .art files.
 Here are the UPDATED images I used to make the headlight decals. You can right click on each image and select "Save Picture As" to download the image to your computer. The images are ones I made and I invite you to use them if you wish. If you do, I would like to hear how your headlights turned out. Since I have updated them you will not need to resize them if your using them on the new Dodge truck body. Just print , cut the decal out as shown above and apply. You can also place the laminating sheet on the decal after it is cut out. Then trim the sheet about 1/16" from the decal and then apply it.


 Here are some decals I have done. You can make these in paint shop or even paint brush. Play with the fonts until you find the right one for the text on your decal. Then just add the colors. You can remove my website info from the cluster I made if you want to use it. Just size them to what you need. Print them on label paper. Then cut the decals out and place them face down on the laminating sheet. Cut the sheet leaving about an 1/8" from any decal edges to seal the cluster. Note: When you go to print the cluster sheets, Set the print size to "Fit To Page" This will give you the right size for 1/4 scale bodies.
If you would like to make headlights for your car but don't have a camera or good pictures to work with. Email me and let me know what car you need the headlight pictures of. I will go take them and email them back to you. Then you can make your own headlight decals.
If you need more info just ask, I will be glad to help.


Here are a few pictures of the updated decals I have posted for the dodge. I need to cut the window out and finish trimming the body. The decals look pretty good for what they cost. (about 2.00 for the set).
More Pictures

This Banner will take you to Troy's Main page!

Email your questions or comments to
