Continued Etching 2
|
With the kistka, heated over the candle flame and filled with wax, begin covering the parts you wish to be left dark. This may not be an easy task, because the wax is not easy to see on the dark shell. If you are tackling a bird or animal, try to follow the lay of the feathers or fur with each short line of the wax. That way you will end up with more realistic looking features. Check in a good light once in a while to be sure of what you've done. If you still have the photo of the koala egg that I sent to the group, have a look at it now and you will see what I'm talking about. Be sure you have all the dark parts done. You won't get a second chance at the dark colour. If you want some shading, as I did, leave some areas for a fill of the next shade of colour. This process might be referred to as "reverse pysanky/batik" as it is waxing and removing colour rather than dying and waxing. I use a gallon ice cream pail in which to do the etching. I lay the egg in the pail and position beside it a couple of small jars full of water (with lids), for displacement of the vinegar, so you don't have to use so much but at the same time giving you plenty of room to reach in and raise the egg with your hand. Cover the egg with vinegar (takes about ½ gallon). You will know that it is working when you see the bubbles all over the shell and rising to the surface. Don't be in a hurry. This will take a while. Check about every 15 minutes with the soft toothbrush to see how much colour is ready to be removed. Don't scrub too hard, and be very careful around the waxed parts so that you don't dislodge any of your design. If it needs to wait a little longer in the vinegar to obtain the desired layer of colour, then be patient. The colour when wet is different than it is when dry, usually being somewhat darker. (Note: If you intend coating your egg when it is all finished, it will become the wet colour, but if you refrain from coating it, the colour will remain the dry version.) When you see the next colour that you want to keep, blot the egg dry. Be sure its completely dry then wax those parts. (your hair dryer does a good job). With careful planning you can get some really good shading. If you have larger areas that you wish to coat solidly, rather than using the kistka you might use a slurry. It can be made in the bottom of a small babyfood jar and capped tightly for future use as well. I used little bits of the beeswax, squished into a soft mush with the addition of small amounts of lighter fluid. Bit by added bit you will eventually get a 'slurry' like a cream sauce. It takes a while to be sure it's well blended. You won't likely need much, and it can be applied with the twisted corner of a paper towel or a Q-tip, then sharpen up the edges of the area using the kistka before you continue on to the next vinegar bath. *** Don't use the black wax and a light colored slurry on the same 'large' exposed area, such as the background. Where the black wax sits it may leave a dark stain and a light slurry doesn't, so they can't be used together. I found out the hard way. Better to use all light or all dark beeswax.*** If you want to see what colour you have in a dry state, use your hair dryer, being very careful not to melt the wax in the process. Continue waxing and vinegar etching until you are satisfied that you're finished. The wax at the bottom hole of the egg can be scraped off now with a knife, and pour the sand back into your sand container to use again or if the egg isn't drained you can do that now. The waxing you did can be removed by melting and paper towel, but I find it quicker to use lighter fluid and paper towels (outside). You may wish to finally wash the egg with dish soap to remove any last vestiges of the lighter fluid. Either let dry and leave it alone or spray it for the look of the wet colour. Bits of white for hilight can be added with acrylic paint, and any crucial bits that should have been the dark shell color but were accidentally scrubbed off can be replaced with an acrylic paint mixed to match the exact color of the shell.
|
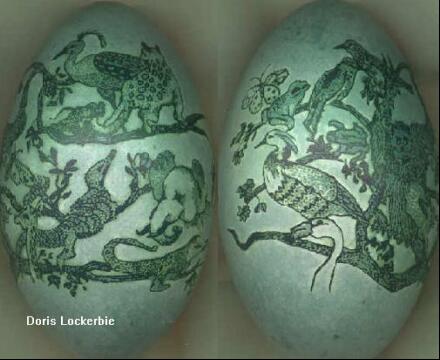
Here's a beautiful example using the electric kistka
to do the vinegar etching.
by Doris Lockerbie