Pysanky Eggs Hints
|
I'm trying to dye chicken eggs with Pysanki dyes I have had for about a year or so and the colors don't seem to take to the shells as well as they used to. I want to do a mosaic with these because the colors are so brilliant. Can you tell me if the dyes go bad after a long period of time? From Barbara B...... You may want to try straining the dyes if there is residue in the jar, placing them into clean fresh jars, and adding 1-2 tablespoons of vinegar.It may not be the dyes but the commercially washed chicken eggs. You may want to give the shells themselves a vinegar bath. Seal the hole with wax if necessary and place them in a jar of 2/3 white vinegar and 1/3 water. Sink them with a smaller glass or jar since they will float. 10 minutes or so should be enough time, hope this helps! Before I was decorating full-time, I was able to use some Pysanky dyes for three years. Now, I make a new batch every six months. From Barbara Through experience, I've learned to give each egg a vinegar soak BEFORE drawing the design, outlining with kistka or dye process. Years ago, I would just wipe with vinegar but learned that is not enough, especially with duck eggs. There is a film on the egg, that will wipe off when removing the wax, and will ruin the beautiful design, and dull the bright dye colors. After sealing the empty hole with wax, I soak the eggs approximately 5-6 minutes in white vinegar. I used to dilute with 1/2 water, however, because I seem to be more in a hurry lately, I use straight vinegar. Important to watch closely, as too long a soak will texturize the shell. Although some of these are quite beautiful, and I've sold many a "unique" one-of-a-kind, egg that soaked too much. You will see the surface bubble, remove the eggshell and wipe with paper towel. Rinse and set aside to dry. Examine closely, to be sure it is perfectly clean. If you leave any splotches, you will have splotchy dye spots! Taking the opportunity to send a photo of my last batch!
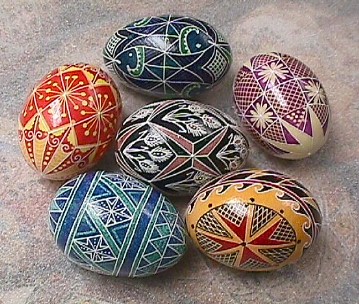
These pysanky eggs by Barbara B. More hints for working with eggs. From Lucille...... ....I also purchased the three prong points used in firing ceramics they work well too! ......When I used the two part Invirotex, I used a pysanky egg drying board. It's a wooden board with a bunch of nails coming thru from the bottom in groups of three to sit the egg on to dry. .....On Carol Duvall show, Jane Pollack used a piece of card with three thumb tacks push thru from the bottom for the egg to sit on to dry. .....When I use the pysanky drying board, I place a paper towel over the board and push it thru the nails so the board doesn't get so messy. After the egg is dry, I just remove the paper towel and throw it out. I soak up the dripping with a piece of paper towel.
From Beth
From Danetta......
It's basically like Pysanky, I use black wax,
draw and outline the design with the black wax,
but instead of dipping it in the dye,
I use a paint brush to paint individual sections
and let dry.I just use the Pysanky dyes.
The black wax holds the dye in that section,
leave it there for a few minutes and blot off
with a paper towel. I don't remove the wax from these eggs. Then a quick coat of varnish and it's done.
From Lucille...... Pysanky with KidsI don't know how old the kids are so I am assumming they are young kids like age 8 on. First of all each kid has in front of them an egg, pencil and a small dish to put egg in so it won't roll off the table. The teacher has a blackboard up and she draws an egg. Then begins with dividing lines showing exactly step by step what to do on the egg. The kids then follows with their pencil (not too hard just softly lining on egg). When you have showed them the division lines and then make a star in middle and they followed exactly, then you would have a candle, a kistka and wax in front of them. Light up the candle, and tell the kids to now cover their lines with wax. Teacher may have to give them a head start to make sure the kistka is working. They also put their initials anywhere on egg on a line so they can identify their eggs after dying. When the kids are finished waxing their lines, the teacher puts the egg in the dye cause kids tend to drop them in (unless they are the careful ones) and thus, banging onto another egg that may be in there (causing damage to someone else's egg). I usually take the eggs out of dye for them (less mess) and give to the kid their yellow egg (first color). This is when you say, no more pencil. Take away pencils. The lines they are waxing now just follows along what they have on egg already (like parallel to, etc). The teacher is still telling them what to outline now on the board and they follow. Don't go too fast for the kids. When they have done what you told them, go to next step so the kids don't get confused. I usually have a volunteer or parent around to help so these kids won't stray or even burn themselves. Like for instance-any long hair dangling in front of candle. If you have older students they are usually more careful and faster in following instructions. Keep going with instructions till you get to last stage - black. Then the students clear their stuff in front of them - only have a lit candle and a clean kleenex and begin to take off the wax. Tell students not to put egg in the "fire" just as close as possible beside the flame. When shiny, rub. If won't rub, back to candle, and then rub off till all wax is off.
For younger kids I usually give them a simple egg to do like the division lines and a big star, a little star inside and on lines, arrows - you will find simple ones in books.
From Patty.....
|
http://www.pysanka.com/page3.htm
http://www3.ns.sympatico.ca/amorash/ukregg.htm
You will find many more sites by doing a pysanky egg search