Making The Blue Haze Egg


by Maureen Williams


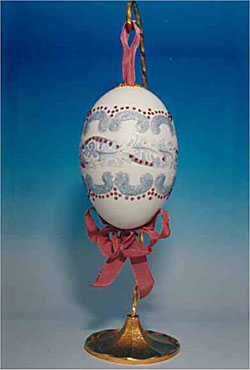
IDEA OF THE MONTH CLUB*
FEBRUARY 1998
BLUE HAZE

REQUIREMENTS:
Goose egg 9”
1/2 metre x 1 cm wired ribbon
Wrapping paper cutout
Hanging stand
Liquid Lace
Matte Mod Podge or Liquitex Matte Varnish
Glitter to match paper
1 Keyhole finding
Flatback rhinestones (Approx 160 to 180 needed)

MARKING THE EGG

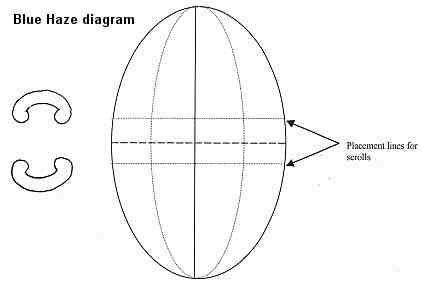
1.Divide egg into quarters lengthways. Mark centre top and bottom of egg.
2. Mark a centre girth line around the egg and then measure 1 cm. (or the measurement to suit the paper cut-out you have chosen) each side of this line. Using a fine pencil mark in these lines.
3.Measure the distance between 2 lengthwise lines and halve this measurement. This will be is the width of the scroll that you will need to fit around egg 8 times. Both lines above and below centre girth line need to be measured as these lines may not be the same due to the curvature of the egg and some adjustment may be needed for the scrolls to fit egg exactly.
4.Trace scroll pattern onto tracing paper or Vilene and transfer to egg. Permanent mark the scrolls using a fine dotted line. Mark centre top and bottom of the egg as the top hole will need to be enlarged to attach the ribbon loop to hang the egg from. The size of the enlarged hole should be approximately the same size as the hole in the keyhole finding. Remove all remaining pencil lines.


PAINTING THE EGG

1. Paint egg with colour of your choice and allow to dry. Seal with 1 coat of Mod Podge Matte and allow to dry.
2.Glue paper cutout around centre of egg it may be necessary to cut between flowers of leaves to let the paper sit flat against the shell. Apply two more coats of Mod Podge Matte.
3 Follow the instructions for Liquid Lace to build up the scroll areas on the egg. Allow to dry overnight.
4.Mix glitter with Mod Podge and paint the scroll area.
2 coats of glitter may be needed to give the depth of colour and sparkle required.


DECORATING & FINISHING THE EGG

1. When dry, glue flatback rhinestones onto the egg in a pattern to suit your motif.
2.Use epoxy to glue a keyhole finding to centre top of the egg, allow to set-up and then glue wired ribbon hanger into position.
Approximately 10 cms of ribbon will be needed. Do one side of the ribbon at a time, pressing the ribbon against the inside of the shell with angled tweezers. Make sure the width of the ribbon is placed to the side of the egg so that the centre of the egg will be facing towards the front when it hangs from the stand.
3.Make a double loop bow and attach to the bottom of the egg.


TO MAKE BOW:

1.Find the centre of the wired ribbon and mark this point with pencil. Make a loop on each side of this mark and secure with milliners glue or clear craft glue.
2.Make another loop, slightly smaller than the first loop, on both sides, secure with craft glue.
3.Twist the tails of the bow towards the front and trim to desired length. Pull the loops into an irregular shape; the wired edges will hold the ribbon in place.


USING PHOTOCOPIES

Wrapping paper and prints can be photocopied and then re-coloured to match the colour scheme of your design. The following is a strip of the wrapping paper used on this egg. You can use chalks or watercolour pencils to achieve beautiful results. When doing the photocopy have it dark enough to see the print but not too dark to impede the colouring process. The darker parts of the photocopy will become shaded areas in the new re-coloured piece.


*'The Idea of The Month Club' is no longer being published.


INDEX