DEFENSIVE POSITIONING IN THE "FIVE/ONE"
Our "FIVE/ONE" man to man defense is based on defending from the basket out. To understand how we defend the post and why, it is first important to understand our perimeter defense.
Diagram 1  shows the "FIVE/ONE" defense with the ball at the guard position with three additional perimeter players. A is guarding 1 above the free throw line. A is between 1 and the basket. The defenders guarding the players one pass from the ball (C&B) have 'jumped to the ball'. Closing down the gaps between 1 and 3 and between 1 and 2. D is guarding 4 who is more than one pass away from the ball. D has both feet in the lane.
Diagram 2  shows the "FIVE/ONE" defense with the ball at the wing position, with three additional perimeter players. 3 has the ball at the wing position - below the free throw line. B is guarding 3. B plays to the baseline side of 3. B's top foot is positioned directly in front of 3 - B's top foot is positioned in a position that if B moved up tightly on 3, B's top foot would be directly between 3's feet. B will have his baseline foot back and his top foot forward. From this position B is in a great position to stop any drive by 3 to the baseline.
With B splitting 3's feet, if 3 were to drive toward the middle of the court, this would force 3 to drive slightly toward the free throw line. B will drop step and stay between 3 and the basket.
A who is guarding 1, who is one pass away from the ball. A has 'jumped to the ball'. A is now closing the gap between 3 and 1. Should 3 drive to the middle A is in a position to give help and stop the drive. C and D are guarding players more than one pass away from the ball. C and D have both feet in the lane.
Diagram 3  shows the same situation as Diagram 1 but with the addition of a post player. The ball is above the free throw line so E is denying the pass to 5 in a closed stance with a cushion.
Diagram 4  shows the same situation as Diagram 2 but with the addition of a post player. E has moved to a position almost directly behind 5, shading slightly to the baseline side. E's baseline hand will be up with his palm facing the passer (3) and his fingers positioned toward half court.
You can move the offensive players to any position on the court and follow the same defensive rules and guidelines.
The Ball Passed Into The Post
When the ball is passed into the post from the wing area, the following actions occur: (Diagram 5)
1.
E is responsible for any move to the baseline and any move directly to the basket. If 5 were able to move across the lane, E will stay with him, between 5 and the basket.
2.
B who is guarding 3 at the ballside wing area, will jump to the ball with his back to the baseline. B is ready to return to 3 quickly and pressure a shot attempt if the ball is passed out of the post to 3.
3.
A who is guarding the ballside top man will now execute a "SEAL" on the post player. A's responsibility in the "SEAL" is to double the post and 'prevent the drive or move to the middle' so he must be tight on the post and on the lane side at a slight angle. It is very important to understand that A's "SEAL" is not just a double down on the post. His most important job is to prevent the drive or any move to the middle. A is now in a 'zone' defense until the ball is passed out of the post.
4.
C and D, who are guarding the two players on the helpside, form a 'two man zone' in the middle of the lane that we refer to as a 'zone unit'. C and D will remain in their 'zone' until the ball is passed out of the post.
Cutters With The Ball In The Post
The toughest position in regard to cutters when the ball is in the post is that of the ballside wing defender. Physically this position is not difficult. The difficulty comes into play by recognizing the actions of the cutters. Only four things will happen that will effect this defender but he must know what to do in each situation.
1.
His man will stay on the ballside wing. If this happens B, who has already jumped to the ball with his back to the baseline, will stay ready to quickly return to 3 if the post passes out to 3. If 3 moves within the wing area (below the free throw line extended) B will adjust his position in such a way that he is able to quickly return to 3 if the ball is passed out to 3. (Diagram 5a)
2.
If 3 cuts through the middle, B must defend the cut man to man. Then initially position himself according to 3's location on the court. (Diagram 6)  After B has positioned himself according to 3's location B now becomes part of the 'zone unit' (with C and D) in the lane.
3.
If 3 moves to a position above the free throw line, B will move into the lane to again join the 'zone unit' (with C and D) as in Diagram 7.
>b>4.
If 3 moves to a position above the free throw line and another offensive player replaces 3 at the wing area, B will take the player who replaced 3 at the ballside wing area. As in an exchange, a split or a baseline runner. B will 'jump to the ball' and play this new player the same as he would have played 3 if 3 had simply passed to the post and remained at the wing area. (Diagrams 8 & 9)

In the case of a baseline runner it is D's responsibility to communicate to B that he has a runner so that B can re-adjust his positioning (Diagram 9).
CUTTER FROM ABOVE THE FREE THROW LINE OR HELPSIDE
If the cutter comes from above the free throw line or the helpside, the cutter will be obsorbed by the 'zone unit' and then released out of the lane. Diagram 9 is one example of this type of cut. Diagram 10  is another example of this type of cut.
Pass Out Of The Post
Diagrams 11 & 12
 show a pass out of the post going to a player above the free throw line.
C, the top player in the 'zone unit' will take the pass out of the post to any offensive player above the free throw line. A, the player who executed the "SEAL" will rotate helpside to locate his man.
In Diagram 11 A, executing the "SEAL" is ballside. When the pass goes to 2 that side of the court now becomes the ballside. 1 is now helpside. A will now pick up 1. A has gone from ballside to helpside even though he has remained on the same physical side of the court.
In Diagram 12 the ball is passed to 1. C takes the first pass out of the post to any offensive player above the free throw line. C will take 1. A will rotate out of the "SEAL" to the helpside to guard 2.
The remaining three defensive players (D, E and B) adjust to their normal "FIVE/ONE" defensive positioning.
Diagrams 13 & 14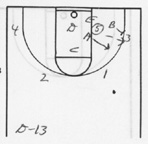
 show the ball being passed out of the post to the ballside wing.
Diagram 13 shows the normal recovery out of this situation.
Diagram 14 shows the ball passed out of the post to the ballside wing, who quickly passes the ball to 1, who has moved slightly to center. C is the nearest defender to 1. C will cover 1 and A will rotate to the helpside to locate his man.
Diagram 15  shows the ball passed out of the post to the helpside wing area. On this pass the bottom player (D) in the 'zone unit' (D and C) will cover the ball. All other defenders move to their regular "FIVE/ONE" defensive positioning.
REVIEW
We are in our "FIVE/ONE" man to man defense when the ball is on the perimeter. When the ball is passed into the post we go into our "FIVE/ONE POST ZONE" defense. When the ball is passed out of the post we re-adjust and move back into our "FIVE/ONE" man to man defense.
NOTE: The only time we 'automatically' switch is in our "FIVE/ONE POST ZONE" when there is a cutter. And when the ball is passed out of the post when necessary, as described.