DEFENSIVE DRILLS - PART TWO
4 on 4 DEFENSE THE CUTTER DRILL: (Diagrams 51 & 52)

Players line up as in '4 on 4 Shell Drill'. On the guard to wing pass the guard will cut through the lane and go opposite. On the guard to guard pass, the passing guard will cut through the lane and go out on the same side he is on. The other offensive players rotate to fill the next empty spot. There is no cut on the wing to guard pass.
The player guarding the cutter must 'Defense the Cut' and the other players adjust their position according to the location of the ball and the location of their man.
2 on 2 DEFENSE THE CUTTER AND FLASH DRILL: (Diagram 53)
1 will pass the ball to the coach and cut to the basket inside the NBA Lane, when the cutter reaches the low post area he will move across the lane to the helpside block. As 1 starts his move to the helpside block, 2 will flash directly to the ball. A must defense the cutter and 2 must defense the flash.
3 on 3 BALLSIDE DRILL: (Diagram 54)
Three offensive players stay on the ball side and move randomly. Two offensive players stay on the helpside and move randomly. Both ballside and helpside defensive players must adjust their position constantly in relation to the location of the ball and the location of their man.
2 on 2 BALLSIDE DRILL: (Diagram 55)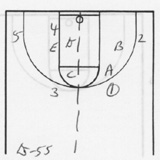
Two offensive players stay on the ballside and move randomly. Three offensive players stay on the helpside and move randomly. Both ballside and helpside defensive players must adjust their position constantly in relation to the location of the ball and the location of their man.
1 on 1 CONVERSION DRILL
Two players start at the free throw line. The coach tosses the ball off the board. Both players go for the rebound. The player gaining possession of the basketball is on offense and the other is on defense. The offensive player dribbles to the opposite goal and attempts to score. The defensive player sprints back defensively and defends against the offensive player.
Once the offensive player shoots, the ball is now free again. Make or miss both players go for the ball. The player gaining possession of the ball is the NEW offensive player (even if it is the same player who just shot). The NEW offensive player dribbles to the opposite goal and attempts to score. The defensive player must sprint back and defend against the offensive player.
DEFENDING AGAINST THE SCREEN DRILLS
3 ON 3 DEFENSE THE PICK AND ROLL DRILL: (Diagram 56)
The players line up as shown in the diagram. 1 will dribble in either direction and run a pick and roll with the offensive player on that side. In the diagram, 1 dribbles off the screen set by 2. As soon as 1 dribbles by 2, 2 will roll to the basket.
1 plays 2 stopping the direct drive to the basket. As 1 nears 2's screen B will call out "screen". B will step out into the path of 1. B's responsibility is to stop 1 penetration to the basket. B will stay with 1 until A (who has gone over the top of the screen) tells B, "I've got him!". At which time B will release and relocate his man and establish his defensive positioning. As 1 dribbles toward 2's screen, this means C's defender is farther away from the ball on each dribble. C will start moving away from his man. When C sees the pick and roll developing he prepares to help on the rolling player (2). C will stay with the rolling player (2) until B recovers back and yells, "I've got him!" at which time C will recovery back to his man. In this case we do not allow the pass from 1 to 3.
DEFENSE THE DOWN SCREEN DRILL:(Diagrams 57 & 58)

The ball will start with 1 having the ball at the wing position guarded by A, and 2 in the ballside low post guarded by B.
1 will pass to the coach and then go set a screen on 2's defender. 2 will move off the screen to the wing position.
On the pass from 1 to the coach, A and B will 'jump back and to the ball'. A will guard 1 as in defending the cutter. As 1 sets the screen on B - A must get between the passer and the goal. 2 will move around the screen to his new defensive position and A will recover to defend 1.
2 on 2 CROSS SCREEN DRILL: (Diagram 59)
The coach has the ball at the wing position. Two offensive players line up on the blocks defended by two defensive players. The ballside player (1) will turn and move into the lane to set a screen on B. B's rule is that when he is being screened in the lane that he turns and attacks his assigned man in a face guarding position. A will turn so that he can see his man and the ball, ready to help B and ready to defend 1 should he pivot back to the ball. B will attack 2 and force him over the top of the screen.
3 on 3 DEFENSE THE WEAVE DRILL: (Diagram 60)
1 will dribble toward 2, 2 will go behind 1 and receive a hand-off, 2 will now dribble toward 3, 3 will go behind 2 and receive a hand-off - the offensive players continue this pattern.
A is guarding 1, B is guarding 2 and C is guarding 3. As 2 goes behind 1, B will slide between 1 and A, ready to guard his man if he receives the hand-off.
3 on 3 DEFENSE PASS AND SCREEN AWAY DRILL: (Diagrams 61 & 62)

1 will pass to either wing player and screen away for the opposite wing player who will replace him at the guard position. When the middle man of the three offensive players has the ball he will pass and screen away.
On the pass from 1 to 2, B will close out on 2. A and C will immediately 'jump back and to the ball'. As 1 sets the screen on C, C will slip the screen on the ballside (between 1 and A).
IN THE NEXT TWELVE AUXILARY DEFENDING THE SCREEN DRILLS WE WILL ONLY SHOW THE MOVEMENT OF THE OFFENSIVE PLAYERS. Note: each offensive player is defended by a defensive player (unless the position is shown as a passer [P]) following the defensive concepts and rules we have previously mentioned. AS IN: "jump back and to the ball", "defender guarding the screener stepping between the passer and the basket", etc.
4 on 4 DEFENSE PASS AND SCREEN AWAY DRILL: (Diagrams 63 & 64)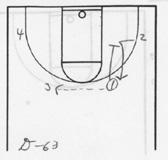

DEFENSE POT-TO-POST ANGLE SCREENS DRILL: (Diagrams 65 & 66)

DEFENSE FLARE SCREEN DRILL: (Diagram 67)
DEFENSE BASELINE RUNNER DRILL: (Diagram 68)
DEFENSE DOUBLE DOWN SCREEN DRILL: (Diagram 69)
DEFENSE BASELINE DOUBLE SCREEN DRILL: (Diagram 70)
DEFENSE POST-TO-POST BALLSIDE SCREENS DRILL: (Diagrams 71 & 72)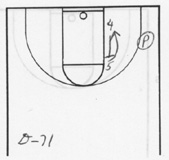

TRIANGLE POST DEFENSIVE DRILL: (Diagram 73)
3 ON 3 DEFENSE BOTTOM FLEX CUT DRILL: (Diagrams 74 & 75)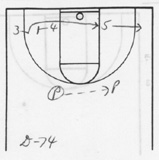

3 ON 3 DEFENSE FLEX CUT AND DOWN SCREEN DRILL: (Diagrams 76 & 77)

3 on 3 DEFENSE WING-TO-WING CROSS SCREEN DRILL: (Diagram 78)
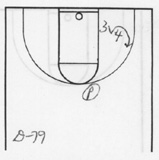
DEFENSE BRAZIL STATIONARY SCREEN DRILL: (Diagram 79)