
The "old reliable" Richard Quick (RQ) Gap
This is the original spark gap I used with the coil. It is formed from a section of 6 inch diameter PVC pipe (cut from the same stock as the secondary). Contains 9 copper pipes 2 inches long x 1/2 inch in diameter. Each pipe has a brass bolt holding it to the PVC wall. The gap can be quickly and easily adjusted by moving the taps from one bolt to the next allowing more or fewer elements to be used for the overall gap. The bolt hole in the PVC is also slotted to allow the pipes to be moved with more or less gap between each as operating parameters change. A small 6 inch fan (sold as a "Personal Clip On Fan" from Wal-Mart) performs the cooling and quenching duties. I also cut a small plywood block (visible in the right-hand photo) to help direct more air through the pipes.
Spark Gap Failure

The gap has 24 pipes total 1/2" diameter x 4" long. Each of the 22 gaps is .012 inches for a total of .264 inches. I also salvaged the fan off of my RQ gap, and built a shroud on the back side of this gap so the fan could blow out all the nasties from between the pipes.
So...the
result from my day's activities, several hours worth of planning, $10 for
copper pipe, $10 for some lexan, and $10 for a pint of epoxy glue....improved
spark length? better quenching? smoother operation? Well,
the answers are NO, NO and NO! The spark gap had no trouble firing.
I started at .100" to be safe, opened to .150", opened to .200" all with
never a spark from the coil. All the while adjusting tuning, using
a breakout point...just no sparks. After about 1 minute of intermittent
operation, I noticed that most of the evenly distributed sparks had moved
to the outer or inner edges (near the lexan) of the pipes. I can
only assume that the airflow was slightly less there and led to a slightly
lower resistance path. With about another 30 seconds of operation,
carbon tracks were well burnt into the lexan, and the gap stopped firing...well
except for three loud...POP...POP...POP's. This was the capacitor
building up enough energy to bridge the center piece of lexan...all .500"
of it! The coil still didn't fire, but luckily the cap didn't blow
either. Anyway, I switched back to the RQ gap and got performance
back in the 50" range. A lesson learned!
26 Element Gap - Works, but no better than the 'ol RQ gap

This gap was designed with the idea of higher power dissipation in mind. The copper pipes (5 inches long, 3/4 inches diameter) are epoxied to a 12 inch square ceramic floor tile in two rows of 13 pipes each, with about .011 inches between each pipe. The ceramic was used in an effort to get away from the possibility of melting the PVC in the RQ gap with extended runs. Of course now there is the epoxy glue to worry about (it's really not feasible to drill holes in the ceramic to mount the pipes) but so far no troubles.
The
gap works fine. It's easy to adjust and the 10 inch fan creates a
real air blast for cooling and quenching. The footprint is a little
big (12"w x 12"l x 5"h) but that is the price for running 26 sections of
pipe.
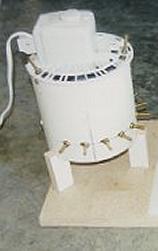
4 Element Water Cooled Gap

This is an attempt to make a water cooled easily adjustable gap. Obviously, due to conduction of water, the gaps can't share a cooling fluid. This gap was formed from 4 sections of 2 inch diameter copper pipe which have been sealed with a soldered copper plate on the bottom. Each element rests on a ceramic insulator in a lexan "track". The element on the far right is fixed and a spring is placed horizontally in the lexan between each of the elements. A 1/4 - 20 threaded shaft is turned via the black knob on the left and compresses the elements together (or allows them to spread apart) at .050 inches per turn. A small fan (not shown) blows through the gaps for extra quenching. The pipes are filled with water which simply evaporates if the temperature ever rises above boiling point.
This
gap works well and stays cool. It is very easy to adjust (simply
turn the knob) It may have trouble quenching at higher power levels,
though due to only three gaps.