Wheels and Tires...
...Here are some answers as to the largest wheels and tires that will fit the 1st gen RX-7...
...FRONT: The maximum front tire diameter is
...FRONT: The maximum front wheel width is
...REAR: The maximum rear tire diameter is 28"
...REAR: The maximum rear wheel width is 275mm
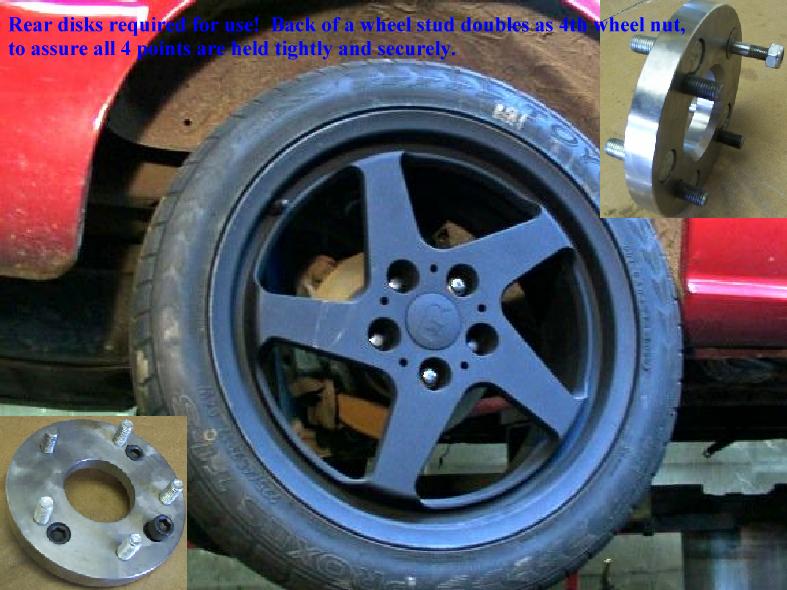 79-85 RX-7 4x110 to 5 Bolt Wheel Adapters
CP Racing & Designs
1440 Tottenham Road
Tottenham, Ontario
L0G 1W0
CANADA
(905)936-5151
80.00 each, 320.00 for all four. Brand new design, converts
all 78-85 Rx7 4x110 bolt pattern to 5 bolt by 4.5! Same
bolt pattern as 86-96 Mazda Rx7s. No more rims selection
problem. Made of 4140 steel, bolts onto factory rotor,
without any modifications to factory equipment. All
hardware necessary provided in kit. SHIPPING AND
TAXES INCLUDED.
CP says they will pay for ground shipping!!!
Click on image for a larger view.
Front Suspension
...The 1st gen RX-7 front suspension varied a bit over the years. The differences are summed up here...
...'79-'80 12A RX-7
...large dia front spring material with 7-1/2 coils, rated at 121 lbs/in.
...small plastic shim style upper thrust washer.
...'81-'85 12A RX-7
...smaller dia front spring material with 5-3/4 coils, rated at 121 lbs/in.
...roller bearing style upper thrust washer.
'79-'83 rotors are all interchangable, and use the same wheel bearings. '84-'85 rotors/hubs use a larger outer wheel bearing, so they must be paired with a compatible '84-'85 strut tube/spindle.
The change to smaller spring wire with less coils saves about 6 lbs (3 lbs per side), but has the same spring rate. The later style upper thrust bearings are slightly heavier, but steering effort is reduced. The change to a larger outer wheel bearing for the '84-'85 increases the front wheel bearing's load capacity. These production changes complicate the mixing/matching of parts...
...strut shaft, upper spring seat, upper thrust bearing must be compatible
...spindle and hub must be compatible
...'79-'85 12A caliper mounting brackets share the same bolt pattern and and offset.
Rear Axle
...The easiest upgrade for a stronger axle w/ better available ratios is the 8" Ford from a late '70s / early '80s Granada or Monarch. This rear is almost exactly the same width as the stock RX-7 rear, and comes with a 5 on 4-1/2" lug pattern.
These rears were originaly equipped w/ either 2.79, 3.00, or 3.40 ratio.
Most versions were equipped w/ drum brakes, but the Lincoln Versaise used the same rear but was equipped w/ disc brakes.
Most will come with an open 2 pinion diff, but the aftermarket has either the mini-spool (drag use only) at appx $50. as an option, or a number of clutch type limited slips are available from the aftermarket.
There are quite a few guys running 9s on this rear, so it's plenty strong enough for most anything you will do with a car as lite as your RX-7.
These rears are available in most wrecking yards for $50-$100.
Installation options include...
...cut your RX-7 brackets off and re-weld them to this rear
...buy our bracket set and weld them to your 8" yourself
...buy an exchange 8" housing from us that has new brackets welded and the housing straightened
...buy a complete 8" rear from us ready to bolt-in with your choice of lug patterns and differentials ($$$)
Hoods, Scoops, and Body Kits...
...Racing Beat (714)779-8677
...Mazda Comp
...Mariah Motorsports
...
Roll Bar Manufacturers...
...Kirk Racing Products (205)608-1156
...I/O Port Racing Supplies 1-800-949-5712
...Autopower (619)297-3300
...
Suspension, Brakes, Shocks, Struts, Coil-Over Kits...
...Ground Control (530)677-8600
...Dave Turner's (858)571-3811 Do-it-yourself Coil Over Kits
...
...
Balancing your RX-7 after an engine swap...
...Before finishing a conversion, effort should be put into achieving a 50/50 front to rear balance of weight
in the car. The easy way to measure this is by weighing the front and rear axles separately. The target is
equal weight on both ends of the car with the driver seated and the fuel tank 1/2 to 3/4 full. An easy way
to achieve this at home is to support the car at a point midway between the front and rear axles on each
side, with the tires slightly off the ground. Be sure to protect the underbody of the car from damage. An
inverted 12" section of channel iron placed over the "frame rails" is usually sufficient. Use a short piece
of 1" square tubing between the channel and the floor jack / jack stand for a pivot point (the use of
square tubing prevents the car from rolling forward or backward on the pivots). With the driver seated in
the car, an assistant can easily lift the front or add weight to the rear to determine the amount of weight
that has to be moved / removed.
1. The best way is to remove weight from the front until the car balances. This provides for the lightest possible car. Easy ways are installing an aluminum hood, aluminum intake manifold, lite exhaust components, aluminum heads, lighter starter / flywheel, etc.
2. The second most desirable way to achieve balance is to move weight from the front of the car to the rear. The easiest heavy component to move is the battery. The farther back the weight is moved, the more effect it will have. If the battery is located inside the passenger compartment, use a sealed battery such as the "optima" and be sure to anchor it down securely. Loose batteries in an accident are VERY dangerous.
3. As a last resort, add weight to the extreme rear of the car. Lead securely fastened to the inside bottom of the spare tire well is an excellent choice. Try to place the weight as low and as far back as possible to get the most effect for the least weight.
Even if you choose not to balance the car, your distribution will still be better than stock Mustangs and Camaros.
Some weight related numbers...
...An aluminum intake manifold is 28lbs lighter than cast iron.
...Aluminum heads save about 50lbs over iron.
...An aluminum block will lose ya another 55 to 95lbs.
...A 4.3 V-6 is only 11 percent lighter than a V-8.
...An aluminum hood(turbo II)will save you about 30lbs.
...Headers are 20 some lbs lighter than iron manifolds and headpipes.
...The typical RX-7 A/C system weighs 55 lbs.
One of the main engineering goals of the RX-7 was to stay close to the perfect 50/50 chassis balance. When they added the extra weight of a turbo system to the Turbo II model(180-200lbs), they needed to come up with a way to maintain the chassis weight balance as much as possible. Some of the methods they used include...
...They went to an Aluminum hood
...They moved the intercooler rearward to the top of the engine
...They used a heavier spare tire & jack
This just goes to show that the Mazda factory uses the same methods to balance their cars as the regular guy. They reduce the front weight as much as possible, then move components if possible, and finally add weight to the rear if needed, in that order. This is the biggest reason the added 180-200lbs of the Turbo II option did not ruin the balance and handling of the RX-7. The factory decided that the extra power that the turbo system offered more than offset the added weight.
This is what power-to-weight ratios are all about.
GrannysSpeedShop.com Home Page
2....Considerations & Requirements....
4....Engine / Transmission Installation....
5....Exhaust / Throttle Cable / Accessory Drive / Pulleys....
6....Cooling / Fuel Systems....
7....RX-7 Wiring Harness Connector ID and Circuit Locations....
8....Electrical System Modifications By Circuit....