
Guide For Designing To Publishing Your First Page!
Introduction
In order to produce something on the Web, you
have to learn what is known as HTML. It is a simple 'tagging system' where
the web browser (ie Netscape/Explorer) is instructed what you want to show
on your page. A bit like a computer program! If you want to put an image
on your page you have to tell the browser to display it. It all sounds very
complicated, but I guarantee that after a few goes it will become second
nature to you.
So what do these TAGS look like then? Below is an example of the basic TAGS you need to get started, there is absolutely no content in the web page as it stands now but we will build on this basic structure and you can learn as you follow this tutorial, the basic tags required.
Creating Your
Page
1. Copy the below into either your Notepad
in Windows or one of the HTML Editors that I suggested on the
HTML Editor Guide.
| <HTML>
<HEAD> <BODY> </BODY> </HTML> |
2. Now save this as test.html. Please remember the location you save it to!
3. Open up your web browser.
4. Open your test.html by going into the FILE MENU ...OPEN PAGE of your browser and locating where you saved it.
5. If all is correct, then you should have a completely BLANK page displayed!
You now have to start adding things to your test.html to make it appear when you open the page in your browser. Take a look at the coding already in the page. There is an HTML tag. This tells the browser to begin reading the code. At the very end of the code is the end tag for this too </HTML>. All tags in your coding must have an ending (there are exceptions to this). As we carry on, you will get to understand this more.
Located the <BODY></BODY> tag in your code. In between here is where all your information goes. It is where you put TEXT and graphics. Lets do an experiment!
6. Just after the first <BODY> tag type 'My First Ever Web Page! ' as in the example below:-
| <HTML>
<HEAD> <BODY> My First Ever Web Page! </BODY> </HTML> |
7. Now save the file as I explained previously and re-open it in your browser (you may select REFRESH/RELOAD if you wish).
Bingo, you have made your text show up in the browser! A bit boring though isn't it, so let's jazz it up a bit.
8. Go back to your coding and where you have written "My First Ever Web Page" type <H1></H1> on either end of it (see example below, save it and then re-open again in your browser:-
| <HTML>
<HEAD> <BODY> <H1>My First Ever Web Page!</H1> </BODY> </HTML> |
This is your first big step into designing. Changing the way the text looks. Of this type of TAG <H1> is the largest text size. From there it drops down in stages, trying messing around and change <H1> to the below:-
<H2></H2>
<H3></H4>
<H4></H4>
<H5></H5>
When you are done messing around with the size, make sure to change it back to <H1>.
8. Although the text is nice and big now, its still scrunched up in the corner, so we need to move it to the middle. Follow the example below by surrounding your coding with the <CENTER> tag:-
| <HTML>
<HEAD> <BODY> <CENTER><H1>My First Ever Web Page!</H1></CENTER> </BODY> </HTML> |
Please remember that if you spell the British way, that all TAGS are 'Americanized' with American spellings!
9. Ok! Now you should have a nice large title that is centred. The next step is to put a little bit about yourself in there to pad the page out a bit. You need to tell the browser that you want a paragraph after your title so this is where the <P> tag comes in. See easy isn't it? Unlike most tags this one doesn't need an ending tag </P> although can use it if you wish. So after the title make sure you insert <P> and then you can write any details you wish after that. Still confused? Look at the example below:-
| <HTML>
<HEAD> <BODY> <CENTER><H1>My First Ever Web Page!</H1></CENTER>
<P> </BODY> </HTML> |
So now you've experimented with the text, it's time to start adding some links to your page.
10. In order for you to jump from page to page on a website you must enter coding that tells the browser to look for another page either in your own directory or elsewhere on the web. We will deal first with the latter which are called external links. After your text ensure you place another <P> tag to begin a new paragraph. When link to any page you must use the <A HREF> tag. Firstly write down the name of your favourite page you would like people to visit, it could be anything at all, see my example below to make sure you are following:-
| <HTML>
<HEAD> <BODY> <CENTER><H1>My First Ever Web Page!</H1></CENTER>
<P> <P> Julia's HTML Guide </BODY> </HTML> |
11. You now need to put in the <A HREF> tag to make what you have written into a link. As the tags above you will need to surround the text with this tag and the FULL URL of the page you want to go to....
| <HTML>
<HEAD> <BODY> <CENTER><H1>My First Ever Web Page!</H1></CENTER>
<P> <P> <A HREF="http://www.members.tripod.com/~html_4_everyone">Julia's HTML Guide</A> </BODY> </HTML> |
As you can see I have written <A HREF="THE URL">The Sites Title</A>. The ending tag is </A>. The actually full version of the tag means 'Anchor Reference' which is shortened to A HREF and the end of the tag means 'End of Anchor' shortened to </A>. It is important to always end the Link with this tag otherwise the rest of your text on the page will be included in the same link and all be highlighted and underlined!
When you test your page the link should look like this:-
You can add more links using the exact same way. If you want them all on a separate line be sure to enter the <BR> tag after each one. This will separate them but the line spacing will not be as wide as using the <P> tag. I have included another example below to demonstrate this:-
| <HTML>
<HEAD> <BODY> <CENTER><H1>My First Ever Web Page!</H1></CENTER>
<P> <P>
<A HREF="http://www.members.tripod.com/~htm_for_everyone">Julia's HTML
Guide</A><BR> <P> </BODY> </HTML> |
The overall effect should look like this...
Julia's HTML Guide
Visit Netscape
Visit Microsoft
After these links you may add anything you like to the page, more text if you want! But make sure they are all within the <BODY> tags. Adding internal links can be found in the TAGS area.
The last thing we need to look at before you put it on the web is to change the background colour and give the actual page a title so the browser knows what it is called. To do this we look at the very top of the coding.....
| <HTML>
<HEAD> <BODY> |
12. This is the <HEAD> area of your coding and will not be shown up in the main browser window. It gives the browser instructions on how to display the page. If you want to give the page a title that will appear at the very top of your browser (this is used for when someone bookmarks your page) The it is as simple as inserting it between the <TITLE> tags. Remember to test in your browser as you add these additions.
| <HTML>
<HEAD> <BODY> |
13. Giving your page a colour is just as easy, and is done by amending the <BODY TAG>. Colours have their own coding too! If you want your page to be white then you will need to put:-
<BODY BGCOLOR="#FFFFFF">
BGCOLOR meaning 'Background Colour', remember that American spelling! A list of all the different types of colours and there codes can be found here.
So now your full coding should look something similar to this:-
| <HTML>
<HEAD> <BODY BGCOLOR="#FFFFFF"> <CENTER><H1>My First Ever Web Page!</H1></CENTER>
<P> <P>
<A HREF="http://www.members.tripod.com/~htmlguide">Julia's HTML
Guide</A><BR> <P> </BODY> </HTML> |
Last take a look at the test page I have done and compare it with yours to make sure you have followed everything correctly:-
Publishing
Your Page On The Web
So at last you have now created a page to be
put on the web! It's pretty basic at the moment, but just for now it will
do so that I can teach you how to get it seen by all. We can then study how
to jazz it up with graphics and coloured fonts.
So how do you go about getting a page on to the web? It actually depends on a few things! If you have no idea where you are going to put your page and your Internet Provider has not provided you with any space then you should visit the below places who offer FREE webspace to anyone. I have given instructions for each web space provider for how to get your page published. If you want to publish your page on your own web space that came with your Internet Provider Account click here.
Geocities - How to Upload your pages with Geocities
Space: 11 Megs
Email Account: Yes
Tripod - How to upload your files using Tripod
Space: 11 Megs
Email Account: No
Using Your Own Internet Provider Webspace
and Uploading Using WS_FTP
For those of you without the use of EZ Upload or if you are publishing your page on your own web space given to you by your provider you will need to download a copy of WS_FTP. This is a program which enables you to upload files onto the web space using 'File Transfer Protocol'.
Download
WS FTP For Windows 95
Download
WSFTP For Windows 3.1
Please note if you are using a Mac then you should download Fetch.
 WS_FTP is what you will use to upload your html
files and graphics to your web directory. A web directory is set up very
much like your 'File Manager/Windows Explorer' on your own computer!
WS_FTP is what you will use to upload your html
files and graphics to your web directory. A web directory is set up very
much like your 'File Manager/Windows Explorer' on your own computer!
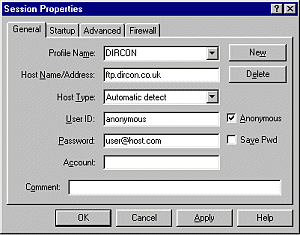
Once you have set up WS-FTP you and opened the program it will automatically bring you to the Session Properties Screen as pictured to the right here. You will need to fill in the details of your web space account.
Profile Name: Do not enter the Host Address, but any name you choose as if you were saving the page.
Host Name/Address: The Address of your account usually something like 'ftp.geocities.com'
Host Type: Leave as Automatic Detect
User ID: The Username or Member name
Password: The password you chose or were given.
Account: Normally left blank
Comments: Unless otherwise told, leave
this blank.
Now you have completed this screen, this should be ok to save now. So at the bottom of the screen click on APPLY. If you have been given other instructions such as a 'Remote Directory' then these should be entered by clicking the 'Start Up' Tab and input in the same way. Remember to use 'APPLY' though for the changes to take effect.
When you are satisfied you have put all the details and have saved them you can now click on OK. You will be taken to the main area of the program and WS_FTP will try to connect you to the address you put in. The WS_FTP program 'talks' to the location you are trying to connect you to at the lower end of the screen.
 Once you are connected you will be presented with 2
boxes. The left hand box is YOUR COMPUTER and you should now find the files
that you want to upload. On the right hand side of the screen is the directory
you have just connected to. Most instructions from Webspace providers should
take you direct to the account where you can upload. Should you be required
to move around once connected then you can simply click on the 'Yellow Folders'
to have a look in the directories.
Once you are connected you will be presented with 2
boxes. The left hand box is YOUR COMPUTER and you should now find the files
that you want to upload. On the right hand side of the screen is the directory
you have just connected to. Most instructions from Webspace providers should
take you direct to the account where you can upload. Should you be required
to move around once connected then you can simply click on the 'Yellow Folders'
to have a look in the directories.
You can upload files into your web space area by finding them in the LEFT HAND box and simply double clicking on them or by highlighting the file and clicking the arrow --> button.
![]() You will notice that underneath these two
boxes are some radio buttons. When transferring files using WS_FTP you will
need to choose one of these BEFORE uploading the file. As a general rule
all HTML files are ASCII and all graphics are BINARY. Click on the relevant
button and proceed with your upload. To test that your uploading worked you
can then open your browser and fill in the address of you webspace area and
your html file, for example:
You will notice that underneath these two
boxes are some radio buttons. When transferring files using WS_FTP you will
need to choose one of these BEFORE uploading the file. As a general rule
all HTML files are ASCII and all graphics are BINARY. Click on the relevant
button and proceed with your upload. To test that your uploading worked you
can then open your browser and fill in the address of you webspace area and
your html file, for example:
http://www.geocities.com/test.html