In this tutorial i going to tell
you how to make low-res leg in LightWave 3D.
This tutorial require basic navigation/selection skills
with LightWave Modeler. Although i tried to show all
"moves". Indeed it's not really tutorial, it's
a tip rather. Using this tecnique you can create almost
all parts of avatar. There're two main ways to create
parts of avatar. First one is making primitive shapes
like cylinders, balls and tweak them with Magnet and Drag
Net tools. Second one is using splines for rail extrusion
and spline modeling. My opinion is that second way gives
you more control, works faster and makes more accurate
joints.
I used LW 5.5 for this
tutorial. It's necessary to use shortcuts with LightWave.
For example making this leg takes less than 2 minutes
using shortcuts, without them it gonna take a life. So, i
write actions as Shortcut (Tab|Button), for example "T" (Modify|Move), that means you can press
"T" key on keyboard or go to "Modify"
tab and press "Move" button. If shortcut won't
work for some reason (my typo or they are redifined) use
buttons then. (Some shortcuts don't have buttons as
"G", "R")
So, let's start.
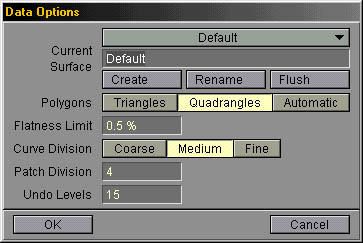
Before you start, you have to adjust your "Data
Options" and "Surface".
To do that, make sure that "Caps Lock" is
turned off and press "O" button (Objects|Options). Press "Quadrangles"
button and "Okey" then. Now
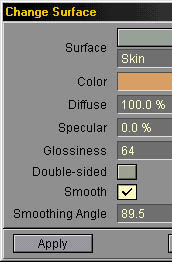
LightWave will generate Quads only. Press "Q" button, select
"skin-like" color, check "Smooth"
checkbox, press "Apply".
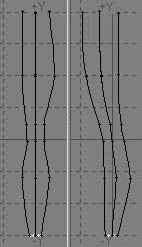
First thing we have to do
it's rail splines.
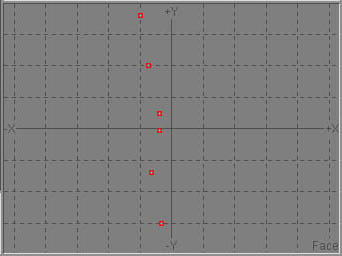
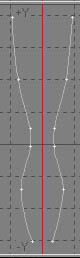
Select "Points" ![]() selection mode (Ctrl+Shift+G). Press "+" key on keypad (Polygons|Points) Now, using right mouse button put
six points on "Face" view as shown on the pic.
Do it "from bottom to top" direction, it's
important note, direction of spline has meaning.
selection mode (Ctrl+Shift+G). Press "+" key on keypad (Polygons|Points) Now, using right mouse button put
six points on "Face" view as shown on the pic.
Do it "from bottom to top" direction, it's
important note, direction of spline has meaning.
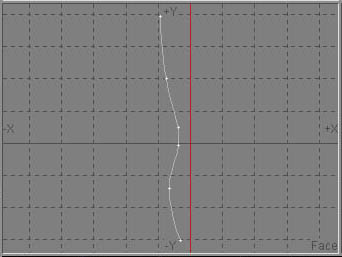
Press Ctrl+P (Tools|Make) to make spline.
Now we need to "mirror" our spline, to do that
press Shift+V (Multiply|Mirror) to select "Mirror"
tool.
Click in the "Face" view and make axis appear
as vertical line, then press "Enter" or right
click mouse.
Now we have 2 symmetrical
splines lying in the frontal plane, we need to create
anoter two splines in a "side" plane. Easiest
way to do that is copying and rotating existing ones.
Select "Poligons" ![]() selection mode (Ctrl+Shift+H). Add second spline to selection
using Shift key. Press "C" (Copy) then "V" (Paste). Go to
the top view, point cursor between splines and press "R" key (rotate 90 degrees).
selection mode (Ctrl+Shift+H). Add second spline to selection
using Shift key. Press "C" (Copy) then "V" (Paste). Go to
the top view, point cursor between splines and press "R" key (rotate 90 degrees).


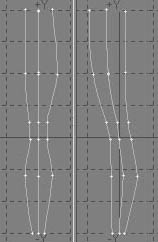
Okey, now we have all splines what we need. We need to shape them as leg. Select "Points" selection mode again (Ctrl+Shift+G). Press Ctrl+T (Modify|Drag) and move points to make contours look like a leg.
Now we going to make
actual leg.
Let's move our splines to any background layer, to do
that:
Press "X" to cut them of first layer then
press 2-key on keyboard not keypad (to make second layer
active) and press "V" to paste them. Now press 1 key to make first layer active,
then press Alt+2 to make second layer visible and active as
"Background".
Now we have to create polygon we will extrude along
rails. I think best choice is 7 points polygon, but you
can use more or less points one. Matter is
"Smooth/polygon count" rate.
Select Disc tool (Objects|Disc), draw small disk on the top view,
then press "n" key to call "Numeric"
options (Objects|Numeric), type 7 in "Sides"
field, press "Ok" then press Enter or right
mouse click.
Press "T" key (Modify|Move) and move this disc to the base of
the leg (bottom). Press Shift+A (Display|Fit Sel) to Zoom Selection (our disc). Now
we have to adjust size of the disc to fit splines. We
will use Move (T) and Stretch (H) tools for that. So move it and
adjust width of the disk with Stretch tool (H key) in Front and Left views. When done
press "A" key (Display|Fit) to view whole thing.
Time to make Rail
extrudion is came :)
Press Ctrl+Shift+R (Multiply|Rail
Extr), select
"Knots" and "Uniform" in dialog.
Type 10 in the field near "Uniform" button.
What does it mean? Uniform allows you type number of
subdivisions what you want, Knots makes LW allocate
subdivisions according to knots on rails, usually it
makes shape more accurate, well, better one time to see
then few times to read, so just try them both (use "U" key to undo). Well, press "OK"
and we have our leg almost done :) If for some reason you
have all polygons flipped, just press "F" key (Polygons|Flip) to flip them all.
If you aren't satisfied
with shape you got, just press "U" to undo, go to second layer (2 key), adjust splines with Drag
tool (Ctrl+T), then repeat Rail Extrusion again.
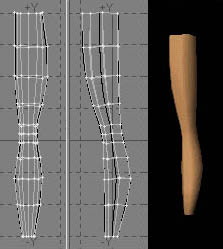
If you look on preview you
see that we got two 7-points polygons on top and bottom
of the leg shape. We need to delete them, as far as they
won't render with RenderWare anyway. To do that select "Poligons"
selection mode, press "W" key, press small "+" button near ">4
Vertices" field to select them then press "Delete
key". Close "Polygon statistics"
window.
Now we have to make joins, i.e. separate leg on two
parts.
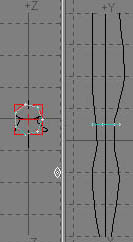
Use "Volume" selection mode,
press button to make it read "Include" ![]() . Draw rectange around lower joint
as shown on the pic then press "X" (Cut) key, then "V" key (Paste). Now
we have them separated.
. Draw rectange around lower joint
as shown on the pic then press "X" (Cut) key, then "V" key (Paste). Now
we have them separated.
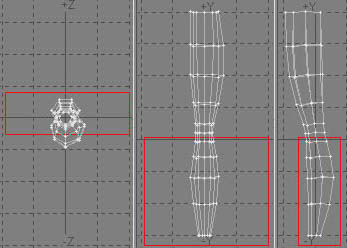
Now we need to create
"hinge-like" heads for joints. Let's do it.
Select any polygon(s) on "Upper leg" joint,
press "]" (Display|Sel
Conn) key to
select all connected polygons, then press "-" key on keyboard (Display|Hide
Sel) to hide
selection. Now only "Lower leg" joint left on
the screen. Select "Include"
selection mode, Draw rectangle around "lower
leg" joint as shown on the pic, you need to leave
points on the top of joint out of rectangle. Press "-"
key again. Now only seven point left on the screen. Press
"A" (Display|Fit) to fit. Select "Points"
selection mode (Ctrl+Shift+G).
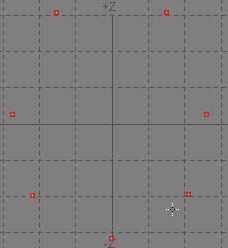
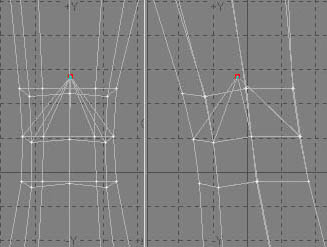
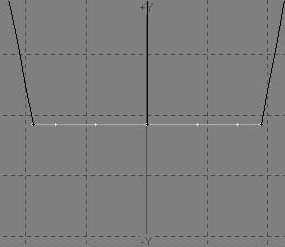
Go to "Top" view
and select points with clockwise direction (use Shift
or just press and hold mouse button while selecting) Go
to "Tools" tab, press "Custom"
button and select LW_PointExtender, now
press "T" key and move
points up a bit, then press Ctrl+Shift+W (Tools|Weld) to merge them, now press "\" key (Display|Unhide) to show all thing
hided before, press "T" key (Modify|Move) and adjust position of that
"welded" point, press "A" key to fit. Okey,
we have "lower leg" joint done. Do same with
"upper leg" joint.
![]()
That's all :)
I hope it will help you a bit.
Please e-mail me if you have suggestions about grammar, spelling, phrasing, how to make it more "understandable". Leftover