Softimage
Tutorial: Control Panel
This tutorial will show you how to set up a simple
control panel using expressions. You can take these ideas and modify them
for your particular character. I welcome
any comments or suggestions.
- Get -> Primitive
-> Cube
- Scale it to .2, 1, and .2
- In Ctr mode, move the center to the top
of the cube. This is the bicep of an arm. Or maybe it's the pendelum in
a clock, I don't know.
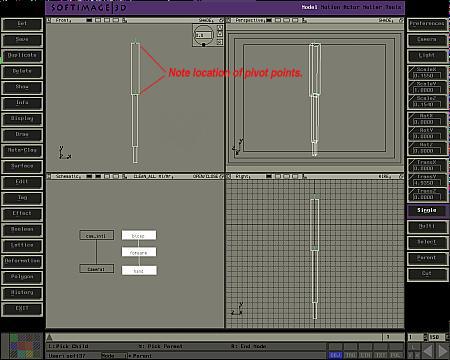
- Duplicate the object, translate it down
in Y and scale it slightly so it looks like this. Call it forearm. Make
bicep the parent of forearm.
- Add a hand if you like, the same way you
added the arm. Make forearm parent of hand.
- Now if you branch select the bicep and
rotate it in Z, the whole arm should move like a stick, (locked).

- Get -> Primitive
-> Sphere, size 1. Name it arm_flap. This will be your arm control
slider.
- Translate it out of the way of the arm.
Go to Effects -> Freeze Translations
- Go to Motion mode. Select the bicep object.
Go Expressions -> edit.
- In the affected element box, enter bicep.rotz
- In the expression box, enter arm_flap.etrnx
* 10.
- Click O.K.
- Now select the arm_flap shere, and move
it in X. Note how the arm object rotates.
- Select the arm_flap sphere again. Go to
Model mode, Info -> Transformation Set-up.
Select Trans and check X, User Defined and DRG.
- Activate User Defined Transformations
from the Preferences menu.
- Now when you select the arm_flap
element, (in single mode), the X translation is automatically selected.
- Get another sphere, move it out of the
way, freeze transformations, and call it elbow_flap.
- Select the forearm object, and in the
expression editor, in the affected element box, enter forearm.rotz,
and in the expression box, enter elbow_flap.etrnx.
- Now, moving the elbow flap slider moves
the elbow.
- Select the elbow_flap sphere. In
the expression editor, make the affected element elbow_flap.etrnx.
- In the expression box, enter at_frame
(Fc - 5 , arm_flap.etrnx) * 4
- Now try moving the elbow_flap slider.
You can't because it is locked to the arm_flap slider.
- Move the arm_flap sphere. The whole
heirarchy still moves like a stick. There is no extra rotation in the elbow.
That's because your at_frame expression requires that the referenced
object have some animation.
- Select arm_flap object again, and save
a keyframe in X.
- Go to Motion mode,Fcurve
select -> Object -> Explicit Translation -> X
- Go Fcurve edit ->
Expressions. (Note: The source controlling object must have actual
keyframed animation. You cannot enter an expression from the Motion
-> Expression dialogue box, or the affected elements won't move.)
- In the dialogue box, enter sin
(Fc * 10 ) * 5
- Now play the animation. Note how the arm
swings, and the elbow has a slight lag as it swings. Try changing the value
after the Fc in the expression. See how the lag changes. Note
how the elbow_flap ball lags behind the arm_flap ball.
- Now, lets add a switch so we can make
the elbow move automatically, (with the bicep), or manually, (independant
of the bicep).
- Get -> Primitive
-> Cube. Scale it, move it out of the way, freeze transformations,
name it Switch.
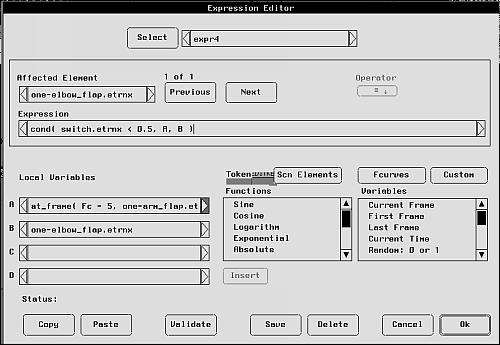
- Select elbow_flap sphere. Go to
Expressions -> Edit. Copy and paste the
existing expression in the Affected Element dialogue box to Local
Variables B. Copy and paste the expression in the Expression dialogue
box to A.
- Now replace the expression in the dialogue
box with: cond (switch.etrnx < .5, A, B)

- Click O.K.
- This expression says: If switch is less
than .5 in X, (off, or set to auto), then use the value of A, which is
the value of the bicep rotation, plus the offset, (the Fc - 4part
of the expression.) If the switch is more than .5 in X, (on, or set to
manual), use the actual value of A, which is the elbow's actual rotation
value.
- Now go back to the animation. Play it.
Move the switch back and forth in X. Note how the elbow is linked to the
forearm when the switch is set to Auto, (about zero in X), and how it you
can manually control it, (or even animate it) when it is set to manual,
(about one in X). Now it's up to you to build a pretty interface for this
thing. See the hints below.
Animating
Transitions Between Automatic and Manual
Sometimes you will have to have your character
go from full automatic to manual. For example, maybe the wings of your
character are flapping nicely in Automatic, and then you have to have your
character wave one arm.
Go to the frame that you want to begin
manual operation. Select all the sliders and icons that you will be animating
from that frame on, (lets say frame 50). Save a keyframe here. Now go to
the frame where you want to begin the transition from Auto to Manual, (say
frame 40). Save another keyframe here. Now go to the object that switches
between Auto and Manual. Go back one frame, (frame 39), and save a keyframe,
(should still be set to auto). Now go ahead one keyframe, (frame 40), move
your switch to manual, and save a keyframe. Now you can go to frame 50,
and move the individual sliders so that the character's arm is in the position
it should be after the transition. When it's all said and done, you should
have a smooth transition between frames 40 and 50, (auto and manual).
Hints
and Tips
- Multi-select all components of your control
panel and go into Info -> Mental Ray. Deselect
everything so that your panel won't render if it happens to get in the
way.
- I moved my panel -400 units in Y so that
it would be out of the way of any action, and won't clutter up your view
when working. Save out a viewport preset so you can return to your panel
quickly and easily.
- Use named selections, (Select
-> Set Named Selection), so you can quickly and easily turn on
and off your control panel. With SP1, you only have to select the Named
Selection Icon, and then h + u on the keyboard to turn the
display of Named Selections on or off.
- As I mentioned before, use the User
Defined Translation option under Info -> User
Defined Translations. Make sure to select User Defined Translations
in the Preference menu too. That way, when you select a slider in
single mode, the appropriate translation channel will be automatically
selected.
- Select the parts of the panel that you
don't want to be able to select, then go to Select
-> Selectability -> Toggle Selection. Now when you select
your sliders, you can't inadverdantly select frames and such in your control
panel. Unselectable icons are represented in the schematic with a box around
them. Of course, they can still be selected in the schematic window.
- Of course, instead of using geometry as
I did to make your interface, you can use an image map. I found it took
too long to load on my O2, so I've gone with geometry.
- All of these constraints and expressions
will slow down your interactivity somewhat. I have also noticed a problem
occasionally with the animations updating properly when command-line rendering
when you have a lot of expressions.
This
page by Sean Lewkiw.
Copyright 1998, Sapporo Japan.
To Top
