Visit Harry for more details, PCB layout, Performance specs
FM
Transmitter circuit kit ham free project spy FM bug how do I
FM Transmitter Kits for
Beginners
09th July '99
We all gotta begin somewhere :
So far I have been reviewing PLL based FM Transmitter kits
in the 150-200$ range. These kits have PLL Chips and are
Microcomputer controlled. Definitely not what a school kid or
rank beginner would start of with.
I remember that I too began with a one transistor AM Transmitter when I was 14 years old. In those days, there were no FM stations in my country and most Radios available did not have an FM Band. That one transistor circuit taught me a lot of the basics of transmitting, and because of its lousy characteristics, forced me to understand what was missing and why the fancy circuitry of the professional gear was necessary.
The humble 1-3 transistor FM kit has a place, even if it is only to act as a low cost, high excitement kit that entices hobbyists into learning more. I am therefore pleased that Cana Kits of Canada and DIY Electronics of Hong Kong have submitted me some of their low end kits to review.
One :
Basically an FM Transmitter has to have a Voltage Controlled
Oscillator (VCO) stage. This is a high frequency oscillator whose
output frequency changes based on the voltage applied at a
particular control point. If you feed the VCO directly with a
microphone and also connect an Antenna to its tank circuit, you
have the classic one transistor FM Transmitter circuit.
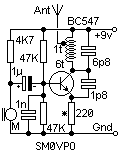
|
One Transistor "FM Bug" Courtesy Harry
Lythall SM0VPO Visit Harry for more details, PCB layout, Performance specs |
Many beginners wonder how Frequency Modulation is achieved in the basic one transistor circuit. One has to realize that the frequency of oscillation depends upon the Inductance in the tank coil and all the capacitance in parallel to it. This normally includes a 2-15 pF tuning capacitor plus a hidden component - the internal capacitance of the transistor. In low frequency circuits, one ignores the 2-20 pF internal capacitance of the transistor but you can see that it is important in 100 MHz circuits as it's value is of the same order as the tuning capacitor.
When you speak into the microphone, that presents a voltage signal to the transistor's base. This makes the transistor work at a different point in is operation curve. Here it has a different collector voltage and current; and interestingly, has different internal resistances and capacitances.
Now we see the light : An Audio voltage input at the oscillator will change the Amplitude and Frequency of the oscillations because of the changes in the transistor's internal resistances and capacitances. So we will get an FM and an AM component. However the VCO is normally driven so hard that its output is clipped at both ends. The VCO transistor is acting more like a switch. This means that the AM component is very small. In any case, the FM receiver will not react to a small AM component. So we are left with a basic circuit where the Audio voltage controls the oscillation frequency, in other words an FM Transmitter !!
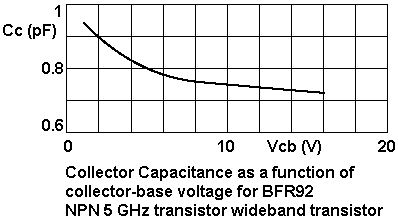 |
This graph shows how Collector Capacitance varies
against Collector-Base Voltage. The Graph is for a
Philips BFR92 5GHz transistor. Hence Cc has small values
in the range of 0.7 - 0.95 pF while Emitter Capacitance
Ce is about 0.5 pF. For a BC547 general purpose
transistor, typical values would be about Cc = 1.5 pF and
Ce = 11 pF. We can see that an Audio signal at the base would alter Cc, changing the oscillation frequency. Cc and Ce are temperature sensitive. |
The problems with this one transi circuit are -
A) The internal capacitances of the transistor
also changes with the temperature of the transistor. The tuning
capacitor also changes values slightly with temperature. So one
experiences a slow frequency drift till the transmitter reaches
thermal equilibrium with it's surroundings. This can take 5-10
minutes. If one does not use a closed box for the transmitter, a
draft of air can shift the frequency of operation after thermal
equilibrium is reached.
B) We already recognize that changing the
transistor's operating point changes the internal capacitances.
If one is using a transformer power supply, any slight hum will
directly modulate the oscillator. If one is using batteries, the
frequency of operation shifts as the battery runs down. This
effect is called "Frequency Pushing".
C) The Antenna has to be connected either
directly to the tank circuit or via a small sniffer capacitor.
The Antenna now forms part of the tuning circuit. If you approach
the antenna, the frequency of the oscillator shifts slightly.
This effect is called "Frequency Pulling". ( Infact
some circuits use this feature to make a movement detector or
metal detector )
D) Sometimes the Mic does not present sufficient
Audio input to modulate the VCO to the maximum allowed 75 KHz. In
this case, even if the carrier signal is strong enough to reach a
receiver, the low modulation means a weak, noisy signal.
E) There is no "pre-emphasis" applied.
F) The one transistor circuit can only output a
miniscule 1-5mW RF signal that possibly travels 10-20 meters, due
to limited power supply voltage, limited modulation, very loose
coupling with the Antenna. (There are ways to make the One Transi
circuit go 200 meters, but then you land up with a highly
unstable circuit that will forever keep on changing its output
frequency)
After the initial adrenaline rush of hearing one's voice across the ether wears off, the more technically inclined get to work in removing the above deficiencies.
Two is better than one :
If you decide that the above circuit does not have enough Audio
modulation, you can add an Audio stage before the VCO to amplify
the Audio signal. You now have the basic two transistor circuit.
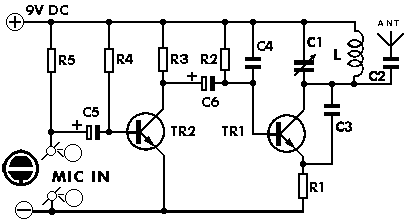 |
Two Transistor kit by Smart Electronics,
Greece Typical range claimed : 100 meters in the open |
This circuit shows greater sensitivity to Audio input, but also runs greater risk in overmodulating the signal.
Three :
If you feel that the RF output signal is too low or that the
frequency changes too much when somebody approaches the Antenna
("Frequency Pulling") , then you need an extra
transistor acting as an Amplifier/Buffer.
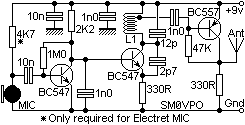 |
Three Transistor "FM Bug" Courtesy Harry
Lythall SM0VPO Visit Harry for more details, PCB layout, Performance specs |
The last stage offers about 10dB of gain, but more importantly, provides a degree of isolation between the Oscillator and the Antenna. This makes the circuit a bit more stable against frequency changes when somebody comes near the antenna.
Cana Kit's CK111:
The CK111
that Cana Kit sent me is a two transistor kit. The kit does not
have the first Audio stage, they drive the Oscillator directly
from the Electret Microphone. An Amplifier/buffer stage feeds the
antenna.
The Cana Kit came with excellent documentation in English and Francais. It showed all components pictorially for ease in identification and even listed the color bands on each resistor used. It had basic tips on kit building , step by step instructions on what to solder in next and a complete circuit diagram. I wish the documentation had a little bit of theory or explained circuit operation. The PCB and all components were of high quality. Thankfully the capacitors were very easy to identify.
My 6 year old daughter built the kit in about 45 minutes, under my supervision. It worked first time.
The CK111's main tuning coil is 6 turns of copper wire wound around a small ferrite slug. It comes pre-built, even with the tap on the third turn. All you need to do is plonk it in and solder it. As the coil was correctly designed, we could immediately tune to the recommended 90 MHz without any fuss. We could get a range of about 30 meters around our building ( some turns and one wall) which makes me believe the 200 mtr range claimed for open spaces. As the kit uses up only 25mA at 6V, I am sure that it can be easily altered to get the 500-1000 mtr open space range that Harry gets out of similar circuitry biased to use 50 mA at 9V. It might need a different output stage though !
The suggested antenna is a piece of wire a quarter of a wavelength long , about 83 cm ( supplied with the kit)
We found the Electret mike to be very sensitive and it was very easy to overmodulate the transmitter by speaking close to the microphone. This justifies Can Kit's decision not to use an Audio stage. Looks like an Audio Limiter or Automatic Gain Control (AGC) is totally necessary for a bug so that it can pick up whispers at 3 metres, without overmodulating when someone speaks 10 cm away from the Mic.
As the kit does not have pre-emphasis, the radio receiver unnecessarily de-emphasizes all the high frequency content leading to a slightly boomy bass voice. On top of that, the Electret mike is fairly directional so if you do not speak directly into it ( when used as a room bug, for example), it catches a rebound from a wall which makes the voice boom even more. Besides this boominess, the Audio was very clean with no noticeable distortion.
Cana Kits inform me that they have just released a new version of this kit, which features an on-board Mic as well as an RCA input to connect to a Walkman. One can choose between the two inputs by a Jumper. I hope that kit has pre-emphasis as that's totally necessary when transmitting music.
The Frequency of operation shifts about 100 KHz initially till circuit reaches Thermal equilibrium, after which it is quite stable. We have not yet run its battery down but I am sure its frequency will change slightly as the batteries go weak. If you change the antenna characteristics a bit by folding up the antenna wire, the transmitted frequency can shift by as much as 400 KHz.
All in all, an excellent kit for a rank beginner who will be amazed when he firsts conquers the air waves.
DIY Electronics' Kit
32:
Don't be fooled by the title of this kit "Two stage
FM Transmitter". While it does have two RF stages ( A
Colpitts Oscillator and an Amplifier/buffer), it also has an
Audio stage. So it could possibly lay claim to being a three
stage circuit, very similar to Harry's 3 transistor circuit shown
above. The only difference is that Harry uses a broadband last
stage while the Kit 32's final stage has to be tuned.
The Kit 32 fits all the three stages unto a small, well designed PCB measuring only 17mm x 70mm. The resistors are stood up on one end to save on PCB real estate.
I found the Kit 32 quite easy to build as the instructions are sufficient. To aid novices, the documentation lists the color codes of each resistor used. The documentation included some basic description of the circuit and a complete circuit design. DIY posts the PDF of their kit's documentation online so you can check out exactly what you are buying into before you put your money down :) I wish more kit manufacturers would follow DIY's lead. ( Kit 32's PDF)
The DIY Kit 32 is well constructed and designed. All necessary components are supplied except the two optional capacitors needed for changing FM frequency range and for loose coupling the Antenna. It took me about an hour to build. It worked first time. The coils needed are pre-wound but you need to attach a center tap to the tank inductor yourself. Though I'm OK on soldering, it took me about 15 minutes to accomplish that simple task to my satisfaction. Maybe if I had a conical tip soldering rod instead of a wedge.....
The Audio stage makes Kit 32 so sensitive that it can easily over-modulate if you whisper closely, while it also picks up quite a bit of unwanted noise. Any slight over-modulation results in extreme distortion in the FM receiver. Maybe a variable gain control pot or instructions on how to adjust the Audio gain would have been nice.
Lack of Pre-emphasis : As with most other simple FM bug circuits, the DIY Kit 32 did not have Pre-emphasis, leading to a boomy bass voice.
Range : DIY claim that upto 1 Km range can be achieved with 9V and the supplied half wave antenna. They claim even more range with a 15V supply and a Dipole Antenna.
Tuning the Kit 32 is an interesting exercise because of many factors -
Tuning Range : The Kit 32 cannot tune to the whole FM band as built. Components are supplied to tune from 98 to 105 MHz. You can, of course, change this a little by compressing/expanding the tuning coil but to reach the lower ends of the FM band, you need to replace the 10pF tank capacitor with a 27pF ( Not supplied, I wish it was)
Sensitivity of the trim cap : I found that moving the trimmer cap plates by 15 degrees shifted the frequency by about 3 MHz. That is very sensitive indeed and you need a very steady hand to reach your desired frequency of operation.
Thermal stability : As with all free running oscillators, the Kit 32 shifts frequency of operation till it reaches thermal stability. Here is my test data -
| Cold Start | 104.10 MHz |
| After 2 Min | 104.00 MHz |
| After 8 Min | 103.95 MHz |
| After 15 Min onwards | 103.90 MHz |
| After blowing on the circuit | 103.95 MHz |
Frequency Pulling : Though the kit does have an amplifier stage which also provides a measure of buffering, one can easily see the effects of Antenna loading as explained in point C above.
DIY suggests a piece of wire that is half a wavelength. This works out to be a 160 cm long wire (supplied with the kit) which makes it pretty hard to conceal if used as a bug.
As an aside, some kits suggest a quarter wave antenna which is only about 83 cm long making it much more manageable. The half wave and quarter wave antenna actually need a good ground plane to operate ( 3-4 radial wires about quarter wavelength long), which such kits do not have so I am uncertain on which antenna is better when used in this way.
Other kits suggest any odd piece of wire, maybe only 20 cms long, like what you see at the base of wireless mikes. The idea is that you do not want a well matched antenna as better match = more effects of Antenna loading.
Here's my data on Frequency Pulling on the Kit 32 -
| Kit on table, Thermally stable and Antenna wire in straight line | 103.90 MHz |
| Holding the unboxed kit in the hand | 103.45 MHz |
| Kit on table, Thermally stable, Antenna wire folded up a bit | 103.80 MHz |
Above was done with the 1/2 wave antenna as suggested. When I cut the Antenna wire to a more manageable 1/4 wave, I found that folding the Antenna wire would change the frequency by upto 2.5 MHz !!!!
The documentation suggests that a 10pF coupling capacitor ( Not supplied, I wish it was) be connected in front of the Aerial. This would make the coupling of the last stage to the antenna "loose", giving you greater stability at the expense of range.
Frequency Pushing : Though the kit comes with a snap-on for a 9V battery, DIY suggests that you can use upto 15 V to get maximum power. As with all such circuits, the frequency of operation will shift with power supply.
Here's my data :
| New 9V battery delivering 9.4V and 25 mA | 103.90 MHz |
| Older 9V battery delivering 5.5V and 11 mA | 102.20 MHz |
From the Cc versus Vcb graph above, we see that lower Collector-Base voltage = more Collector capacitance. We know that more capacitance in tank circuit = lower frequency of operation.
As Kit 32 opted for a tuned final stage, it can only output maximum power when the output stage is tuned to the exact frequency of the oscillator stage. DIY includes a "Peaking Circuit kit" along with Kit 32. This consists of diodes and capacitors to rectify and sample the RF voltage at the output. One of the inductors on the last stage has to be expanded/compressed for maximum voltage readout on a Voltmeter connected to the peaking circuit. DIY recommend this is done with the peaking circuit in place instead of the real antenna. When the circuit is peaked, the antenna wire can be replaced.
As the last stage has to be tuned for the correct frequency of operation (which shifts with power supply, temperature and Antenna loading), it is best to attempt tuning after the kit is boxed and correct power supply used. You need to wait for thermal stability, make a little change to the Inductor, move away from the kit, wait 2-3 minutes, look at the Voltmeter and decide what to do next. All the while, you have to have a radio receiving the kit's signal so that you know you are peaking the right signal.
Oh yes, I forgot to tell you, changing the inductance on the last stage alters the operating point of the last stage, which now presents a slightly different impedance to the oscillator stage which, you guessed it, makes the oscillator output a slightly different frequency.
And when you connect the real antenna back again, .............
All that reminded me of one of Einstein's theory about the very act of trying to determine where an atom is at a given moment changes where the atom was. Tuning such kits is like hitting a moving target with the added problem that when you hit the target, you move it even further and then they tell you it was the wrong moving target anyway !!
I took the easy way out. The kit's documentation said that "almost certainly the (last stage's) coil turns have to be spread very far apart" so that's exactly what I did. One day I will alter the final stage's tuning circuitry and replace it with a resistor, making it more like Harry's last broadband amplifier/buffer stage shown above. I am not sure that the output power at desired frequency will be much different between the two options, I only expect the tuned last stage to have much less harmonics than the broadband stage.
Bottom Line : Both the Cana Kit CK 111 and the DIY Electronics Kit 32 are well designed kits, easy to assemble and appropriate technology for rank beginners. In the end, if well built and boxed, you have workable FM bugs with atleast 30 mtrs of very clear reception inside buildings and maybe 200-1000 mtrs out in the open. Getting to your desired frequency of operation and staying there will be a major challenge.
They performed exactly as can be expected from circuits of their class and are guaranteed to raise further interest in features most noticeable by their absence in such simple kits.
I would think such kits make ideal presents for all the 6-16 year old nephews and nieces you have. If you also help them build the kit, you have a great excuse to spend some "Quality time" with the kids. And who knows, you just might have started one of the kids on the road to become an RF Engineer ?
Wanna have your own page here, write
about your own experiences, own review, refute existing review,
add comments to existing review, publish your circuits ?
Contact
me
My
review of the Broadcast Warehouse 1W PLL Exciter with LCD 08 Aug 1998
My review of the WaveMach
FMS2 Stereo PLL Exciter 20 Dec 1998
My review of the Mighty
MAX-1 FM Exciter 02 May 1999
Page started on 09 July 1999. We have had page loads
since counter reset on 15 May 2000.