macramé on line
The On-line Magazine Exclusively Dedicated to Macramé
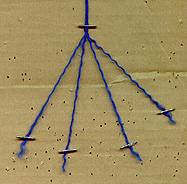
Because the proportions of the number of clove hitch diamonds around ring 6 and ring 6 do not match, (in part due to the way in which light blue lines were added, and in part due to the width of all the clove hitch knots within each clove hitch diamond, and in part due to the way the lines were added to ring 6—resulting in the clove hitch diamonds not being exactly square) and due in large part to the way the lines will be clove hitched to ring 7, a slight bulge will develop outward in the lower external layer when tied to ring 7. This bulge is a predetermined effect, calculated into the overall pattern design, and not a design flaw (It was designed to appear as a wicker basket—the bulge, and the color scheme in combination.). Most 3D fills are concave when they are tied. This one is deliberately convex.
Tying off the clove hitch diamonds is in reverse to building the perimeter, with a twist.
The lines are tied to ring 7 in the following manner: clove hitch lines 1, 2, 6, 7, 8, to ring 7. Next, bring line 5 under lines 6, 7, 8 and clove hitch it to ring 7. Now clove hitch lines 9 and 10 to ring 7. Lines 3 and 4 are not tied at this point, but are left loose. Tie in like manner the rest of the lines to ring 7.
Begin any where along ring 4, and tie a square knot chain of 3 square knots.
With about 6" of fishing line, thread both ends through a natural colored bead’s central hole, leaving a loop at one end, and two loose lines at the other. Feed the two ends, up about 3 or 4 inches from the loose ends, of the last tied square knot’s anchor lines through the fishing line loop. Pull the two loose fishing lines until the two anchor lines are fed through the bead. Pull until both anchor line ends have passed through the bead, this will also free the fishing line such that it can now be removed from the anchor lines and set aside. Pull the bead up to the last square knot tied. Wrap the decorator lines from the last tied square knot around the bead, and use them as decorator lines for a square knot below the bead, using the fed lines through the bead as anchor lines. Grasp lines 1 and 2, one to each hand. Using line 1 as an anchor line, and line 2 as a decorator line, tie one half hitch. Next tie one half hitch using line 2 as the anchor line, and line 1 as the decorator line. It is important to tie the two alternating half hitches in this order, i. e. inside out, then outside in, as it will cause the lines to flare out when frayed. Leave the lines loose for now, as they will be frayed later.
With the next 4 lines, either right or left, it does not matter, on ring 4 following the square knot chain just tied, tie a square knot chain of 5 square knot. Tie 2 alternating half hitches to the ends in the same manner as with the square knot chain with bead described above. Leave the ends loose, as they will be frayed later.
Tie in like manner this 2 square knot chain set around the rest of the lines of ring 4, i.e. one square knot chain of 3 square knots with bead, followed by one square knot chain of 5 square knots without bead, followed by one square knot chain with 3 square knots with bead, followed by one square knot chain of 5 square knots without bead, etc.

Begin with the first 4 lines next to any main anchor line, and tie a square knot chain of 6 square knots.

Tie on a dark wooden bead in the same manner as described above for the light wooden bead. Tie off the ends with like manner, i.e. two half hitches, first inside out, then outside in. Leave ends loose for now, as they will be frayed later.
Next, tie a square knot chain of 10 square knots with the next 4 lines following the square knot chain just tied. Tie off ends in like manner, leaving the ends loose.
Use this 2 square knot chain sequence to tie the rest of the section, i.e. 5 square knot chains of 6 square knots with bead, and 4 square knot chains of 10 square knots without bead for each of the 4 sections of ring 5.

Bring the loose dark blue lines from behind ring 2 to the front. Tie a square knot chain of three square knots to each set of 4 lines.

With the right 2 lines from one square knot chain, and the left 2 lines from its adjoining square knot chain, tie a square knot chain of 3 square knots about half way down the exterior layer of the upper section. Be careful not to pull the upper square knot chains to one side or the other while tying this square knot chain. Repeat the process around the section.
Repeat the process except bring the square knot chain to about 3/4 the way down the exterior layer of the upper section.
After the third row of square knot chains of 3 square knots each, tie on a natural wooden bead, in like manner as above, except no alternating half hitches, to each square knot chain. After securing the bead with a square knot, extend the square knot chain another 9 square knots, and tie on another natural wooden bead to each chain. After securing the 2nd natural wooden bead with a square knot, tie 9 more square knot to the square knot chin. Finish the ends with 2 alternating half hitches which flare as above. Leave the lines loose, as they will be frayed later.

Begin with any set of 4 consecutive light blue lines, and tie a square knot chain of 5 square knots. Tie on a dark wooden bead, and finish with 2 flaring half hitches.
Tie a square knot chain of 5 square knots with the next 4 consecutive line, consisting of 2 light blue and 2 dark blue lines. Tie on a natural wooden bead, and finish with 2 flaring half hitches. Repeat for the next set of 4 lines.
Repeat this 3 square knot chain set around ring 7, until all the lines have been tied which are on ring 7.
Tie a half hitch chain to just below the level at which the flaring half hitches are tied above to the sets of 2 loose lines behind ring 7.
All standard knitting yarn is 4 ply, i.e. it consists of 4 individual strands. The first step in fraying is to separate these strands. Grasp the last knot tied in one hand, and with the other hand, spin the yarn until the 4 strands are straight. With a finger nail, separate one of the strands out, and pull away from the other strands until all the interconnecting fibers which hold the strands together have been broken. Be sure to separate the strands all the way to the last knot tied. Repeat for the other 3 strands.
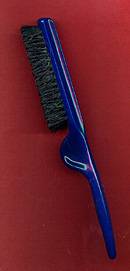
With a hard bristled brush (which is becoming hard to find—it is bad for the hair, it splits the ends, and unduly stretches out the hair!), carefully brush out the loose strands. Be Very Careful!! It is possible to completely brush away all of the fibers. You should only brush the strands until they are just frayed and then stop.

Cut all loose ends from rings 4, 5, and 7 to approximately 4 inches past the last knot tied. Un-braid the strands. Grab the last knot tied with one hand, and fray the ends with the other.
Congratulate yourself for a job well done!!!
Visit our sister sites at:


![]()
|
|
![]()