You might want to print this out so you can
follow along with me !!
This was made by the Scotsman and if I knew his URL....I could give him credit for it.
I asked for it and he does not have an URL that he can give out. So I decided to
make
this Stained Glass Tutorial and share it with all of you.
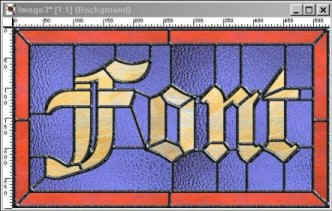
At this size, you can only get four letters on the image but you need it that large to get
good results. be sure you keep text image away from sides of graphic about 3/8 of an
inch so it has room to grow when you erode it.
Convert (almost!) any wide font to outline or hollow for use in stained glass design
Skill Level: Intermediate & PSP+ BladePro needed
This tutorial will take you through the steps necessary to
convert a solid font into an
outline font and then into the basics of stained glass design. There should be
accompanying links at the bottom that supply any needed unusual filters.
Foreground color: black
Background color: white
New image: (example) 600 x 300
Image type: 16.7 million (24 bit) colors
Background color: white
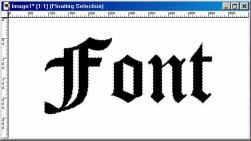
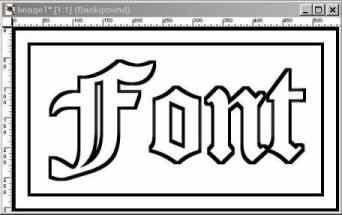
Select the text tool and click in the middle of your new image to open the
text dialog window.
Choose your wide font, remember, it has to be big enough to fill with glass.
Font name: (example) Cloister Black
Style: regular
Size: (example) 150 (you're right, it's not on the list, but wipe the entry number
and you can type in 150)
Checked: antialias, center, floating
Click ok to place your text. Move away from edges, if necessary, and leave selected.
Invert selection.
Pulldown menu: image/other/erode. Repeat for a total of 5 times. If you like a
thicker looking leading, erode the image more. Some fonts may have features
that grow closed when eroded more.
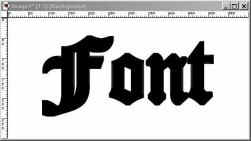
Invert selection.
Pulldown menu: edit/cut.
Deselect your image.
Do you have a nice thick black outline? Good - have a cookie and
a glass of milk.
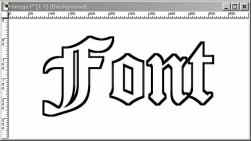
To finish a sign or window panel....
5 erode steps results in a line width of about 5 pixels. Set the width of your
lines and shapes to about 5. If you made your outline thicker, increase
your line and shape width.
Crop down the image.
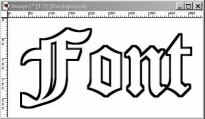
Reverse foreground/background colors.
Add borders: symmetric
Width: 5
Reverse foreground/background colors.
Add borders: symmetric
Width: 20
Reverse foreground/background colors.
Add borders: symmetric
Width: 5
You should now have good text and borders.
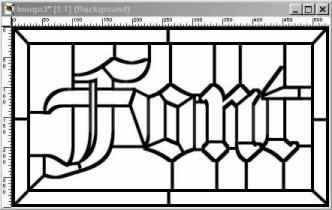
Those of you who have had the pleasure/torture of building real stained glass
know that you must divide your desired picture or design into many pieces so
that is physically possible to cut the glass into a shape that will not break in the
wrong places after you've used a glass cutter on it. This results in a lot of extra
lines in your designs, but this effect should be copied for a realistic result. Your
intended picure or disign will be defined by the colors you fill with... but we only
have to cut virtual glass (whew!). If you feel that the extra lines will
"detract"
from your design... don't use as many lines.
Reverse foreground/background colors (foreground: black).
Select the line tool, set to the thickness that matches the width of the font outline.
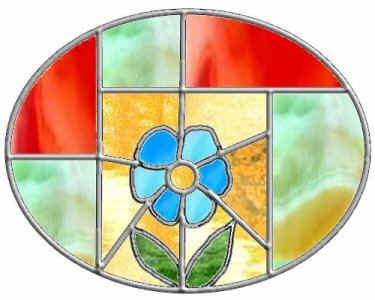
Now draw in your lines similar to example just below. Your design should be
similar to the one below.
Next, apply a filter that will give your image the look of lead channel or copper foil
that has solder smoothly flowed over it with a little texture. (Bright solder is usually
washed with a solution that turns it a dark grey "antique" color. There are a
number
of BladePro presets that will do this. One of the best is rlk_lead... you will need
rlk_lead.q9q and pi silver flare.bmp in your bladepro/environments and textures.
BUT an example of a standard preset that works is Bagatelle, with "tarnish"
turned down to 35.
To apply lead effect;
Select the magic wand tool,
Match mode: RGB value
Tolerance: 40
Feather: 0
Sample merged
Click ON any of your lines. If every last one of your lines gets selected by magic wand,
that's a good indication that you have have added enough lines to look realistic. If
something did not get selected, you can add more lines or shift/click, to select all
lines in your design.
Pulldown menu: Image/Plug-in Filters 1 (or 2)/Flaming Pear/Blade Pro.
Browse for the rlk_lead, or bagatelle, and click ok. deselect your image.
Download lead now !!
Lead
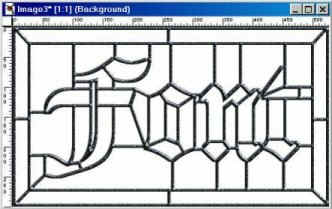
Better already huh? If your results don't look good to you don't hesitate to play with
all the settings, bmp's and textures (caution, this can lead to comatose drooling, and
missing time syndrome). Don't forget to click on save to disk, and name your leading
filter settings that took you so long to get just right in Blade Pro.
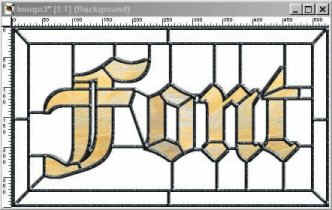
To get to the final example, We can fill with our glass samples.
You can obtain these at this site ::
http://www.Spectrumglass.com/Stocklist.html
There are no right or wrong colors as long as it looks good to you...
Next. I browsed three colors of glass, opened, then minimized them in PSP.
Select the fill tool and view its control palette.
Tolerance: 50
Opacity: 100
Match mode: RGB
Click on Options.
In flood fill options;
Fill style: pattern
Blend mode: normal
New pattern source: I chose a light color for the text itself.
Click ok.
Fill each section that makes up the text itself with your text color glass.
NOTE: If you see tiling lines in a section's fill, you might need larger glass
sample images. You can usually fix this line by undoing the fill that has the
tiling line, selecting the magic wand and selecting the section you want to fill.
Then switch to the fill tool and fill your section. Then select none, and
continue filling with the fill tool.
Here's the font color filled.
I think you get the idea...
"Play and Learn!"
Just below is my result from following this tutorial.
the only thing i did different is use Arial font at 125 size

I hope you enjoyed this tutorial as much as I did .....
:)
Hope
|
