| The
Restoration Journal -
|
|
2008-9 | 2006-7 | 2005 | 2004 | 2003 |
| Phase
7 - Sorting It Out |
|
|
| 02-21-2010 –Bed Liner |
|
I toiled over and over with what to do for the refinish of the bed floor and walls. I decided I wanted to be able to use the truck to some degree and paint would not be the most durable solution. I ended it up putting in a SEM truck bed spray-in liner. This way I would be able to haul my bikes or swap meet items with reckless abandon.
The photo below is a nice angle that shows the light texture the liner and the HD gauges. I really love driving this thing!
Not pictured I bought a Edelbrock Thunder AVS 800 carburetor and the proper calibration kit. I am still sorting it out but I have most of the off-idle stumble out of it making it real pleasant to just putter around with it now. Ill keep tuning it and finishing up little things as I can afford it. I need to fix a really bad rear main seal leak at least that is what I think is leaking


|
| |
|
|
| Phase
6 - Final Assembly |
|
|
| 01-04-2010 fix rear axle |
|
I pulled the rear axle apart since it was howling like a hound dog after the trip south. The pinion nut came loose so I simply pulled the assembly apart, checked the bearing over, put it back together, installed a new seal and stuck it back in locktited the threads this time :) no noise so far

 |
| 12-27-2009 the St. Pete Reveal |
|
In many ways this day far exceeded any expectations I had with sharing the truck with my family. My mom Barbara was shocked beyond words and could not hold back tears of joy in seeing her baby come back to life. My dad Hobe was proud as a dad can be in seeing it come back to life at the hands of his middle son. My older sister Ellen had a similar reaction as my mom did (I shed a couple tears as well with them both). Also in attendance was my younger sister Elizabeth and her two toddlers, Ellens adult daughters Jamie and Pauline and almost all of their kids. My friend Mike was the guest of honor along with Matt Simmons who manned the camera for most of these photos.
It was great day and I hope to share it with my two brothers Hobie and George and my other sister Mary sometime soon.
In the meantime here is a link to all of the photos from the reveal
http://picasaweb.google.com/simonsben/20091227_StPeteReveal#

Pulling into the original family driveway for the first time since the reneal - "BEAS" is the one in purple.

Mom and Dad seeing it for the first time, again.

Surrounded by family...

Sister Elizabeth (in pink) and nieces Jamie and Pauline.
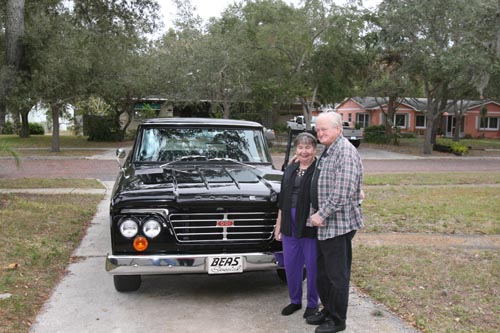
Hobe and Barbara in front of the BEAS Special.

a familiar pose...

Sister Ellen seeing it for the first time, again...

In front of the old Gulf Station where i grew up - it is now a private service station.

Corner of US 19 and Fla SR 121.
|
| 12-24-2009 ready to go |
|
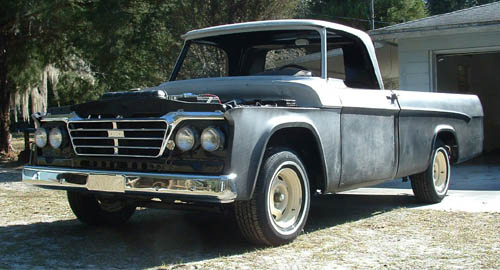
It is difficult to sum up the events of the past week. Mike and I repainted the truck bed and small parts, assembled the parts, Mike wet sanded and buffed the paint, and I added the chrome bits, had Gainesville Muffler install exhaust pipes.
The truck sure sounds nice and it looks fantastic. I drove it around town and shared it with a few people as part of a shakedown test drive the truck did great!
Here is a link to many more photos from this event - http://picasaweb.google.com/simonsben/20091224_WrappingUp#


|
| 12-13-2009 - More Progress |
|
I have the bumpers and lights on the truck now. It looks really neat like this!
With Kelleens help I was able to get the weather strip on the passenger door. I also installed the wipers and best of all the actually work!
Next up is exhaust, buff the paint and install the chrome


|
| 12-10-2009 - Windows and Bed |
|
Another fairly productive week and things are really starting to pick up speed now!
I installed the side glass my self and all I can say is that is sort of love hate type of thing to do. The results are quite gratifying but the process is so incredibly stressful. Concerns about scratching the paint of the glass are really high along with the chance of breaking the glass. Yeesh. It well though with only one minor issue with the drivers glass and winding down too far. Kelleen lent me a much needed helping hand with the regulators.
I also roped in some help from two of my neighbors Ian and Richard and my coworker Mike to help me put the truck bed on. It looks like a truck again! This is just awesome covered awesome with awesome filling and served with a side of awesome.


|
| Phase
5 - Body |
|
|
| 12-06-2009 - Busy coupla weeks |
|
First up I had the front and back glass installed in the old Dodge. It is so freaking cool to have NEW glass in it. I work just a few blocks from the glass shop so I mounted my bike to the frame of the truck and drove it over early one day during the week.
I plan on installing the side glass myself and then taking the truck back to Mauldins glass to have them put in the wing windows. Should be fun stuff.
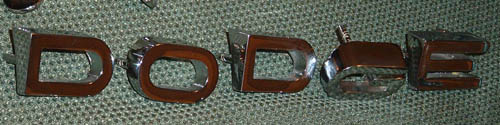
I also prepped the bed and tailgate letters for paint. And this past weekend Mike sprayed them all down. Taping the letters was tedious work but the results are so worth it.
I cant wait to get the bed back on just to see the tailgate in place!
Next up - put together the windows and put 'er all back together!


 |
| Paint Take 2 |
|
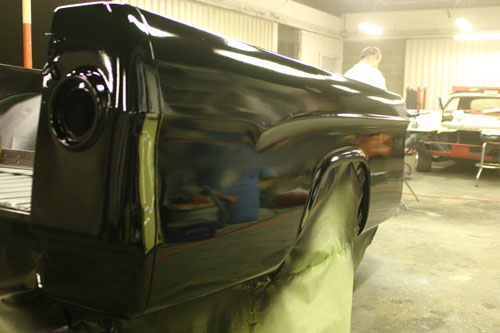
This time we has some success with the paint so much so that Ill block out the bed to match these results!
The next steps: getting the glass installed, put the door mechanisms together, polish and install some bright work, paint the tailgate letters and sort out the mechanicals by driving it!


|
| 11-2009 - Block Party |
|
Mike and I decided to block the paint down and put a few more coats on it. Mike plans to use his old school Binks gun this time so I am sure the results will be MUCH better than the crappy HVLP I have been using.
Whenever I have spare few minutes I have dropped by Mikes shop and sanded out the fresh paint
. I am getting really good at sanding the body panels on this truck!
.
|
| 11-2009 - The nightmare called Orange Peel |
|
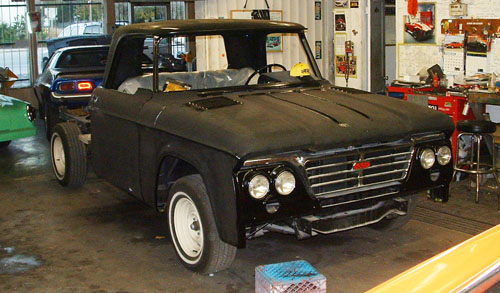
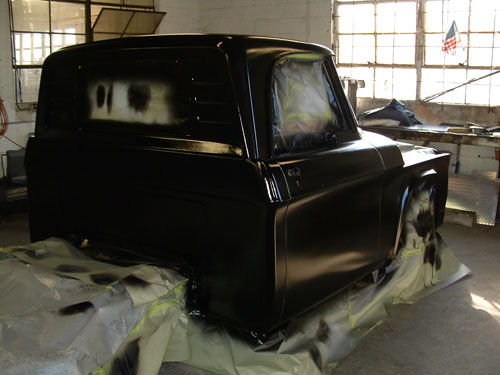
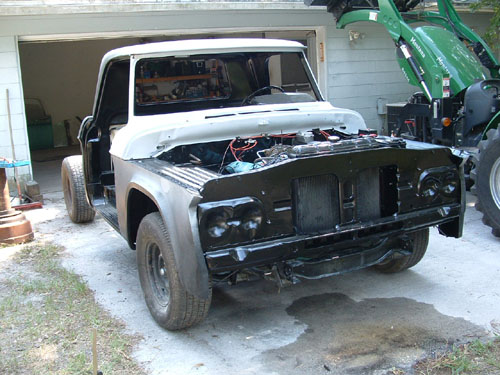
I spent this weekend taping the chassis cab, hood, tailgate and misc small parts up and painted it all black.
The paint would not lay down for me despite my best efforts and left me with the worst orange peel I can possibly image.
I used the same technique I used on the door panels (which turned out perfect) and did not get favorable results.
With the help of my friend Mike Nelson he swears it will buff out with lots of wet sanding. I guess time will tell. At least it is all black for the first time in 6+ years.


|
| 10-2009 - slow roll to completion |
|
The past couple months have been pretty rewarding.
My friend Mike and I painted the bed in the final single stage urethane paint gloss black, I polished all the stainless trim and hubcaps, I painted the door panels, rear view mirror and bracket, and the sun visor arms all in mustang grey, and I painted the under side of the hood in gloss black.
The hood did not turn out as well I would have liked with all the orange peel and runs so I loaded it up with 5 coats of paint and plan to sand most of it out and buff it up.

The trim polished up very nicely with cheap polishing wheel and buffs. It is a very time consuming process and you have to give it your full attention at all times or it will snatch a piece of trim and bend it up. Dont ask how I know this.

The door panels and other parts I painted with the grey paint turned out very nice. I think I finally hit on the right combo of pressure and flow for my cheap-o HVLP gun. Now if I can get the rest of the paint to flow out like that!
Finally, I installed all the tags on the doorjamb. The Data plate and VIN tag were pretty straight forward as they are held in with pop rivets. The SERT sticker is a reproduction and its sticky back is quite tenacious and the sticker curls on itself if youre not careful. I was able to mark it out and it installed without a hitch.
Next up is painting the cab, door skins, top of hood, tailgate, light covers and cowl grill wish me luck!

|
| 08-2009 - Update |
|
Wow, so much to report and I am not sure where to start. I have been plugging away on the body and finally have it all in primer. I also have a guidecoat in place and I am blocking it out with 320 grit. It is slow going for me but I am really enjoying the process and watching it finally take shape. My friend Mike is giving great advice as usual and he is looking to help me out in these final stages with the paint and final blocking.


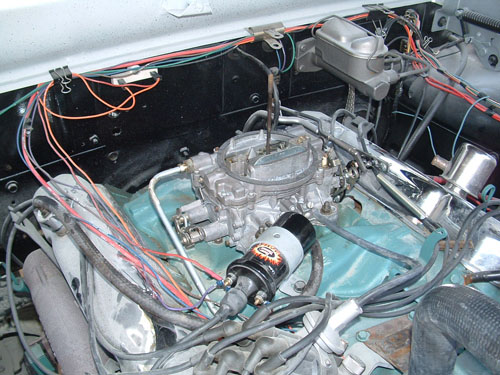
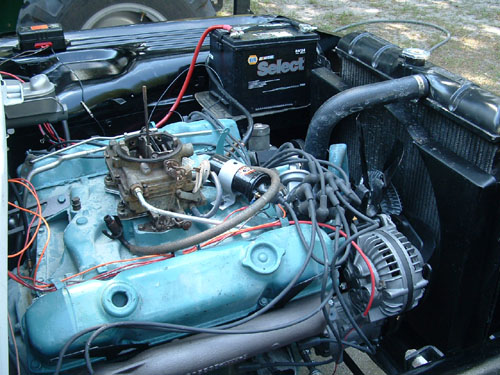
I let the truck sit for too long with gas in the tank and not starting it during this body work/primer phase - sure enough the gas went bad. It gummed up the fuel pump and the carburetor. I have wanted to deal with the carb issues for a while and considered buying a new Edelbrock AVS when Mike offered up a Weber AFB he bought at a swap meet. I took it apart to clean out some shelf wear, made a new adaptor for my linkage and stuck it on. I took it for a ride and all I can say is woot! It has that "AFB" sound I remember so well and itll actually get sideways when you floor it while it is trying to suck the hood through a column of corduroy. I was actually laughing when it pinned me in the seat and the speed got up enough to blow my hat off (still no windshield). Left a nice couple of patches out on the black top
a great way to cap a weekend!
There are many gremlins still to be reckoned with but the s*$$ eatin' grin is back. Thanks Mike!

|
| 04/13 - 4/18/2009 body work and trim holes |
|
I took the whole week off from work to work on the truck. Made some good progress in spite of a couple distractions details below.
starting with the second task was the focus of the week body work. I wanted to get the majority of the work done this week but found that was going to be much too ambitious with my feeble body skills being factored into the schedule. I did get the dents and rust smoothed out on the driver side, masked all the panels and then put on several coats of high build primer. This took about 40 plus hour to accomplish in spite of a couple distractions the roof on our house started leaking during a rainstorm! When the truck was finally in primer I fixed the leak - i should start a blog on home repair and horse stuff...


First on the list – the side trim. I had a tough time trying to figure out the best approach for this and came up with a pretty easy solution. I simply taped the trim to the sides and then ran tape above and below the trim to mark it. Then I cut the tape holding the trim up and marked each hole on the tape above. I then used a piece of card board the same dimensions of the trim but only about two inches long with the center marked. I then used a self-punching center punch to mark each hole and then drilled them with my Rotabroach hole drill bits. It worked like a charm.


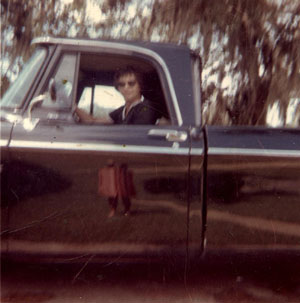
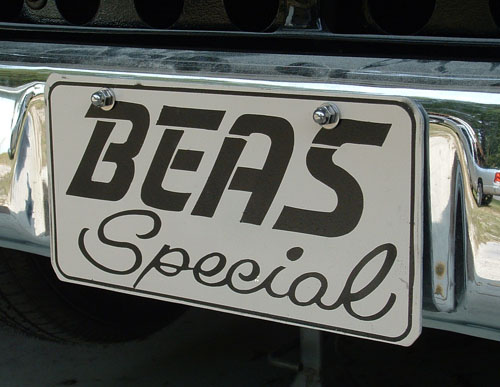
The other distraction was invited on my part my dad came up to the house with a friend name Mike Brady (one of my brother Georges high school buddies who I am sure helped burn the hides on the old truck once or twice isnt that what they are for?). They wanted to use an old wheel balancer my dad gave me a while back and he gave me a reproduction of the front plate he made when the truck was new. He called the truck BEAS Special back then and had a special tag made up to mimic the Dodge logo of the time. BEAS is my mothers initials Barbara Ellen Anderson Simons. For some reason I was not sure how Id feel about putting this back on the truck but when we bolted it on it just feels right. In his own way my dad is really excited about the truck and how it is coming together.
|
| 2009-03 - – Hood, Lights, AC and heater |
|
This has been a very productive month.
i have the new hood about ready for primer. I fixed the rust, most of the dents and have laid it on the fenders to check for any alignment issues. It looks fairly good for my feeble body skills.
I bought a Classic auto air under dash kit with hoses and condenser. It took a while to route the hoses and hang the evaporator but it looks pretty clean with the hidden compressor I put in while back.
I bought a new heater core from Butch Romig.
I also bought a new heater valve and figured out a way to mount it inside the heater box and still have it work with the dash controls. That twisted my brain a little but with a couple strategic holes in the heater core mounting bracket and case it functions as expected.
Finally, I finished up my chassis harness and have fully functional brake lights, running light and signals. I also added a 4-wire trailer plug in case I decide to pull something behind the truck in the future.


|
| 2009-01 |
|
The
UPS man delivered a nice care package from Chicago’s very own Andy
Mikonis this week. Andy was able to get all my emblems and both set of
mirror stems chrome plated for me – check out the photos below.
Everything look very nice and will match all the other plating I had done
down in St. Pete.
Andy also sent
along a 23 channel CB Radio. I have been mulling over putting a CB Radio
back in it. One of my earliest childhood memories in this truck was the
family road trips and listening to the truckers and learning the lingo.
This radio sure fits the era I am shoot for so I may have to find a place
for it next to the AC unit. If I do pull the trigger on the CB then the
next time I am down at my parents I will need to locate the old Fuzz Buster.
Ol’ Hobe had all the cool 70’s toys in this runner…
Still plugging away on the truck… I have most of the wiring figured
out and all the lights work with the exception of the tag lights. I am
working on a solution for that now since my original housings are just
shot. I don’t think they have ever been off that bumper until I
pulled them to have the bumper plated.
Sent Butch Romig the heater core to have it worked over by the master.
The radiator is still holding water even under pressure!


|
| 2009-01 |
|
since
September i have been busy on several fronts splitting my time on projects
that are fairweather safe and stuff i can do when the weather is not so
fair.
Hood - i have been
struggling with a decision on which hood to use. i have fixed most of
the rust on the original but there is a TON of body work left to do to
it that is probably beyond my skill level and event then will still look
bad. i bought another hood from Jeff Thomas that has much less rust but
has the dreaded drip rail dents. i was working on a trade for yet a third
hood but that deal appears to have not worked out. anyway i decided to
try my hand at bumping the dents on the second hood and to my surprise
i was able to get 90% of it out and not have it "oil can". i
am now in the process of repairing the little bit of rust on it and will
strip the paint when the weather is good.
electrical - i have
most of the electrical things sorted out - all that is left is the radio,
running lights and taillights. everything else is working including the
glove box light and cigar lighter!
Tires - i pulled the
trigger and bought a full set of tires for the truck - my air holders
were looking questionable. i bought a set of thin white walls on 70's
width to give the truck its sleeper looks again.i painted the old cop
wheels a light creamy tan. the tires were hard to find in the size i wanted
- 235-70-15 but Town Tire here in gainesville was able to accomodate my
needs. photos below. i plan on using the orginal style hub cap - 50s plymouth.
the white walls even met with approval from Kelleen!

|
| 2008-07
thru 09 - lots o' stuff |
|
July,
August and September have been busy months on the old truck project. First
of all I would like to say thanks for my co-workers Charlie and Mike for
their help in flipping my new truck bed over (twice). It allowed me to
finish stripping all the under coating and paint off and then let me prime
and line the bottom of it. It also allowed me to finish fit the maple
blocks in their proper location. I could not have done all that without
their help.
In addition to prepping the bed I mounted the headlights and wired up
that circuit. This was pretty challenging for me as it was a marriage
of the existing wires and the Ron Francis kit wires. I did not like their
suggestion of going straight to the back of the bulbs with the wires so
I spliced in one connection for each side using old harnesses I have from
two sets of lights. It worked well and everything looks very clean.
I also painted in the inner door shells and hinges along with the fasteners
for the doors. My neighbor John Reese helped me hang the doors. It was
quite tedious and he was a real asset to have his hands for this part.
The chrome bumpers, grill, valve covers and air cleaner came back from
the chrome shop here in Florida. Thanks goes out to my old buddy Matt
Simmons for picking up the chrome and dealing with the flighty nature
of the people saying it was all done and it was not. they did an ok job
on the polishing but did not treat the backsides – I primed and
painted them using Rustoleum semi gloss black.
All and all I am making great progress but as you can see I am just now
getting started on the exterior body work. The engine runs strong and
usually starts up on the first try after pumping the pedal twice. The
carb needs a rebuild but for $50 off ebay and just sticking it on it sure
runs well :o) I fixed a couple exhaust leaks along the way and had a couple
serious tranny leaks I repaired while it was up on stands. Thanks to Matt
Cook and his shifter cable I am back in business with better parts.


When salvaging
some struts off the rusted original bed to splice into the "new"
one I was looking at the underside of the old one. I was remarking to
myself how there were all sorts of buildup of dirt, oil, undercoating,
tar and other unidentifiable substances from years of driving. It is thick
stuff. I bet all this stuff could tell a story...
When I was looking in the wheel wells I noticed a much darker almost black
but somewhat softer undercoating. On further examination I noticed this
stuff extended well past the wheel wells and back towards the rear roll
pan... then it dawned on me it was melted tire rubber!
There is equal amounts on both sides - that sure grip rear works well...
I guess we put our fair share of tires through hell with that truck :o).

|
| 2008-06-15
- The Seat |
|
i
got the seat back last week and put it in this weekend – my neighbor
Richard Miles helped me put it in.
it turned out really nice. i am almost afraid to sit on it now. i guess
when i get a few grease marks on it it will feel more normal...
i ran the engine again this weekend affect effecting repairs on the water
pump and hooked up the gauges - everything works! tach, amp gauge converted
to voltmeter, temp gauge, and fuel gauge - they all work! yee haw! i tuned
it a little more to smooth out the idle - i probably need to rebuild the
carb to get it perfect.
Kelleen helped me bleed the brakes so i was able to drive it afterwards
- the rear tires spin easily with no bed on it. The left side exhaust
manifold is leaking at the pipe so I will need to figure out what is going
on with that.

|
| 2008-06-08
- It's ALIVE! |
|
I
was able to get the 440 wired and fired it up yesterday.
along with assembling to the front clip (minus the hood) i installed the
radiator and hooked up the transmission cooler lines and wired the start/run
circuits. it starts thru the key and even the neutral safety switch works.
i even wired in the fuel pump and crash senor/relay.
to say it freaking rocks to hear the sound of that engine and the angry
but elegant lope to the cam brings a heartfelt tear to my eye. the transmission
engages "D" and "R" as expected. i need to bleed out
the brakes and then take it for a careful spin around the yard... it still
does not have the seat installed yet...
the water pump is leaking and i need to wire up the gauges before i go
too far but this past week was a rounding success.
please excuse the painted valve covers as i dropped the chrome parts off
for plating.


|
| 5/2008
- Tach Sender |
|
One
of my many thoughts on this truck is I want a vintage look under the hood
and I did not want to put the modern mopar electronics under the hood.
I bought a pertronix ignition system for the old dual point distributor
so all that was left was how to hide the electronic voltage regulator.
I bought a Ron Francis wire harness and the kit came with a Ford regulator.
Since it was part of the kit I was simply going to hide it under the dash
but when cleaning up the Sun Tach sender I had a brainstorm. It looked
like the Ford regulator may actually fit inside the sender box. I had
upgraded the tach to modern electronics while keeping the vintage vibe
so the sender would be on the fender as a dummy anyway. So I dove both
feet in started measuring and broke out the dremel. The results are surprising.
I had to trim the corners of the regulator and cut a slot in the side
of the sender as well as “gut” the electronics out of the
sender. It seems like the camouflage will work quite well. I’ll
still run the original tach sender wires and the new regulator wires will
be obscured by the hood hinge.


|
| 1-2008
thru 4/2008 - mechanicals |
|
So
much has happened over the past four months that I don’t know where
to start.
I have decided that I will restore the truck to “owner modified”.
There is so much my dad, Hobe, has done to the truck that to remove all
of that in favor of some “factory restoration” would remove
the “soul” from this truck. I know I could be criticized for
not going “original” with this considering the extent and
length to which i am going with this project but I am building this for
me to drive and share with my family. We all have various stories that
are either shared or independent events surrounding this truck that it
would be in my mind “incorrect” to correct these deviations
from stock. I am also doing stuff in the vein that old Hobe would do something
– improve its functionality and dependability. He added the ‘70
front axle with bigger brakes and sway bar to improve the stopping power
and handling. He also added the ‘68 rear axle so it would be easier
to service the brakes over the tapered axle of the original. He added
AC so it would be more comfortable. He also put in a four-core radiator
and an external transmission cooler. I plan on retaining these things
or enhancing them slightly to keep more of a late 60s early 70s vibe to
the truck. I ditched the 8 track that old Hobe cut the dash in favor of
an original AM radio. In a concession to safety I put in a double pot
master cylinder and disc brakes up front. When funds permit I will send
in my extra AM radio to have it converted to modern electronics AM/FM
with inputs for some sort of audio device.
Concepts aside here are updates on my latest progress.
Brakes:
The brakes are complete and just need to be bled.
I had to fabricate brackets to mount the hoses for the disc. I could have
used the original hole in the frame but the hoses would have twisted slightly
in each hole when the wheel turn left or right as the holes down't match
the hoses. I was not willing to let the brake lines get stressed over
that. So I fabricate little brackets that are under slung on the frame
and then filed a grove so the hose would “lock in” and fit
perfectly without allowing any twisting. It took a while.
I adapted a 1986 D Series proportioning valve and hid it between the second
and third frame cross members. I had to fabricate a bracket to mount it
on and more importantly I used existing holes – no new holes drilled
into the frame. One deviation from stock: I ran the right front brake
line across the fourth cross member instead of the factory location on
second member. The second member is the removable spanner that accommodates
the 727 transmission. I did this in the event the transmission would need
future service – this way the brake line would not be in the way
when the spanner would be removed. Using the fourth member was the logical
choice since it was riveted into place and the third member supports the
transmission mount and is removed to effect removal of the tranny.
Cab:
Progression on the cab has been slow. I have placed the knobs and switches
in each hole. This way they are out of the way and in a “safe”
place. I also located a rubber floor mat that fits perfectly. The texture
is not correct but it sure looks nice. I sent the original seat out to
be reupholstered by Robert Philpot here in Gainesville. Dan Goldhardt
sent his material down to have a duplicate made as well. Thanks to Chris
Alexander for his leftover fabric!
I rebuilt and painted the heater box. I still need to find a control valve
for a model 86 heater and send out the core to get it repaired. Butch
Romig did an excellent job on the radiator so I will send the core to
him when funds and priorities free up.
Steering:
I used the power steering system I bought from Ki Martin but the lines
would not work on my truck. Luckily Ki used hydraulic lines for tractors
so I bought the burrs and bent my own metal lines. I had to have two hoses
made and I think I shaved a few years off my mental capacity working on
this monstrosity. What I have is not perfect but it should be very functional.
I may revisit the lines later as I am not satisfied with the end results.
Either way my total cash outlay for the system is about $300 which includes
all new hoses the rebuilt ram and control valve from Ki. I realize this
is not original but this reflects my concept of sticking with what my
dad would do to the truck.
Fuel System:
Since I am planning on running a hidden ac compressor I can not use a
mechanical fuel pump. In it place I need to run an electric pump that
is compatible with the old AFB carb. I found a Mr. Gasket pump for a good
price and decided on the best location. Additionally I had a liner put
in my gas tank. For some reason old Hobe painted the tank an off white
so I went back with color rather than try to restore to original. I ran
all new lines for the fuel system. This was not nearly as painful as the
steering lines or brake lines but close. I found the carb on ebay –
this is what my dad always described as the style he replace the boggy
original with. Should be kinda neat to hear an old AFB on the truck again.
Carb Spacer:
I was having trouble locating the orignal relacement .25 inch phenoloic
spacer for the AFB. As a last resort I made one out of aluminum sheet
metal. It is not perfect but at least when I find the right one the linkage
will line up and work with little compromise.
Proportioning Valve.

Brake Line Mount - anyone have a frame bumper like this in better condition?

Heater box and knobs...

Drive shaft with new
u-joints

Engine is close to
being ready to fire!

NOS mufflers - old
pipes will be replaced later on. Note the rear hangers will be removed
when the tail pipes are installed.

Fuel pump - Note: no
new holes drilled. i made a braket to accomodate placement.

Power Steering lines
and brake setup... need one more hose for return.

This is Tom's fix for
the dog-bone ends of sway-bar.

Power Steering lines
- note brake hose braket.

|
| The
Restoration Journal - |
|
2008-9 | 2006-7 | 2005 | 2004 | 2003 |