|
Raising Baby Turtles |
|
Steampunk Terraqueous Etagere
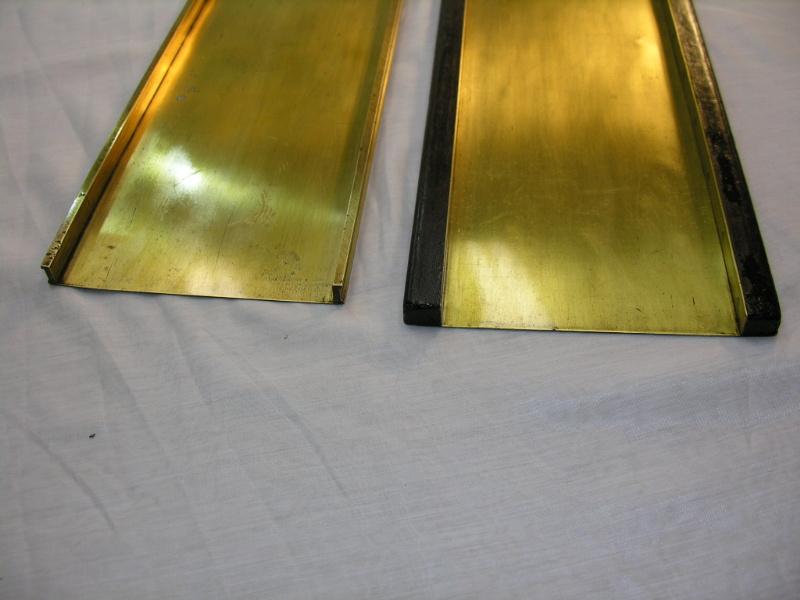
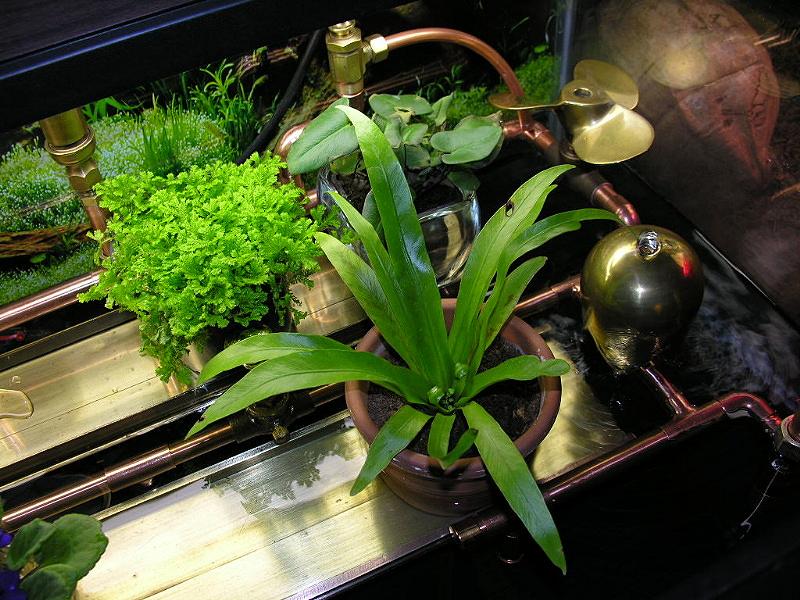
Some time ago I purchased two brass letterpress trays on eBay for a use having nothing to do with turtles. One is all brass construction and one includes wood in its construction. Both are about 6" by 24". They could easily be 100 years old. They were very tarnished and grimy when I got them. I cleaned and polished them and coated them with clear gloss lacquer. Take look great. Recently I was looking for another 24" long letterpress tray to set plants on next to a window above a vivarium. A lot of four 4" by 24" brass letterpress trays was available on eBay so I decided the additional three trays would give me something new to experiment with in turtle aquariums. I purchased the four trays at a reasonable price. When they arrived I was immediately pleased that I purchased them. There were two each of two different construction techniques. I set them aside for time to think about how I would use them and then decided I would use one tray as a plant stand inside a turtle's aquarium. The design is very simple. I used four pieces of half inch copper tubing three inches long as legs attached at the corners using super glue. Originally I planned to use the tray right side up but ended up turning it upside down to accommodate wider pots. The stand sets just under the water surface. On it I placed small potted plants using heavy ceramic and glass containers purchased in thrift stores for the pots. | pic 9 | pic 10 | pic 11 | pic 12 | pic 13 | pic 14 | pic 15 | pic 16 | pic 17 | pic 18 | Before I even placed
it in the aquarium I realized that I had just built a very elementary steampunk
stand and that I could not stop there. I also realized that after I build
a more elaborate steampunk design I would have several new techniques to
share with you. Even though I was pleased with my new plant stand, I could
not stop thinking about a grander steampunk design.
Some
background:
In Tour 13 Using Brass and Copper we presented our reasons for using brass and copper. Copper prevents the growth of algae in aquariums and is anti microbial, does not foul or discolor the water, and copper and brass are easy to work with. When we remove copper and brass items from aquariums for cleaning, there is no algae or slim on them. We simply dry the pieces with a cloth towel. The rich dark natural patina developed both below and above the water is earthy and natural. In Tour
22 How Much Space for Pet Turtles we discuss the creation of environments
for turtles as a hobby. All the space inside an aquarium is our hobby space.
To a turtle plastic is just plastic. It may look like a rock or log but
it is just something to climb on. Many domesticated turtles may never have
even seen a real rock or log so why would they recognize plastic shapes
as what they mimic. Therefore, we can make our aquarium furniture look
like anything we like as long as it is serviceable for the turtles. At
least that is the way we see it. So to create places to set potted plants
inside a turtle's aquarium, I built a brass plant stand.
More
background:
I like copper, brass, and bronze items and working with brass and copper. I like them with their natural tarnishes, various patinas, and polishes. Most polished ornamental brass is lacquered to keep it from tarnishing. I also like the high quality high gloss brass plating finishes common on items manufactured today. The term "steampunk" is often used in ads for brass and industrial items to attract attention because the items may have no other useful purpose. Steampunk is a reference to a fantasy style set in the 1800s during the golden age of steam power featuring lots of brass and futuristic designs like you would find in a Jules Verne novel. It is a mix of brass and other metals, dark woods, and Victorian patterns. Steampunk designs are more ornamental than functional or practical and usually overdone. While most steampunk designs do not appeal to me, the use of brass, dark woods, and industrial items do. I am also cheap.
I am sure I spend less on my turtles than most people. I enjoy sharing
ideas on TurtleTails.com for making unique furnishings for turtles
that cost very little. I find it much more interesting to visit a thrift
store than to visit a pet store. Many of the creations you see on TurtleTails.com
have been made for the purpose of illustrating techniques for you. I pride
myself as being an out-of-the-box thinker and I am sure it shows. And I
must tell you I had a lot of fun making this steampunk terraqueous etagere
for me and W. W is a spotted turtle and my buddy. And yes I enjoy shopping
on eBay for good deals and unusual items.
The
name:
The shelf sets just under the water so the plants are very close to the water. For most plants this requires pots with no drainage holes in them. The shelf in the water would also be suitable for small bog plants which I plan on trying. Terraqueous means consisting of both land and water. Land is represented by the plants and the stand for the turtles to climb up on. An etagere is an
ornamental stand with shelves. Etageres are often included in steampunk
decorating and are frequently made of iron pipe or copper tubing. So the
title of this tour describes perfectly what I planned on making.
New
techniques used:
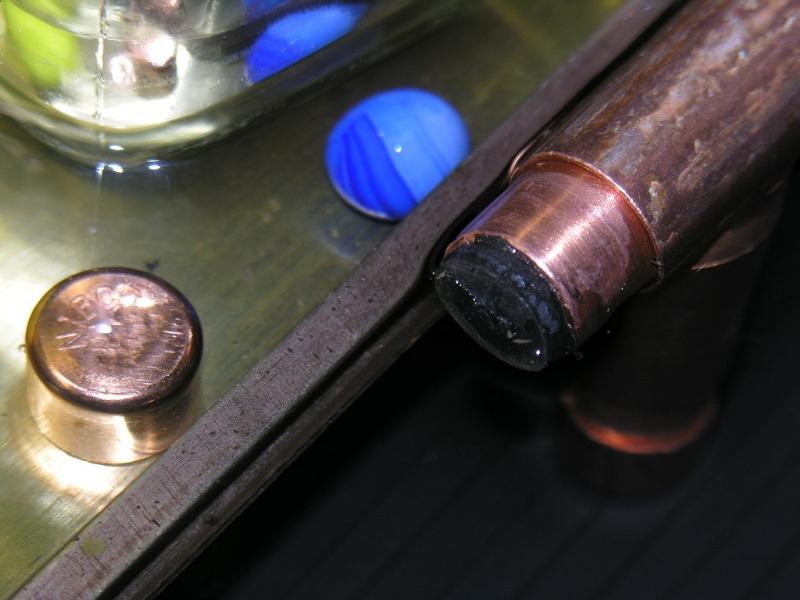
I use super glue not solder so it is easy enough for everyone to use this technique. Super glue is very fast setting which does not allow much time for adjustments. If a joint sets too fast and is not aligned properly, the joint can be heated with a torch and broken just like a soldered joint and with less heat. Then the glue can be removed from the parts by scraping or with sand paper and the parts reused. Super glue can also be applied to the joint after the parts are together and allowed to draw into the joint by capillary action like soldered joints. The use of copper tubing inside an aquarium immediately raises the possibility of piping water around to create fountains and trickles of water much easier than with plastic tubing since the copper tubing is rigid. Whether you want to create a steampunk design or not, copper and brass plumbing fittings can be combined to direct and control the flow of water. It also requires testing and tinkering with the design which is easy to do with brass and copper. For the shelf material
there are many materials that will work. For long shelves lengths of copper
tubing can be laid side by side and lashed together with copper wire or
glued together. Ceramic and stone floor tiles can be cut for shelving and
come in many attractive colors. Thick glass especially colored glass will
work but will need to be cut by a glass dealer who can also grind the edges
smooth. Thick acrylic will work and can be fabricated to add stiffness
if required. If you purchase items like the letterpress trays, make sure
they are brass or copper and not steel or aluminum.
The
Steampunk Terraqueous Etagere:
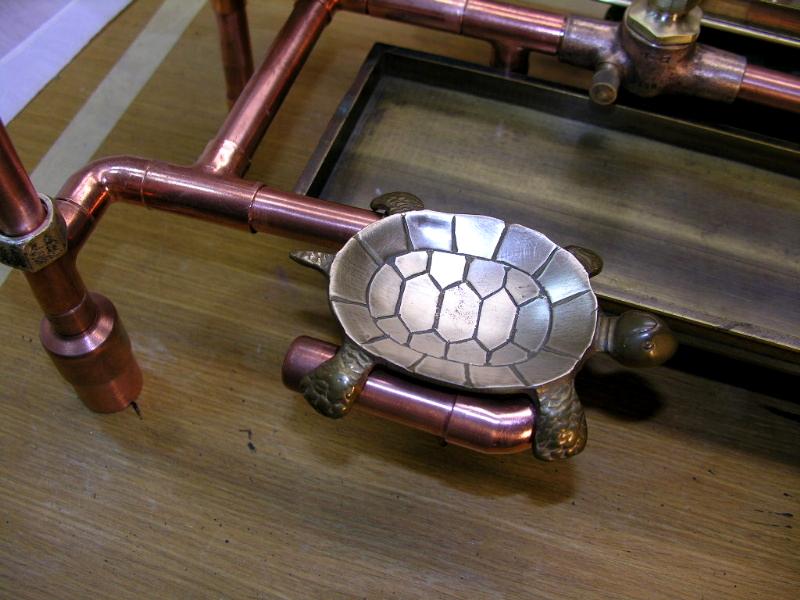
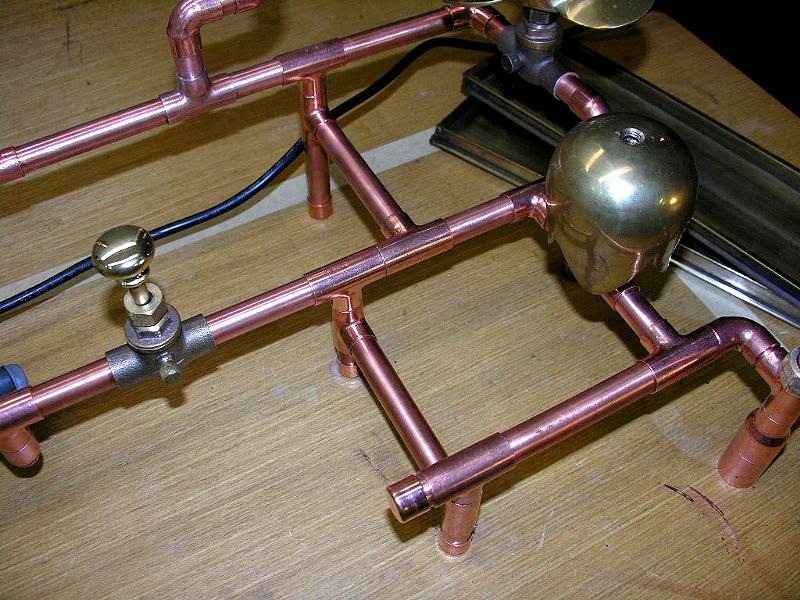
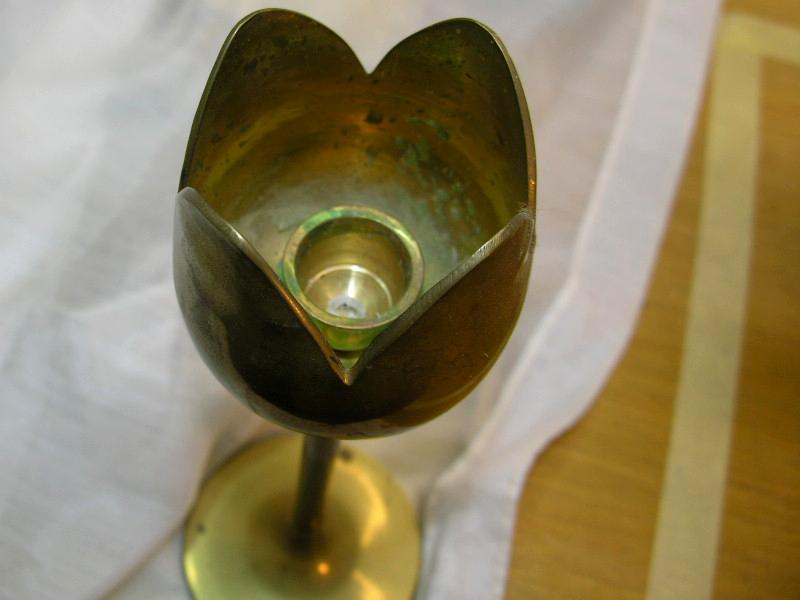
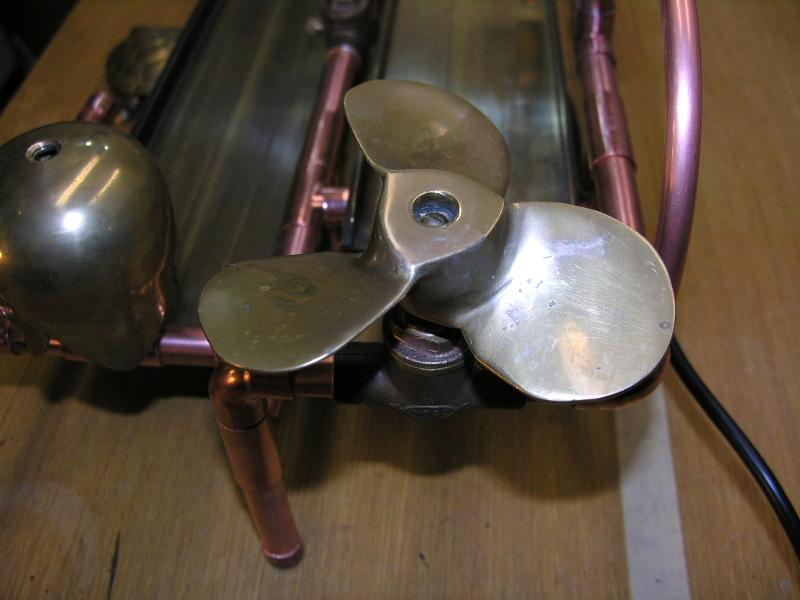
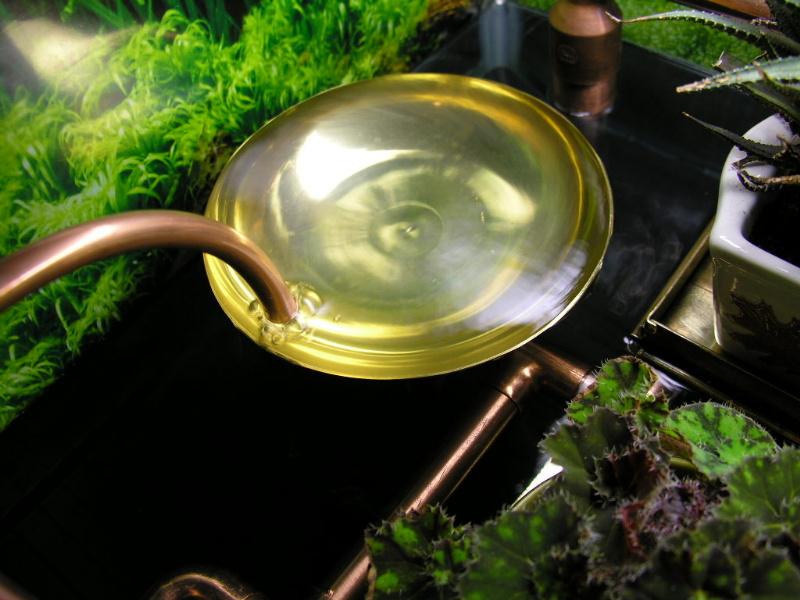
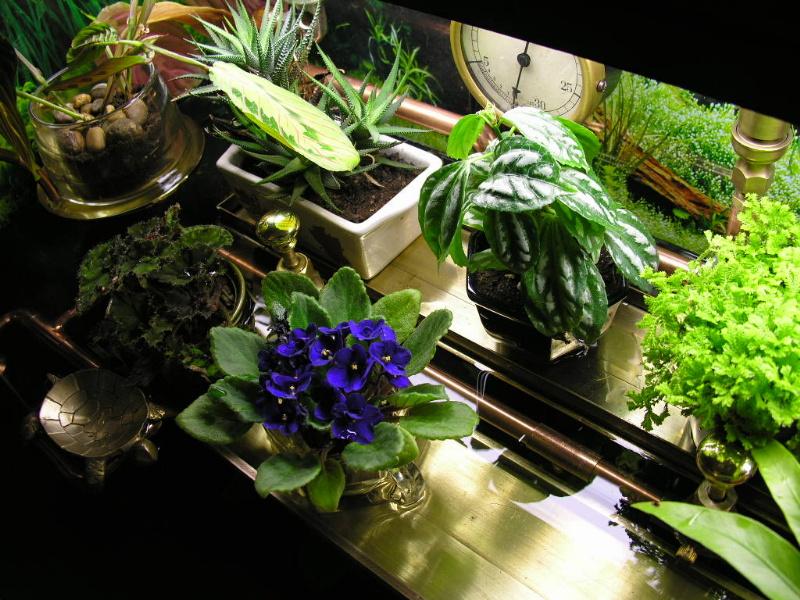
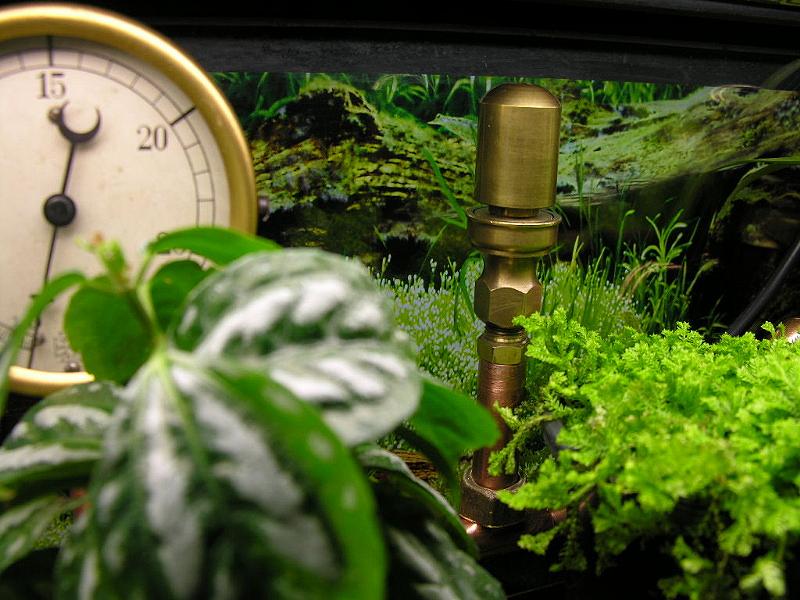
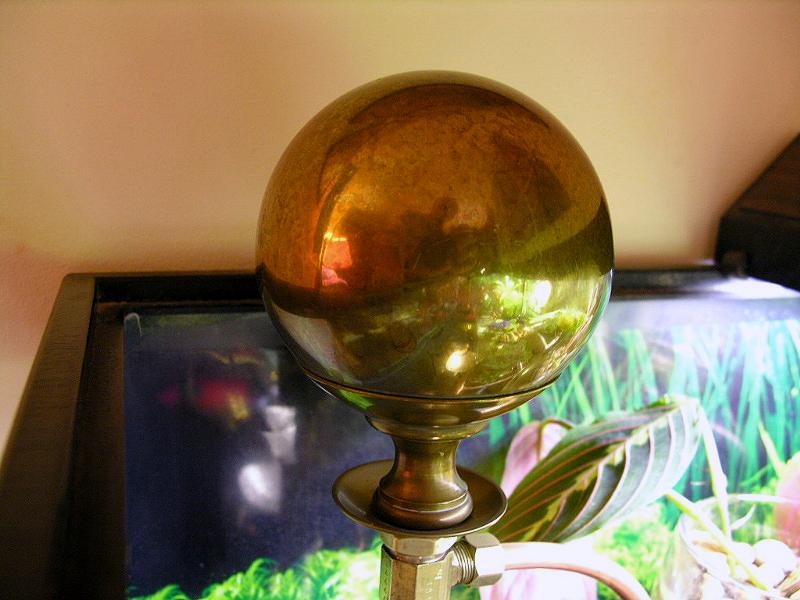
Salvaging copper and brass is like discovering treasure. No matter how crusty and covered with solder they are, they shine when cleaned and have a vintage look. Since we are working inside an aquarium, valves and connections do not have to be water tight like household plumbing. What we need are good mechanical joints. I used tape to make an outline of the aquarium on the workbench and then began to see what I could make out of the parts. I first tried to make a stand using a 4" wide letterpress tray. After many configurations I switched to a 6" wide letterpress tray. Then I progressed to using two 4" wide letterpress trays in a stepped design. One tray would be just under the 4" deep water and one just above the water. This progression in design took about two weeks. During the time I was playing with the design I was also on eBay bidding on components like the pressure gauge, small oiler, and brass drawer pulls I used as valve handles. I also looked for items at my local outlets and searched my house for more. The aquarium I would be using was the limiting factor. It is a 30 gallon breeder tank 36" wide by 18" deep by 12" high. The width and depth are good but the 12" height is very constraining especially since I planned on using the existing strip light which sets directly on top of the tank. I also had no plans to decorate the tank or the light in steampunk style. So everything in the back of the tank had to fit under the light and within the tank. In the front I did extend above the top of the aquarium. I did not take pictures during construction because I was making changes constantly. Here is the completed design on the workbench. | pic 19 | pic 20 | pic 21 | pic 22 | pic 23 | pic 24 | pic 25 | pic 26 | pic 27 | pic 28 | Not everything is glued together. Elements that set vertically do not have to be glued which will make removing the etagere easier when it comes time to clean the tank. Most of the elements are recognizable. The bubbler is from a candle holder that is shaped like a tulip and is simply turned upside down. Four valve handles are draw pulls and one is a propeller. The round dish and the turtle dish are not secured. The caps on the bottom of the legs are not glued on either so that water can be drained out more easily when cleaning the aquarium. | pic 29 | pic 30 | pic 31 | pic 32 | pic 33 | pic 34 | pic 35 | I finally found a good use for the spheres that I mounted on the front posts. They were one of those things I liked when I came across them and they were reasonably priced. They are attached to the caps of valves through the valve stem holes. This makes good mechanical joints. The discs under the spheres are from candle holders. The spheres extend above the top of the aquarium. The valve in the back discharges water horizontally to create circulation. Several of the valves are used to balance the flow of water or shut it off. Rubber stoppers were also used to block water from flowing through several of the tubes. The
reveal:
| pic 41 | pic
42 | pic 43 | pic
44 | pic 45 | pic
46 | pic 47 | pic
48 | pic 49 |
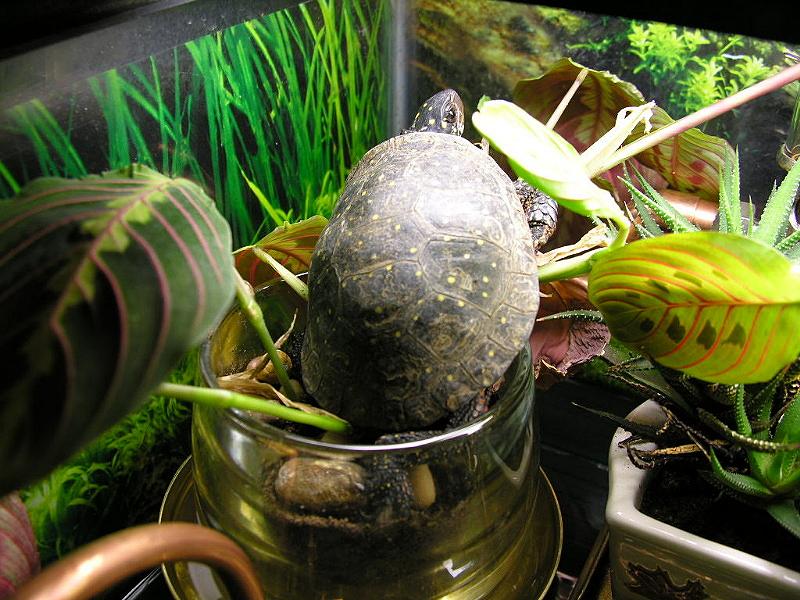
For an additional punch of color I added some marbles. They were originally purchased to see if any of our turtles would play with them. You can read about turtles playing in my opinion "Turtles Can Play". Three days later W did what was fully expected. He climbed up and sat on the highest plant. He is small and will not be too hard on most of the plants. This is his winter environment and he is expected to use everything in his aquarium. After all he is more important than any of the furnishings I put in his aquarium. I will take it as his approval which means I have met our four criteria for housing turtles. And I will enjoy growing plants in his aquarium knowing he may climb on them. While the brass
and copper are nice and shiny in these pictures, I will allow them to develop
patinas naturally. I am not sure how well lacquer will hold up in the wet
environment but I will find out since I am sure the round dish is lacquered.
Everything can always be shined again if necessary.
As always I hope I have inspired you to think well beyond anything you may find in a pet store and in ways you will probably not find anywhere else. If you do build something we have inspired, we would love to see pictures of it and hear your story even if it has snakes, lizards or amphibians climbing on it. If you came here by way of an internet search on steampunk, you may enjoy our other behind-the-scenes tours. You just don't know what you may find here. |
|
|
 Steampunk on TurtleTails.com ! This is going to be a long story
to tell; I have a lot of explaining to do. It will help you understand
this story if you have read all the previous tours on the
Steampunk on TurtleTails.com ! This is going to be a long story
to tell; I have a lot of explaining to do. It will help you understand
this story if you have read all the previous tours on the 