Fleece Hats, Blankets and Baby Fleece Ponchos

Home | Ribbon Blankets | Fringy Fleece Hats | No Sew Directions for Fringe Hats | No Sew Baby Poncho
Fringy Fleece Hats

Perfect to use with those extra pieces of leftover no sew blankets  you might have sitting around.

Bear with me, this is my like second time making them lol The first time I made it I just used one piece of fabric and made a seam along the back of it. So I AM VERY RAMBLY (But its not hard at all) READ ALL OF THIS BEFORE YOU START but I'm making it up as I go so really, do what you want! LOL


YOU DO HAVE TO SEW HERE, but only 2 sides, about 10" each side.
 
***Note: For closed top hats, you're going to need to make it longer to fit on top of their head***

ins.jpg

 
#1 Get a piece of fleece, fold it half with stretchy sides going across, wrap it around your subjects head adding  about 1" total afterwards to the measurement for the seam. In figuring out how tall to make it, fold edge up about 1" (for the brim) and measure from where it is on the head with brim up, to where their head ends, about 3 or 4" up. Add about 6-8 inches for fringe.
 
#2. cut down the middle to make two pieces of fabric if you want seams on both sides, or  make one seam in the back by just cutting the leftover that was hanging as you measured around subjects head.

ins2.jpg
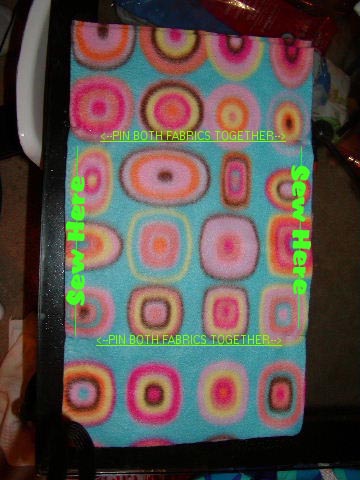
#3. Laying the fabric with the WRONG sides out, pin the fabric edges together about 6 inches down and sew the center edges together starting at the top pin and ending at the bottom pin (one piece of fabric, sew the same way but on the one edge instead of two)  If you are doing a single seam for the back, pin 6" down from edges and sew from pin to pin.
 
This hat is about 18" long, 8.5" wide (HERS are open topped...if you want to tie it shut on top , add about another 2-3 inches and make the lower half of the fabric about 1" more narrow)
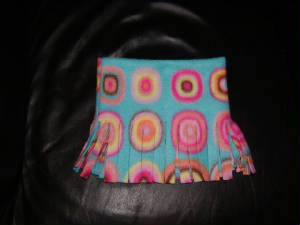
#4. Fold half of the fabric up to match the ends of the fabric together as you had it when you were measuring, you're almost done :)


(plus I put it on her head now to make sure it fit and that the splits on the sides are where I'm going to want the knots to be)

ins4.jpg

hats.jpg

#5 With the edges that were left open, put them around the middle to use it as a guide to how far up to cut, and cut as narrow or wide as you like. THERE ARE NO RULES BECAUSE IT IS YOUR PROJECT! (like the blankets were.) I use the width of half of the tip of my thumb and go all the way around cutting both pieces of fabric together. Now you can either make this as an open had or a closed hat design. (The closed top is a little more confusing to explain I HOPE it makes sense!)
 
 
***I leave my hats open at the top but you can close it***

For OPEN hats,

with the two matching fabric strips in the front (the front and the half folded in) just tie them in knots all the way around and you're done.
 
 
Then tie in knots. Either all the way around in the same direction for both knots, right over left then left over right, or make a loop with inside and outside fringe pieces and pull both edges together through at the same time once.


hats1.jpg
Fold the bottom half up for the brim and you're ready to go face the world in your new funky hat!
hat3.jpg

The finished product for an open top hat. (Thats it, you're done, don't read any more lol)

9.jpg
10.jpg
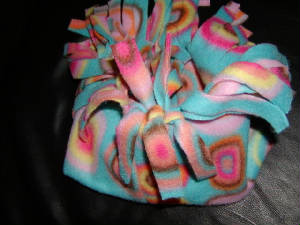
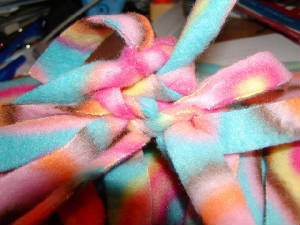
***For CLOSED hats on the top***
 
(this is kinda tricky)
 
THE HAT MUST BE AT LEAST 3" LONGER OR YOU WILL NOT BE ABLE TO GET IT TO FIT ON THEIR HEAD! (unless you're sewing the inside)
 
with the seams on the sides, starting on one side, tie the OUTER Front to the INNER BACK and then the INNER Front to outer back and just go all the way across.
 
(OR if you are a sewer, sew the inside (narrow) half together, and tie the outer strips together) It will look like this when you're tying the knots...it gets confusing and bulky but it works lol

First knot, outer left to inner right, from the seam to keep track

1.jpg

second knot, outer right, inner left, and keep going!
2.jpg
3.jpg

4.jpg

5.jpg
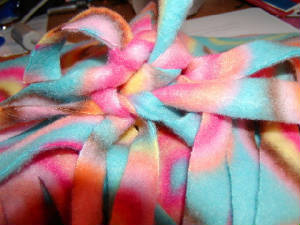
The final result will look somewhat like this (I didn't really mess with it,just tossed it on the chair so it looks a little lopsided) Sorry, its 4am! lol
6.jpg
8.jpg
Fold up the bottom to make the brim size of your choice (optional) and Voila! Another way to wear this hat!
 
Here's pics....I didn't make them long enough on the top (wasn't planning on trying to make it closed lol) so its a tad bit too short on top.
11.jpg
12.jpg

free hit counters