PART 2
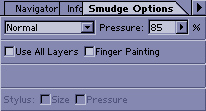
Now we take the smudge tool again and set the pressure at around 75-85. And use the 2nd smallest circle brush.
 -
-
Start going over the outside of the hair, pulling strands out. (Curve them in or out depending on the effect you want. Straight down with a small curve at the end is good for wet hair) Its usually good to follow the way the hair goes on the hair prop but you dont have to. Make bumps in the outline of the hair to show that it's not a piece of plastic like some hair props tend to show (Oh and if you do have a figure with plasic hair...set the reflection and highlight color to black in poser and it should look better. If it doesnt..use the smudge tool to smudge it away in post work)
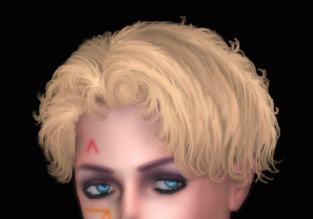
Put a little style in your figures hair too. Make strands come down over the forehead, make them stick up in the back, etc. Here's what i got so far:

Starten to look like hair now!
Okay next comes the smaller strands to make it look real. Choose the smallest circle tool and set the pressure up a little more. Somewhere like 90-96

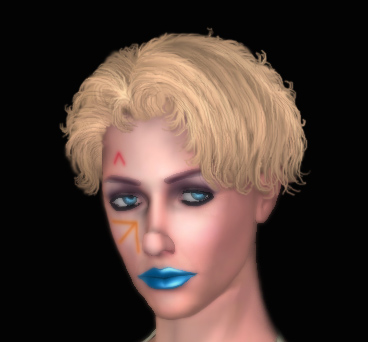
And start again pulling the lighter colors in the direction the hair is going. If a strand doesnt look right, undo and try it again. Look for the closes highlight or shadow in the hair and pull from there. Long smooth strands are the best. Here's what it should look like:
Now compare that to the pic just after the first "go-over" with smudge tool. More defined huh? whoooo! WEE! Sexy hair.... You're done, right? WRONG! a couple of cosmetic techniques left.
Next comes the burning and lightening. Burn tool and lighten tool (not fire and electricity)
Choose your burn tool
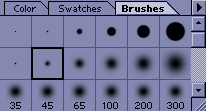
 Then select a brush that is speckled
  (These brushes are custom made by me
especially for doing hair in post work and if you want a copy of them just gimme a shout at jimbo_jones@chalktv.com. I'll zip em up and send them off to ya.)
I believe there are some speckled brushes that come with Adobe PS its just that you have to load them up. Anyway...burn tool and a speckled brush right? I Set the pressure of the burn tool depending on the brush. A thicker brush = less pressure. A smaller brush = more. But this is totally up to you.
 I set it to 80 because the brush i used is very small and doesnt bleed (splatter)
too much.
I set it to 80 because the brush i used is very small and doesnt bleed (splatter)
too much.
Now just go over the hair like you did with the smudger tool concentrating on the light direction and where its comming from. You dont want a light source comming from the right and having all your highlights on the left side of the hair. Which is another good reason why i make the lights a little more even with 2 rendered pics (see beginning of part 1) That way if the lighting is even you can pretty much throw out light direction / highlight rules because there's highlights and shadows all over.
Here's what it looks like after the burn:
Now the individual hairs are a little more noticeable.
Next comes the highlighting. Same thing with the blur instructions. Choose your lighten tool, adjust the pressure to your liking, get a specled brush and start adding the faint highlights.
