This document descibes the following procedures and parts of the program.
![]() Installation
Procedure
Installation
Procedure
This document descibes
the following procedures and parts of the program.
| Installation | ||
NetPOPUP comes in an easy to setup self-installing package. The InstallShield ® installer will automatically install the software onto your hard disk. The installer will also create a shortcut to the program in your startup folder so that NetPOPUP is launched automatically each time you start your computer. The installer will also register the program with windows, so that you can easily UN-INSTALL it when you wish.
To start the installation procedure, unzip the supplied archive and then run the SETUP.EXE program. This will launch the InstallShield® wizard that will guide you through the rest of the setup.
| Uninstall | ||
 |
Uninstallation
of a previous version of NetPOPUP is a very easy
process, thanks to the built in automatic uninstaller.
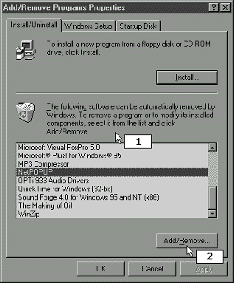
Open the Control panel from your start menu. From the
various control items, choose "Add/Remove
Programs". You will see a dialog box similar to the
following. Locate the NetPOPUP name in the list of installed programs. Once it has been selected, click the Add/Remove Button at the bottom of the dialog box. Windows will ask you to confirm whether you want to remove the program you have specified. When you concur, windows will automatically remove all the files associated with NetPOPUP from your hard disk. |
| Configuration | ||
You can setup the configuration parameters of the program by choosing the "View Properties" in the view menu. You will see various property pages, each of which are described below:
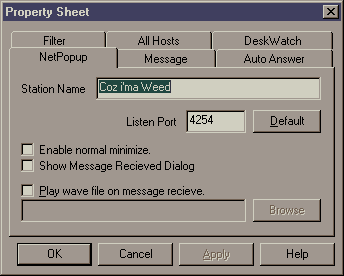 |
Property
Netpopup This is the main configuration box. Enter the name of your station or your name. You can set the program to minimize to the tool bar or to the system tray. You can also specify the name of a wave file to play when a message is received. Also at this point you can specify a different port (SAP) incase there is a conflict on the network on the default port. |
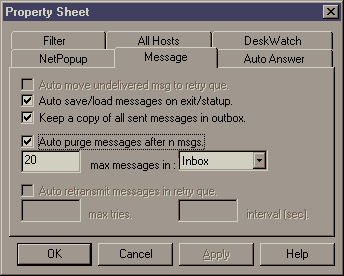 |
Property
Message This dialog is concerned with how the program messages which are received and sent. You can enable the program to load and save the messages onto the disk when the program loads or quits. This maintains your old messages when you restart the system. You can also enable the system to store a copy of all the messages you send. You might want to disable this option for security reasons. Auto purge is a feature that automatically removes old messages. You can set a count for each message queue. If the number of messages exceed this count, they oldest message is automatically deleted. This can be used if u will not be around to manually (or do not want to) remove messages from the que but what to prevent them from piling up and eating up your computer’s memory. |
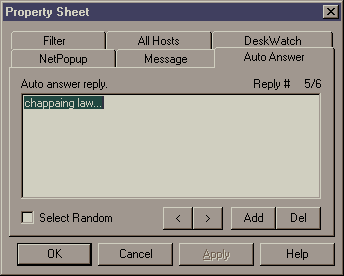 |
Property Auto Answer The auto answer allows you to return messages when you are not available at your station. You can store multiple messages here and then select one. You can also enable the random option which replies with a random message. |
 |
Property
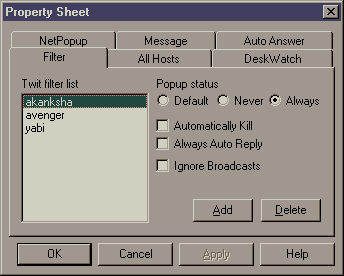
Filter The filter tab is used to put hosts on a special filter list. The filter list defines special handling for certain people. By default the popup status of the program (whether it will pop to the desktop when a message is received) depends on the global setting. But you can explicity put certain people on never to popup or perhaps always to popup even if the global setting is off. This is useful for urgent messages for certain hosts while you do not care for message from other hosts and want to ignore them. Automatically kill will delete the messages of the selected user automatically. Always autoreply causes autoanswers to be always generated for certain users. Ignore broadcasts does just that. |
 |
Property
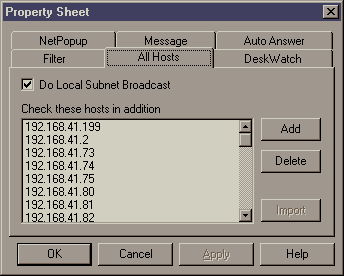
All-Hosts This dialog is where a list of IP addresses are specified which will be polled when the user wants to check if they are online. For the same local subnet we do not need to specify IP addresses. The entire subnet can be made to respond automatically. To enable this check mark the "Do Local Subnet Broadcast" check box. |
| Message Headers | ||
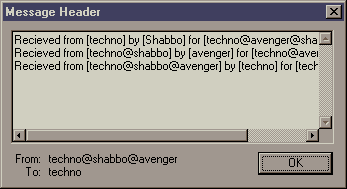 |
Message Header dialog is used to view the message header field of incoming messages. This field contains information on all the hosts the message passed through and at what time. This is useful for debugging multihost messages. |
Example: I want to send a message from host techno to host techno@avenger@shabbo (loop back to techno). The returned header is:
Recieved from [techno] by
[Shabbo] for [techno@avenger@shabbo] at 08:49.19
Recieved from [techno@shabbo] by [avenger] for [techno@avenger]
at 08:57.45
Recieved from [techno@shabbo@avenger] by [techno] for [techno] at
08:55.05
| Sending Messages | ||
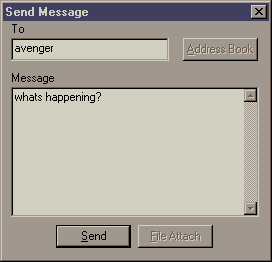 |
To send messages you have to select the "Send" option in the "Message" pull down menu. Alternatively you can press "CTRL+S" which is a short cut to the same command. When you execute the command, the adjacent dialog box appears. You type in the address in the TO field and the message in the box below it. Press send to transmit the message. If the message is successfully sent you will see an acknowledgement on the bottom of the main window. |
| All-Host View | ||
The all host view is one of the most powerful features of the program. It is used to locate other hosts in real time. This dialog box tries to locate other NetPOPUP hosts on the local network as well as any remote hosts (not located on the same subnet) that you have specified in the property box of all hosts configuration.
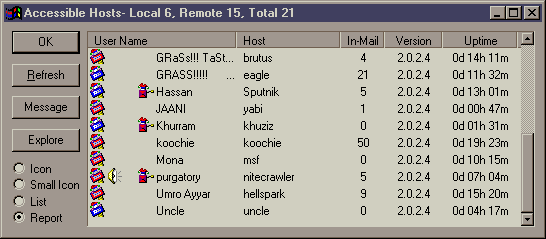
The All Host not only tells us which computers are online and running NetPOPUP but also other information related to the hosts like how many messages are waiting to be read, the version of software they are running, the uptime of their computer (since last reboot). Besides this come information is conveyed by graphical means. If you notice there is a set of four icons on the left-hand side of the list. The first icon shows if the host is local or remote, a remote host comes with a red icon while a local host is blue. The second icon shows if the specified host has his sound on message turned on. The third icon, which is a tiny envelope, shows if the user has put his popup on auto reply mode. The last icon shows if the user’s Auto Popup is enabled or disabled.
The All host window is also used for sending messages directly from this screen. Double clicking on any window will automatically bring up the Send Message dialog with the address filled for the user whose host you clicked.
If you right click on a host you can browse the other computer’s resources like shared file folders and printers.
The list can be displayed in 4 different ways selectable from the radio buttons on the lower left corner of the window.