
How to do a California Legal EFI engine swap...
by Brad Bergholdt
Automotive Tech Instructor at Evergreen State College in San Jose, CA
The state of California allows you to swap a wide assortment of engines into your car or truck, as long as the engine is the same year or newer than the chassis, and all of it's emission controls are intact. Problem areas could be a heavy duty vs. light duty truck engine swap, or a CA vs. federal engine swap. Also, I don't believe it's permissible to downgrade from fuel injection to a carburetor, or from a feedback fuel system back to a mechanical one. To play it safe, you'll want to pick up and read the state's engine swap pamphlet (available from the Bureau of Auto Repair), and ask a question or two of the smog referee before getting too far along. Most CA Consumer Assistance Centers (smog referees) are located in a community college, and you should be able to stop by, without an appointment, for some quick advice.
In my case, I swapped a CA 1989 Lincoln MK-7 V-8 engine (same as a Mustang 5.0 HO) into a CA 1983 RX-7. Early Mustang 5.0 engines and all MK-7 5.0 engines are of the speed density type (a MAP sensor is used to calculate airflow), while later ones have a MAF (mass airflow) sensor. The MAF system is more compatible with engine modifications, and can be retrofitted to a speed density engine, if desired. The HO engine found in the Lincoln MK-7 and Mustang produces approximately 70 more horsepower than the stock 5.0 EFI engine, and has factory tubular steel exhaust headers, which fit the RX-7 chassis like they were made for it.
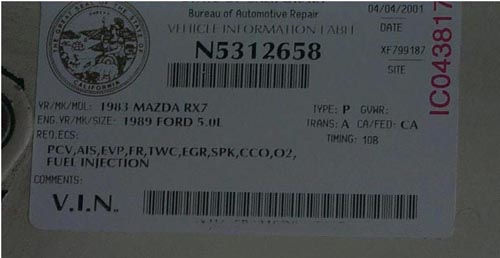
The Lincoln engine was equipped with fuel injection, electronic ignition, and the following emission controls: PCV, air injection, EVAP, EGR, and all related components, wires, and vacuum hoses. The RX-7 came equipped with a carburetor, and a considerable inventory of emissions devices, but no feedback controls. The "chassis" systems of the RX-7 that needed to be retained were the catalytic converter (or a suitable replacement) and the EVAP (charcoal canister and plumbing) system.
This part of the engine swap isn't as bad as it sounds, as most of the needed fuel system and emission controls are integrated into the engine package, with the exception of a few solenoids and relays, which mount to the body, and the catalytic converter. There are five convenient wiring harness connectors exiting the engine harness, each of which was connected to the appropriate RX-7 circuits.
Having a complete donor vehicle is by far the best way to go, as you'll have all the parts and wiring needed, plus the vacuum hose routing sticker. Don't forget to write down the VIN number of the donor vehicle, for the referee's use, and for yourself- for future engine adjustments/repairs. Also, I utilized the Lincoln's AOD four speed automatic transmission (the overdrive is nice, considering the RX-7's 3.90 rear gears), never separating it from the engine during removal or installation into the RX-7
Having kept the computer engine/transmission harness fully connected, and all solenoids and relays still attached to it, I laid this out in the Mazda engine compartment, looking for the best routing and mounting locations. I decided to mount the TAB (thermactor air bypass) and TAD (thermactor air divert) solenoids on the RX-7 firewall, along with the EEC (main system) power relay, MAP sensor, and EGR solenoid. These were lined up on the right side of the firewall, behind the windshield washer bottle. It was necessary to splice/lengthen the MAP, TAB and TAD solenoid wires about a foot, so the main wiring harness could be routed below the parts, and through the firewall (the computer needs to be mounted inside the cabin for protection). The only emission device that wasn't "self contained" on or very near the Lincoln engine was the EVAP solenoid. All that was needed here was to route a hose (the larger of the two) from the original RX-7 EVAP charcoal canister (right side of the engine compartment) to the solenoid. Now, the Lincoln computer purges the Mazda charcoal canister, as if it were its own. That's about it for the under-hood emissions stuff! My donor vehicle didn't have a check engine (MIL) light. If it had, I would have needed to add a MIL light to the Mazda dash, and connect a couple of additional wires.
Now the catalytic converter. The referee's application manual states that the 1983 RX-7 needs an "oxidizing catalyst" (doesn't say how many). I didn't want to run the original RX-7 exhaust, as it was a tangle of heavy pipes, two catalytic converters, and a mass of rattling heat shields. Instead, I fabricated my own two-into-one Y-pipe, welded to the Lincoln's 02 sensor equipped header collectors. (J.C Whitney pre-bent 90 degree and 45 degree aluminized pipes worked great) and sent the two 2-1/4" pipes into a 3" Flowmaster collector), then fed it to a Catco (aftermarket) 3" in, 3" out TWC (three way) catalytic converter. I opted for the TWC cat, as the Lincoln engine had down-stream air injection (that needed to be utilized), and it was difficult to find a 3" oxidizing cat with the needed air inlet tube. The smog referee was OK with substituting the TWC cat for the oxidizing type, as it is superior in emissions performance, and matched the type the Lincoln originally came with. Further downstream is a Flowmaster 3" in, dual 2-1/2 out 50 series muffler. The exhaust tips look like the original RX-7's, but it definitely doesn't sound like a rotary (more like a big-block Chevy). I should add that I retained some of the Mazda floor heat shields, and fabricated additional ones in the needed locations to help keep things cool.
After completing the engine swap, I made an appointment with the state (smog) referee. He was a friendly gent, and was pleased that I had the Lincoln VIN number, and the smog devices neatly organized. After a visual inspection, he ran the car on the smog machine (very clean numbers), and performed a functional test of the EGR system, ignition timing, and fuel tank cap (they all passed). I then received the coveted door jamb sticker, and after paying $38.25 ($30-inspection, $8.25-smog certificate), I was on my way. Next time I need a smog inspection, I can take it anywhere, thanks to the attached BAR label.
Radiators...unless you are converting to a V-6 engine, your radiator will need to be re-located farther forward, between the front sway bar and the round front crossmember, in a vertical position. Some people have had success with the stock radiator by removing a pie shaped section from the sheetmetal the radiator bolts to, with the result of swinging the bottom of the radiator forward. Others have used radiators from different applications, using fabricated brackets. Even stock LT-1 Camaro radiators have been installed by denting in the sheetmetal “frame-rail” sections of the RX-7 to make some additional room.
Air Flow Control...Whatever radiator you decide on, if you live in one of the warmer climates such as Arizona or Florida, you will need to pay extra attention to directing every last bit of air drawn in by the fan THROUGH the radiator, instead of around it. This means sealing off all the paths above, below, and around the rad with sheetmetal, cardboard, or foam. The main objective of airflow control is to MAXIMIZE the pressure differential between the front of the radiator (you want it as HIGH as possible) to the area in back of the radiator (you want it as LOW as possible) to maximize airflow thru the radiator core. A key component vital to accomplishing this goal is to seal the radiator so that the core opening is the ONLY way for air to flow from the front to the back side of the radiator. Any other openings will allow air to pass around the core and will bleed off the pressure differential and ultimatly hurt airflow thru your radiator core. Look for alternate flow path above, below, or around your radiator. This is very important for cooling at ALL speeds, and should not be overlooked. REMEMBER...the RX-7 has a small engine compartment with minimal exit paths for the hot air to escape from. If the air can’t get out fast enough from the rear and bottom of the engine compartment, it will simply go around the rad or fan to the low pressure area in front, reducing the amount of fresh cool air drawn in. Our radiator kits use the largest possible radiator without requiring major modifications, and our radiator brackets are engineered to seal off the paths around the rad without further fabrication.
Thermostat...Be sure to use a new high quality thermostat that features a balanced design. One almost necessary modification to your new thermostat is that a 1/8” diameter hole should be drilled thru the flat area of the disc to allow more thorough purging of any air bubbles when adding coolant. This mod also makes the process much faster, as the bubbles can now travel thru the closed thermostat into the upper radiator hose.
Hood weather-stripping...another exit path for the hot underhood air is at the rear of the underside of the hood. The weather-stripping there can be removed, allowing some of the hot underhood air to escape upward during slow speeds in stop and go traffic. WARNING... although this mod will result in additional removal of hot underhood air, this path will also allow underhood substances a direct path to the surface of your windshield. Oil film or steam from a blown hose could result is severely reduced visibility. Remember...this modification is only effective at low speed "stop-n-go" conditions. At higher speeds, it can work against you, as hi-speed aerodynamics cause pressure to build up at the base of the windshield, which will cause air to flow BACKWARDS into the area under the hood, pressurizing the engine compartment, causing reduced airflow thru the radiator core.
Ignition Timing / Idle fuel mixture (carbureted engines)...common causes of high cooling system temps in low speed/idle situations. Insufficient ignition advance and a lean idle mixture both contribute to high exhaust temperatures (charge is still burning when the exhaust valve opens). Connecting the vacuum advance to a manifold vacuum source is preferred. Advance should be between 12 and 18 degrees BTDC at idle. A lean idle mixture can be as simple as improperly adjusted needle screws in the carburetor, or as puzzling as a hidden vacuum leak in the manifold or carb base gaskets. Make all efforts necessary to eliminate any existing leaks.
Bleeding Air From The Coolant...It is VERY important to bleed ALL air from the cooling system. This often means searching out any internal high spots that are likely to collect air, forming pockets. It is also important to have an effective coolant recovery tank to collect excess coolant as it comes up to operating temperature, and return liquid coolant to the system as it cools off and contracts after shutdown. The pressure cap is a vital component here, forcing expanding coolant to build pressure but relieving excess pressure to the recovery tank. The cap also has to have an effective secondary seal to the upper part of the radiator neck so that the contracting coolant in the system can siphon make-up from the expansion tank instead of air from the outside. If air gets in the system, the expansion of the coolant will not build up much pressure (remember that air is compressible), resulting in a lowered boiling point. Pressure from liquid coolant expanding up to the releif pressure of the radiator cap is a good thing. Pressure from low pressure coolant flashing to steam results in a downward spiral that can only be stopped by shutting off the engine. Aviod air in the system at all costs.
Fan Shroud...If you are using an electric fan you probably already have an effective shroud. If the electric fan cannot effectively cool your engine in your climate, a mechanical engine driven fan may be the only answer. Mechanical fans normally take more horsepower to run because they move much more air. A mechanical fan placed near the radiator core may be enough to meet your cooling needs, but the addition of a shroud will make it much more effective. A simple shroud consisting of a ring of sheetmetal around the circumfrance of the fan (attached to the core with tie straps similar to those used to attach trans coolers) will probably be enough to do the job (these are commonly available in kit form thru street rod parts suppliers). If you operate in the hottest of climates, a custom fabricated full shroud may be necessary.
Chin Spoiler or Air Dam...in addition to the tips on airflow control above, an effective "chin spoiler" or "air dam" is an important tool to help maximize the radiator core's front-to-back pressure differential. The main advantage here is that the spoiler or dam keeps air in front of the car, increasing pressure to the front side of the radiator. It also keeps air from getting under the car, where it could pressurize the engine compartment and kill airflow thru the radiator core.

2....Considerations & Requirements....
4....Engine / Transmission Installation....
5....Exhaust / Throttle Cable / Accessory Drive / Pulleys....
6....Cooling / Fuel Systems....
7....RX-7 Wiring Harness Connector ID and Circuit Locations....
8....Electrical System Modifications By Circuit....