 |
For the left eye, the left edge of the house lies just in the middle of the man's head. |
Some about 3D photographing techniques
When it comes to the taking of 3D photographs, you have usually two different ways to choose from:
You can use a special stereo camera and take both pictures at the same time, or you use an ordinary camera and shoot them one at a time. They have both their own advantages and drawbacks. I don't intend to cover this material, because there are lots of good sites, who deal with it in detail.
I take my pictures with a standard reflexcamera with interchangeable lenses. Lenses with a long focus (above 100mm) or ultrawide (below 35mm) are not really helpful in the act, so I usually stick to the range in between. With a long focus, the difference in position has to be much greater, to have a noticable stereoscopic effect. With wide lenses the distortion (inherent to these lenses) has to be considered. I might experiment with it some day. If someone has interesting results with "extreme" focusses, please let me know!
My outdoor pictures are taken "freehand", without any additional gear, like tripods or anything else. I always take the left eye picture first, then the right eye. This makes identification easy, when the pictures are developed. To get the right spacing for the pictures, I have a little trick:
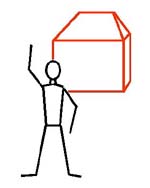
The stereo effect, your eyes produce, is naturally just right. So, before taking the camera, I stand still, close the right eye and find a significant position of a point on the foreground related to one on the background.
| |
For the left eye, the left edge of the house lies just in the middle of the man's head. |
Then I close the left eye (and open the right one of course :-), and find the point, the object has moved to. Do not move yourself in the process. This would give an inaccurate spacing.
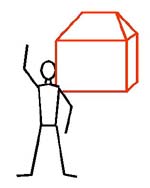 |
For the right eye, the left edge of the house lies now at the right edge of the man's head, just behind his ears (if he had ears). |
Now I take the camera and move, until the objects in the viewfinder match my "left-eye preview" and I take the left picture. Then I just "wobble" on my feet a bit to the right, until the view matches the "right-eye-preview" and take the right picture.
For "studio" shootings like the puppet series, I use a tripod, but the technique is the same. With this "preview", you don't have to worry about the distance to separate the shots, because your eyes will guide you and they will rarely fail.
As you see, taking 3D pictures is a piece of cake. To prevent strange effects (wich can occur sometimes), here a few short tips:
|
|
|
| poor | 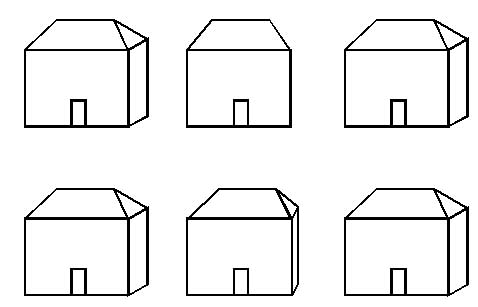 |
|
| better | ||
When you have a situation like the upper row of pictures, you might consider a small change in position, to get a result as in the lower row. As can be seen in the example, the eyes (or better: the brain) can't cope with the first situation, while the depth effect on the second is quite natural.
Another problem with a
single lens camera are clouds. Although movements in the scenery
should always be avoided, clouds tend to be really unconcerned
about our efforts of good photo shooting.
Unless there's no wind, you should adapt the order of the shots
to the movement of the clouds. Especially, when the winds come
directly form left or right, it can ruin the stereoscopic effect.
If the clouds move to the "wrong" direction in the time
between the shots, the entire sky would appear to be in front of
the scene instead on the farthest plane of the 3D image. I will
explain this in more detail in the next section. For now, the
rule of thumb is:
No navigation bars on the left side? Please click here.