|
 |
|
 |
Why
build a control panel?
What
kind of characters or models are well-suited to this method?
Simple
VS Complex Control Panels
Setting
up simple expressions.
Setting
up offset expressions.
Setting
up Conditional expressions to act as switches.
Using
variables in expressions to change multiple values.
Tutorial
Softimage -- Tutorial
Houdini
Animating
smoothly beteen automatic and manual.
Hints
and Tips
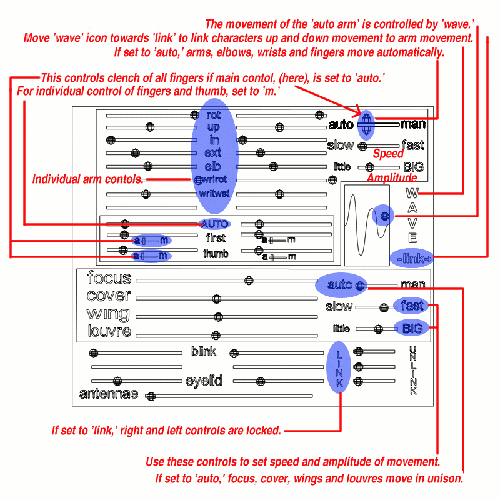
I decided to build this Rube Goldberg-like contraption in order to simplify the animation of the mechanically complex M.o.m character. M.o.m. is made up of dozens of parts that interact with each other. For example, when Mom flaps her wings, her glasses move in and out, her lens covers wobble, and her louvres flap open and closed. Trying to find which icon to select in the schematic window in order to animate these things would be very tiresome. Also, it is much simpler to animate one parameter and have all the others update. It also makes for a more consistant look to the character. It is highly unlikely that you would be able to duplicate the movement of this character from one animation to another if you had to manually recreate all these complex movements each time. Finally, you can see at a glance all of the characters animatable parameters, and also see whether or not they are animated or not.
One last reason for doing this, is that I am going to be leaving Satelight shortly, but the characters will live on in further commercials. The next animator can simply pick up where I left off, and easily grasp how to animate Mom.
What kind of characters or models are well-suited to this method?
As you may have guessed, setting up something like this can take a while. I figure it took about four days of work to get the expressions working properly and the control panel working without being too buggy. So obviously, it wouldn't be worth doing for a one-shot kind of model.
Secondly, it works best for mechanical-like objects. Since Mom only floats and flaps, she is ideal. She never interacts with the ground. Her movements can be easily visualized with a simple sin wave.

Simple VS Complex Control Panels
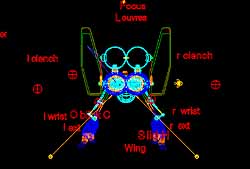
The first time I tried to automate this character, this is what I ended up with. It was fine at first, but as I added more and more controls, and then automation and switches, it got too unwieldly. The icons interfered with the model and were hard to pick. I needed to constantly refer to my notes to remember how everything worked. Other animators muttered constantly when working with my character. Friends deserted me and I couldn't find my car keys. In short, things were very very shabby.

Setting up a Simple Expression
Okay, let's say you've built your model, and you're all ready to attach an expression to it. You've got an elbow, and you want it to rotate in X. You've taken a primitive sphere which you are going to use as a slider. At zero, you want the X rotation to be 0. At 1, you want the X rotation to be 90. For Softimage, you would pick the elbow joint, and then go into the expression editor. The affected element would be elbow.rotx. In the expression dialogue box you would enter sphere.etrnx * 90 Then, when you move your sphere to a value of 1 in X, your elbow object will rotate 90 degrees.
For Houdini, enter ch("/obj/sphere/tx")*90 in the RX box of the elbow in the Object Editor.
Setting up an Offset Expression
Sometimes you'll want something to move a few frames before or after something else. In this case, use an offset expression. For example, when Mom's arms swing down, her elbows rotate down a few frames later, and her fingers clench inwards a few frames after that. For example, in Mom's finger rotation dialogue, I could set up something like this:
at_frame(Fc-4, elbow.rotx) * 5 (Softimage)
chf("/obj/elbow/rx", $F-4) * 5 (Houdini)
This means, use the X rotation value of the elbow, four frames later, (that is, sample the value four frames before the current frame), and then multiply that value by 5.
Now when Mom moves her arm down, her fingers follow four frames later.
Using a Conditional Expressions in a Switch.
By using a conditional expression, you can put "switches" into your control panel. For example, you can link or unlink some components, or have and "automatic" setting as well as full manual control.
This requires a bit more planning, and I suggest you make use of the local variables option in the expression editor in Softimage. You can enter a complex expression in a local value, and then use a simple letter to express that expression within a larger one. This makes it much easier to keep track of how an expression works.
For example, let's put a "switch" into the left eyelid, so that it can be controlled by the right eyelid. Usually, we want both eyelids to blink together, so it makes sense to only have to animate one, and have the other follow. Sometimes, however, you may need to animate each seperately, so you'll want to be able to easily switch between linked and unlinked.
In the rotation X value of the left eyelid, I could put the following expression:
cond(eyelid_link.etrnx < .5, eyelidR.rotx, eyelidL.rotx) (Softimage)
if (ch("/obj/eyelid_link/tx") <.5, ch("/obj/eyelidR/rx"), ch("/obj/geo/eyelidL/eyeblink")) (Houdini - note I have set up a special eyeblink channel.))
The syntax for the condition expression is cond(condition, true, false). Okay, so what does that mean? It means, if the conditon is true, return the true value, if it is not true, return the false value. In my expression, it means, if the eyelid_link icon is at (about) zero, then use the value of the right eyelid. If it is at (about) one, then use the value of the left eyelid. If you look at the image of my control panel, you can see the link switches. When linked, the right control controls both left and right.
I have used a similar technique to control the manual and automatic modes of my character.
Using Variables Within Variables
Sometimes you will want an object to reference a variable, and then another variable to control, for example, the amplitude or frequency of a movement. In this case, nest your variables and use the local variable option in the expression dialogue box, (Softimage).
For example, a normal sin expression looks like this:
sin(Fc * 10) * 1 (Softimage)
sin($F * 10) * 1 (Houdini)
This makes a sin wave with an amplitude of one, and a frequency of ten. Great! But if you want to be able to simply control the speed and frequency of this wave, why not add some more variables? This is how Mom's flapping motions are controlled. For example, you might want to have some sliders labeled speed and frequency. Then in the expression of the element being controlled, you can put something like:
sin (Fc * (frequency.etrnx)) * (amplitude.etrnx) (Softimage)
sin ($F * ch("/obj/geo/frequency/tx")) * ch("/obj/geo/amplitude/tx") (Houdini)
or, even better,
sin (Fc * A) * B (Softimage)
Where A= frequency.etrnx, and B= amplitude.etrnx
Now you can change
the speed of the flapping motion by simply sliding the frequency,
and increase or decrease the amplitude of the flapping just as easily by
moving the amplitude slider.