Front and Back Princess Seams
With photo's and instructions by
Marsha Olson
(printout is 5 pages)
Fabric: Light Weight Cashmere Wool Blend or similar weight fabric
Lining: Dupioni Silk, Taffeta, Synthetic Lining Fabric
Sew-on size 4/0 Snaps
Important Note: The princess seams on the Kitty size pattern are 3/8" rather than 1/4" as on all the other sizes.
All other seams on the Kitty size are 1/4" as usual.
Jewel Neck - Short Straight Sleeve - Mini Length
For the purpose of clarifying some general sewing points,
the lessons may vary slightly from the written instructions accompanying your pattern.
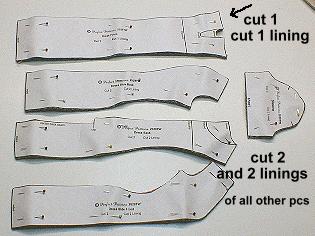
Cut out your pattern pieces choosing |

|
|
This pattern is very tailored, |
When choosing your thread color, |

|
Unpin the patterns. Determine the right sides.
Lay out the pieces as they will be sewn together
for the dress front and lining.
(Side Front - Front - Side Front)

|
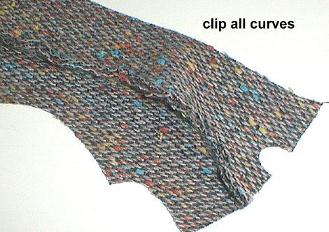
Match the curved edges of the Side |
Clip the curved seams down to the stitching. |
|

|
Press the seam open or towards the side seam of the dress, using the rounded end of a pressing ham. If you do not have a pressing ham, there are instructions and a pattern to make one on the Perfect Patterns website. Here are the direct links: HAM PATTERN HAM INSTRUCTIONS |
|
To determine if your fabric seams should be pressed open or to the sides, do a test on your fabric with small swatches and press the seam to one side. If the seam allowance shows to much from the right side after pressing, you will want to press the seams of your dress open instead. |

|

|
Follow the instructions and sew the dress front and lining front. |
Set aside the dress front and dress front lining.
Unpin the pattern pieces from the Dress Back and Dress Side Back pieces.
Determine the right sides.
Lay the pieces out as they will be sewn together,
dress and lining.
I will be using the lining as my example in the photo's
because the pins, stitching, and pressing is easier to see.
|
Following the same pinning instructions given for the dress front, carefully pin the Dress Side Back to the Back pieces, dress and lining. Stitch both seams and clip the curves. Do not press the seams yet! |

|
|
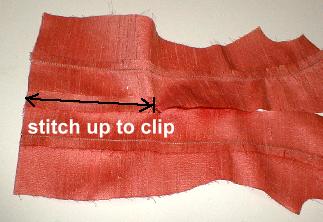
Stitch the center back seam up to the clip mark. |
|
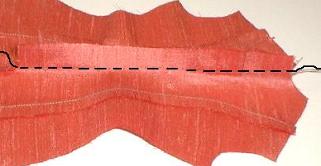
Using a long running stitch, stitch from the clip mark up to the neck. The running stitch acts as a stabalizer to keep the back opening from distorting as you are pressing the curved seams. Press the seams. |
|