1. Matching the princess seams at the |

|
 |
2. Press open the shoulder seams |
3. Staystitch the armholes |

|

|
4. Clip to the staystitching until the |
5. Using a slightly longer stitch, |

|
1. Matching the princess seams at the |
|
|
|
2. Press open the shoulder seams |
3. Staystitch the armholes |
|
|
|
4. Clip to the staystitching until the |
5. Using a slightly longer stitch, |
|

|
6. Pull up the gathering stitches just tightly enough to fit the armhole when the armhole is pulled open to it's maximum. Ease the gathering out evenly across the top of the sleeve cap. 7. Right sides together, lay the armhole over the sleeve cap and pin together. 8. Sew the two pieces together from the dress side. |
|
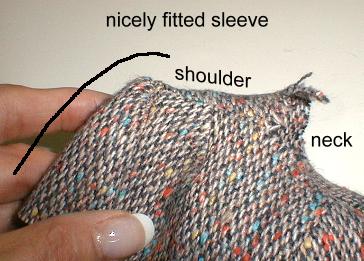
9. Depending on the fabric you have chosen, the cap of your sleeve may have more lift and appear to be more gathered. This cashmere/wool is what I consider a 'spongy' fabric and easily hides what other hard finish fabrics show. |
|

|
10. Press the seams towards the dress. |
|
11. Starting at the hem and sleeve opening, pin the side seams together working your way towards the waist. There may be a small amount of easing at the hip to make the two seams meet evenly. |

|

|
Although the shoulders may appear to be slightly too wide at this point, it is because the neck is still not finished and is causing the shoulders and dress front to look 'pushed out'. |
| HOME | CLASSES | CLASS 29 INDEX | LESSON 1 | LESSON 2 | LESSON 3 |
| LESSON 4 | LESSON 5 | LESSON 6 | LESSON 7 | LESSON 8 |