Heirloom Sewing by Machine
~ Lesson 12 ~
Blouse Neck and Collar Options
With photos and instructions by
Marsha Olson
(printout is 7 pages)
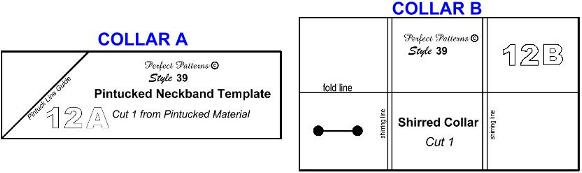
The high-necked collar can be made in several ways. Two collar pattern styles are given.
Collar A is to be cut on the diagonal (bias cut) from the pintucked fabric and lined with tulle. The top edge can be trimmed with very narrow flat lace or ruffled lace in a little wider width.
Collar B is shirred (gathered) down each side of the neck and self-lined. This collar can be cut from the batiste, but because it is self-lined it will gather down into tighter folds if cut from the lighter weight voile. Depending on the length of your dolls neck (some are longer than others), you can safely double the length of the pattern with no problems.
An easy third option can be to make a collar using heavy 1/2" or 3/4" croceted cotton lace. You may want to bind the neck edge first with a piece of bias cut fabric. Actually, this third option has many more options included as well just by using different types of lace.
Lace edging the neck may be the option most used as time goes by. Narrow lace can stand up or be slightly gathered, wide lace can be gathered or formed into tiny pleats to make a wider collar that lays down over the shoulders, the stand-up collar itself can be made of lace as well as the entire blouse if you wish, by zigzagging pieces of straight edge inset lace together to form fabric pieces large enough from which to cut your pattern pieces.
COLLAR A
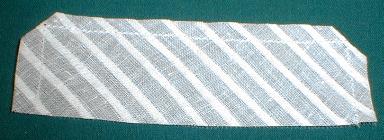
Cut this collar from the pintucked fabric you made earlier in the class.
Although the diagonal line marked on the pattern indicates that it is to be cut so the pintucks will be on the diagonal along the length of the collar as shown in this picture:

The collar can actually be cut from the pintuck piece in any direction. The pintucks can go straight up and down, sideways down the length, or diagonally in either direction.
1. Cut the tulle lining and inch larger all the way around than the collar A pattern.
Tulle has a lot of stretch to it. Cutting it larger gives you more control while sewing.
2. Right side together, pin the collar in the center of the tulle lining piece. Sew the two short ends and one long edge.
3. Trim off the excess tulle and the corners.
4. Trim the sewn seams down to 1/8" or less.
5. Turn the collar right side out and press. Staystitch the long bottom edge together.
Now is the time to check the fit of the collar around the neck of your doll. Neck measurements, both circumference and length differed from doll to doll, so the back overlap will be affected. You may want to press under and stitch down a portion of the neckband/collar to get a more perfect fit.
The top edge can be trimmed with flat or ruffled lace edging.
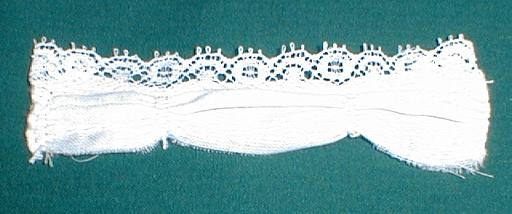
COLLAR B
This collar is cut from batiste or voile.
1. Right sides together, fold the collar in half along the fold lines. Stitch the ends.
2. Trim the seams and corners.
3. Turn Right side out and press.
4. Mark the shirring lines with pins. Run two rows of gathering stitches through both layers leaving thread ends hanging to pull.
5. At the top and bottom, pull all the threads to the back side of the neckpiece. Tie the top threads into a knot at each shirring.
6. At the bottom, grasp both the inside pull threads (bobbin threads) and pull evenly to gather the fabric down. This is a good time to check the length of the neckpiece against your dolls neck in case you may want to make changes such as finding a wider lace to trim the top edge if the collar seems a little short.
7. Staystitch the bottom edges together.
8. Trim the top edge with lace of the appropriate width. Lace can be ruffled or flat, as desired.
| HOME | CLASSES | CLASS 39 INDEX | LESSON 1 |
| LESSON 2 | LESSON 3 | LESSON 4 | LESSON 5 |
| LESSON 6 | LESSON 7 | LESSON 8 | LESSON 9 |
| LESSON 10 | LESSON 11 | LESSON 12 | LESSON 13 |