|
Summer Box for Juvenile Box Turtles Outdoors
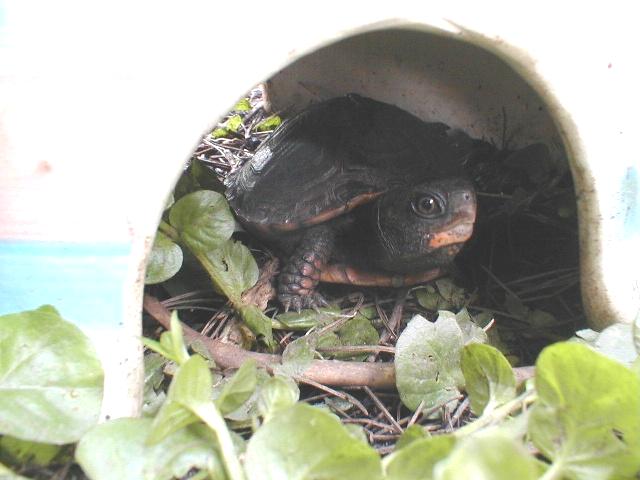
CAUTION! Baby box turtles are very rarely found in the wild. They spend their early years well hidden. Juvenile box turtles are also very seldom encountered in the wild. They do not spend much time in the sun. Before you put your precious young turtles outside like we do, we want you to be aware of the danger the sun poses. A young turtle on its back in direct hot sun can overheat and die in a very short time - a matter of minutes. And some young turtles may sit in the sun too long and overheat when shelter is nearby. Putting young turtles outside in a confined box or container is risky if they get any direct sun. We no longer put one year old baby box turtles outside in the summer box. We wait until they are about two inches long. Then we watch them very closely to see if they appear content in the box. If they try climbing the sides and fall over on their backs, they are not ready to be outside. Better safe than sorry. You would be correct to think that these young turtles should be able to right themselves. The problem is that the plants and leaf litter may cradle them making it impossible for them to right themselves. We once found an adult box turtle on a dirt road stuck upside down. Apparently the turtle rolled down a ten foot embankment and landed upside down in a ridge of gravel that just caught it right. It could not reach the ground with it's head to right itself. It may have perished if we had not come along. The location of our summer box gets several hours of morning sun and no afternoon sun. Less sun would be safer but the location is convenient. We still want to see them often and talk to them like we do inside. You know the saying "Out of sight; out of mind ". We don't want to forget them. The box is constructed from 2" by 8" pressure treated lumber. One long side and one end were cut from an 8' board. The location of the box is inclined so a frame was constructed out of used 2" by 8"s with several cross members. The frame was leveled and filled with rich soil. The summer box sets on top of the frame. It is heavy so there is no need to attach it to the frame. The added elevation is nice too. If you build a box like this, do not elevate it too much unless it is protected from the wind. You do not want it to be "drafty" on cool days or unusually warm on hot days. Remember these turtles normally live on or in the ground which moderates temperature swings. The bottom of the box is 1/4" galvanized hardware cloth. The top of the box is a hinged wood frame covered with 5/8" vinyl covered hardware cloth. The size of the hardware cloths are significant. Our pieces were 60" by 24" so the box is 61" by 25". The bottom has two functions. It keeps the turtles from digging too deeply and allows quick drainage during heavy rains. The lid also has two functions. It keeps the turtles in and all other animals out. The lid is complete with a nylon rope to limit its travel, an old window pull for a handle, and a screen door hook to hold the lid closed. For the water bowl, we took another 2" by 8" board and cut a hole in it in which to drop in a 6" plastic flower pot saucer. The board extends across the box. The extra space on the board provides a place to set the food dish and other food. This technique works very well for providing a stable water dish that is easy for the turtles to enter and exit. It is also easy to remove for cleaning. The substrate (dirt) is homemade compost complete with earthworms and bugs. Yum! The turtles do their best to eat all the worms and bugs. This helps the transition from inside to outside go well. The hardware cloth bottom allows worms and bugs to pass through it. This saves some of them which can come up again later. This is also the reason we filled the frame with rich soil; it's like setting the summer box on top of a worm box. The turtles have enough compost to bury themselves. Some small garden plants were transplanted to the box to get instant plant cover. The rich compost yields plenty of weeds. As excess weeds are pulled, they are placed in a corner for cover. Additional cover is provided by a hide box and a pile of leaf litter. No other obstacles are used such as stones or logs. The space is too small and the turtles don't need more opportunities to fall over onto their backs. More CAUTION! This is a small environment and the turtles are exposed to the elements. They do not have many choices in environment for regulating their temperatures. We must be very aware of the weather. They still need clean water and food daily and moderation of the elements. If the weather is cool or hot, a piece of carpet or rubber door mat is placed over part of the lid to reduce the extremes or we take them inside until the weather improves. For cleanliness we treat the summer box much the way we treat an indoor vivarium. The dirty water is discarded outside the box. This means we loose some substrate (mud) every day. We also loose feces deposited in the water. The food dish is also cleaned outside the box to reduce food scrap contamination. | pic 12 | The daily feeding is still turtle food pellets moistened in a dish. They get more worms and bugs as we and/or the turtles find them. Since they are getting older, they are offered more veggies and fruits which they tend not to like when they are babies. And they are given a piece of cuttlebone as we describe in Tour Three: Give My Poor Turtle a Bone. The hide box is an upside down flower pot with a large hole cut in the side. Cutting a hole in a ceramic pot with a grinding wheel is dusty slow work. Similar pots are sold at some garden centers as "toad abodes". They are intended to be placed in gardens to shelter toads in the hopes the toads will eat unwanted bugs and slugs. The ceramic hide boxes stand up to the weather and we have them so we use them. Any hide box will do. See Tour 17: Hide Boxes for Turtles for ways to make hide boxes. The pictures above were taken when the box was used by Sparky when a juvenile. Sparky is a Gulf Coast box turtle who is featured in some of the other tours. The pictures below show our trio Bush, Laura, and Atom who are also featured in other tours and pages. An additional hide box was added. Their daily diet is still turtle food, but they would rather have worms and bugs. Just before placing them in the box for the first time, additional compost was added containing many worms. They could have landed on the moon for all they cared. They saw worms and they ate their fill. | pic 15 | pic
16 | pic 17 | pic 18
| pic 19 |
pic 20 |
pic
21 |
This tour was introduced for our two year anniversary on the internet - our 104th consecutive weekly addition of new material. As part of the celebration we also added wallpaper pictures of Bush, Laura, and Atom to the Wallpaper page. These pictures were taken in the summer box and are part of the series of pictures shown above. See Wallpapers 9, 10, and 11. Much is written about the concept of home ranges of turtles, other reptiles, and amphibians. Some turtles are clearly uncomfortable when placed in a new environment and some seem not to be concerned. Bush, Laura, and Atom took right to the summer box. Why? Was it the worms? We think there is much more at work here and a good subject to cover in another tour. Before building the summer box, a plastic agricultural stock tank was used. It had a threaded drain hole in which we put a plug with holes in it to insure drainage while not letting baby turtles escape. After a good rain it was soggy. Typically the soil was either too wet or too dry for plants. And it still needed a screen cover to protect the turtles. While more could have been done to overcome the problems of the stock tank, building the summer box has proved to be a much better solution. After reading this tour, a girl from Hong Kong emailed us to ask what she could do for her turtles since she lived in a flat with no yard. She had red-eared sliders. We suggested that she try setting up a plastic container which she could place in direct sun from an open window or door. We know how much red-eared sliders love to bask in the sun. After all our summer box is a second container too. After years of use
We are very pleased with the design. It works very well for young box turtles. It also serves to hold larger turtles for short periods and it has been used to hold toads, frogs, snakes, and salamanders. We can rest assured that the turtles are safe from predators and there have been no escapes. So what would we do differently if building a new summer box? We would probably make the box bigger. Like aquariums used to make vivariums, it is a little small for much landscaping. We would definitely make it longer. Wider would also be nice. Head room is also very limited. We grow Creeping Jenny vines in it which is fine, but we would want more plant verity if we had more floor space. Instead of using 2" by 8" lumber, we would use 10" or 12" lumber. Our use of 1/4" galvanized hardware cloth for the bottom and 5/8" vinyl covered hardware cloth for the top is probably optimal. Any size of hardware cloth for the top and bottom would work well. The dark green vinyl on top is easier to see through, but galvanized hardware cloth can be painted black for the same effect. If you are contemplating building a summer box and you are not prepared to build a wood frame lid, we have some suggestions. White vinyl covered wire closet shelving would work well for a lid. Home centers sell it by the foot and will cut it to whatever length you desire. Poultry staples or coaxial cable clips could be used as hinges. If you are not comfortable even cutting the boards for the sides, you can have them cut at a lumber dealer or home center. Choose dimensions that matches the lids you will use. The sides are held together by 3" galvanized deck screws. A similar product for a lid is sections of metal animal play pens. These are typically sold as eight section pens. Three section expansion sets are also available. The sections link together. You can use it to make one lid or multiple lids. Our seasonal use begins when daytime temperatures reach the 60's. The turtles get to spend some time in the sun and come in at night. In the evening in dim light the turtles are easy to find because they can not dig too deep to find. When the nighttime temperatures do not drop into the 40's, we leave the turtles out over night. They remain out all summer unless we get heat waves that take temperatures into the high 90's or above. It is safer to bring the turtles inside during heat waves. In fall the turtles begin coming inside on cold nights and will remain inside when daytime temperatures do not reach the 60's. We hope that we have given you some ideas you can apply for your young turtles. Building safe small environments outside is not easy. This small environment is working as we intended and gives our young turtles almost as much exposure to natural sun light as they would have if wild, We hope you enjoyed our ninth behind-the-scenes tour.
|
 As our baby box turtles become young juveniles, we like to put them outside
for the summer. In this tour we show you our summer box and some of the
techniques we use. We would do the same for other land turtles such as
wood turtles.
As our baby box turtles become young juveniles, we like to put them outside
for the summer. In this tour we show you our summer box and some of the
techniques we use. We would do the same for other land turtles such as
wood turtles.