Dave's Yamaha XJ Page | home
All About Building A New XJ Exhaust... | Mufflers | Collector Box
Collector Box
The hardest part of building the collector box was the habit of welds shrinking as they cool, pulling the job out of shape. The secret of doing this is to use lots of tack welds before you finish weld. If available use a TIG welder although a MIG will do.
The inside of the original collector box is split horizontally in such a way as to link the two center header pipes on the top side and the two outer headers on the lower side. These then mix at the rear of the box on either side where the tail pipes are fitted.
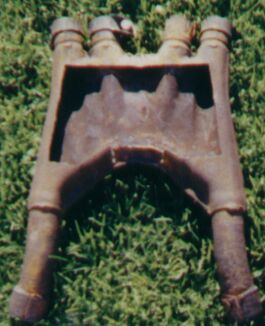
I was unable to copy this with the workshop equipment I had available so I went for individual barriers between each header to guide the gasses as smoothly as possible to the rear of the box. This can be seen below where the lines are cut allowing the baffle plates to pass right through the box.
I made the box from two sheets of 1.6mm 304 stainless that I had profile cut to a plan I took from the old box. I then rolled the sides over a piece of pipe to form it and then welded it all together. I added the baffle plates by passing them through the cuts that I had made by the profiler and reused the mounting bracket from the old box. The pipes were then tacked while the main casing was fitted to the bike (Disconnect all the electric's on the bike or you may fry something while welding!)

The completed box looked like this.
The clamps used to retain the headers are part of the old box and were badly rusted so I used a heavy duty hose clamp (Mikelor or Norma Brand) that was almost exactly the same as the original clamp.
