Perfect Patterns Style 73
Coat and Bonnet for a Little Girl Doll
~Lesson 1~
Collar
With photos and instructions by Marsha Olson
(printout is 6 pages)
(plus 1 for the hand sewing tips)
You will need pattern pieces 1 and 2
Important: For doing hand work you will need a size 12 sharp hand sewing needle and a small spool of Dual Duty Extra Fine thread. Regular thread can be used but is much harder to thread into the needle.
The Extra Fine thread only comes in a few colors, but used correctly will not show at all. Purchase light or dark depending on your fabric color choice.
Decide in advance if you want the edge of the collar to be in the trim color or the coat color and cut the collar accordingly. The trim is the smaller piece and will be added to the top side of the collar.
1. Right sides together, sew the Collar (1) to the Collar Lining (1) along the two short ends and the long curved upper edge. Use a small stitch length so the corners will turn without bursting when you push them out.
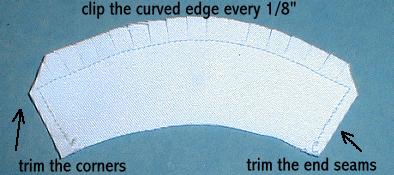
2. Trim the end seams down to 1/8" or less. Angle trim the corners. Clip the curved edge every 1/8".
3. Trim down the curved edge to less than 1/8".
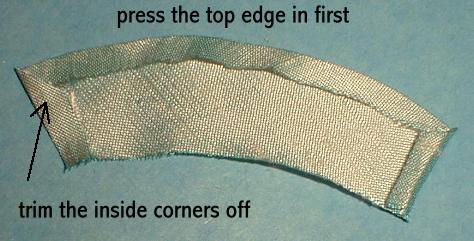
4. Turn the collar right side out, pushing the corners out sharply. Press the collar along all the sewn edges.
5. Press the top edge of the trim piece in 1/8". Press the sides in and trim the corners on the inside.
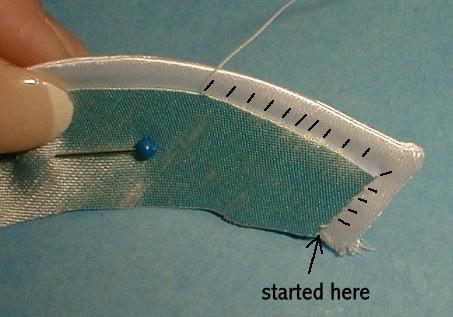
6. Pin the trim to the collar so the collar edge shows evenly all around the pressed edge of the trim.
Invisible Slip Stitch
For those of you who do not wish to do the work by hand, the trim layer of the collar
may be discarded or you may top-stitch the trim to the collar.
The slip stitch is always worked on the outside to sew two layers together invisibly.
You will be using this hand stitch frequently, so try a practice piece first with a straight edge rather than the curved edge you will be doing on the collar. The slip stitch works the best when you are doing very small scale sewing or when you are making something with sharp corners. For a perfect fit, this is also the stitch I use to close the back opening edges of skirts and dresses in all sizes.
7. Start by pulling the thread and your needle (single thread) up from the wrong side to the right side through the top layer of fabric (the trim). Make the first stitch by going into the bottom layer (the collar) exactly under where you first came up through the trim and pushing the tip of the needle over from underneath to pick up just one thread of the trim fabric along the edge. Try to keep your stitches evenly spaced. Done correctly, the only part of the slip stitch that will show is the tiny bit between the top and bottom layer.
8. Your stitches should be invisible as shown in the photo below.
9. Staystitch the open bottom edges together within the 1/4" seam allowance (slightly less that 1/4" from the edge). Use a longer stitch that can be easily removed if it shows after sewing the collar to the coat. Clip every 1/8". Fold the collar in half and notch to mark the center.
It is an optical illusion that the white edging looks like it was added last. The shape of the collar looks slightly distorted due to the digital photography, but the clearest picture was obtained by taking it at a slight angle for perfect lighting.
This style collar, with the slight curve to it, is made to rise up from the neck and then fold over at the back. From the back view it is only half as wide and curves around the neck nicely.
Sometimes called a fold-over collar.