Selling Your Stock Engine/Turbos/Trans...
...If your engine/turbos/transmission are in running condition, the best time to secure a
buyer is while they are still in use, where the running condition can be easily verified by
the prospective buyer. This way, there is no question about the compression, boost
pattern, seal condition, etc. There are many more RX-7's than there are available running
engines, so a good engine can demand a premium price. This can go a long way to help
defray the cost of your V-8 conversion.
...Basic Kit instructions
...LS1 Engine Cradle & installation hardware
...Transmission crossmember
...LS1 plate set
...Engine rubber mounts- (2)NAPA #602-1108
...Transmission rubber mount- (1)NAPA #620-1024
...Custom aluminum LS1 radiator and bolt-in bracket set
...Condensor core re-location brackets
...LS1 Temp sender adapter bushing
...Sway bar spacer set
...Driveshaft w/ slip yoke
...To minimize the down-time required to complete the conversion, the new engine should be prepped & detailed in advance.
Editing the LS1 PCM...
The LS1 PCM has many parameters that should be re-programmed for compatibility with the RX-7. Among them are...
...tire dia
...gear ratio
...smog configuration
...speed limiter setting
...rev limiter setting
...fan turn-on temp
Depending on what your needs are, you may also want to remove the following faults and codes as well...
...VATS (anti-theft)
...BCM
...EGR
...rear O2's
...EVAP
...AIR
...Fuel Level
...Limp Home (possibly change to an alternative tune)
We suggest sending your PCM to Jesse (574) 267-3630. He has re-programmed hundreds of LS1 PCMs, and knows what he is doing. He is familiar with the RX-7/LS1 swap, and can recommend changes depending on the intended use of your car.
Removing Un-needed Parts & Accessories...
...Remove the stock LS1 motor mounts, as they are not needed. After you're done, now would be
a good time to pressure wash the engine, before it gets "too" exposed.
...Remove the intake manifold as a precaution. The gaskets are re-usable, and you will not have to worry about breaking the sensor sticking out of the back when installing the engine.
Preventitive Maintenance...
...If there is any PM to be done on your new engine, now is the time to do it.
Replace any leaking seals or gaskets. If you want to install a new timing chain, oil pump,
etc, it will never be easier than now.
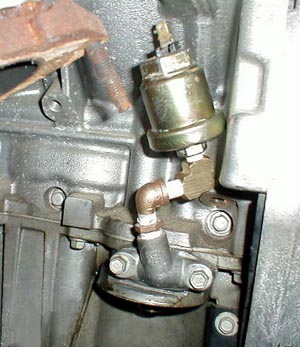
 Installing RX-7 Water Temp Sending Unit into the LS1...
...temp sender adapter bushing
...RX-7 coolant temp sending unit (NAPA PN# TS-6047)
...anti-seize
...teflon tape
...FYI info- LS1 head coolant plug thread is 12mm x 1.5 pitch
................RX-7 temp sending unit listed above has 8mm x .75 pitch
...On the passeger side LS1 head, remove and discard the existing bolt located just to the rear of the rear exhaust port.
...Using our LS1 Temp Sender Adapter Bushing, install the salvaged sending unit for RX-7's water temp gauge into the hole. Be sure to use anti-sieze and a gasket in the head's threaded hole, and teflon tape on the sending unit's threads.
...tighten carefully to avoid stripping the sending unit's threads.
 NOTE:...Some RX-7 sending units have a thread that is very close to 1/8" BPT, which is just slightly smaller than the LS1's 12mm hole in the head. A short adapter that would mate these two is too thin to be reliable. If you want to use this larger sensor, you will need a longer adapter like that shown in the upper pic, which is too long and does not allow the sensor's bulb to extend past the adapter bushing, into the coolant.
If your RX-7 had this larger sending unit and you would still like to use it in your LS1, some aftermarket gauge manufacturers make a 12mm x 1/8" pipe adapter like that used in the upper pic. We do not sell this adapter.
Our LS1 temp adapter bushing is pictured to the right with the TS-6047 sensor installed. The smaller diameter sensor thread allows using a much thinner hex section, letting the sensor's bulb to extend much farther into the coolant. This allows the sensor to measure the actual coolant temperature, not just the temp of the metal surrounding it, providing much more reliable feedback.
 Installing RX-7 Oil Pressure Sending Unit into the LS1...
...10mm socket & ratchet
...in/lb torque wrench
...hand drill
...11/32" drill bit
...1/8" NPT tap
...(2) 1/8" NPT steel "street" elbows
...teflon tape
...Accessing the LS1's oil galley is easiest using the removable plate located on the left side of the oil pan, just above the oil filter (drilling and tapping is necessary) called the "oil pan cover". In order to get the rather large RX-7 oil press sending unit away from the LS1's exhaust, it is necessary to use a combination of fittings, such as the 2 "street" elbows shown in the pic, to allow tucking the sending unit back in next to the block. We prefer to use steel fittings, available at a hydraulic supply shop, as they are stronger and will better resist the increased vibrations of a longer multiple fitting setup.
...Remove the cover plate from the pan.
...Clamp the plate in a vise, using wood to protect the aluminum. Be careful not to place too much stress on the cover, which could cause it to crack.
...Drill a 1/32" hole into the cover as shown in the pic.
...Tap the hole to 1/8" NPT
...Carefully clean the cover block to remove dirt and machining debris.
...Using teflon tape on the threads, assemble the fittings and sending unit onto the cover block as shown in the pic. Test fit as necessary for a good fit.
...Re-install the cover onto the oil pan. Torque the cover bolts to 106 in/lbs.
 Installing LS1 Adapter Plates and Mounts onto Engine...
...Carefully remove the forward/upper engine mount stud from each side of your engine block.
...Install the LS1 Adapter Plate into position over the 3 remaining mount studs, placing the tapered/countersunk hole over the hole from which the stud was removed (NOTE: there is a right and left plate). Thread the flat countersunk 10mm bolt (provided with your LS1 plates) in the plate's countersunk hole. Using anti-sieze, torque the bolt to 22ft/lbs.
...Install the original nuts/washers over the 2 rear studs.
...Install the rubber Mounts onto the installed LS1 Adapter plates, with the lower center hole over the forward/lower LS1 block stud. Install the 2 supplied 3/8"x3/4" bolts into the rubber mount's upper holes. Torque all 5 bolts/nuts to 35ft/lbs.
...Right side LS1 plate and mount shown in upper pic.
...Left side LS1 plate and mount shown in pic below.
...Repeat for other side.
 Preventitive Maintenence...
...now would be an excellent time to change the front and rear seals, as well as the gear oil/fluid.
If you are using an automatic trans, now would be a good time to change the filter and install a drain
plug in the transmission pan. B&M sells one that's easy to install.
Joining The Engine / Transmission...
...it's easiest to install the engine/trans as a unit. Be sure to use the correct flywheel/flexplate
bolt (too long can bottom out or hit the rear face of the block). Properly torque the flywheel/flexplate
bolts as recommended in the shop manual BEFORE joining the engine/trans.
Draining / Evacuating Your AC System...
...While your RX-7 is still mobile is the best time to have your AC system properly
evacuated by a professional. Not only is it illegal to release your refrigerant into the
atmosphere, it is also bad to expose the inside of your AC components to the outside
moisture laden air. A pro will be able to evacuate and seal your system, and at the same
time he can recover and save your rare and valuable R-12 for re-use later.
Pressure Washing The Engine Compartment...
...On your way back from the AC shop, it's a good idea to stop by the car wash and
give the underhood area a good, thorough pressure washing. You would be surprised at
how much easier and more enjoyable the job will be when you can actually see what
you're working on.
2....Considerations & Requirements....
4....Engine / Transmission Installation....
5....Exhaust / Throttle Cable / Accessory Drive / Pulleys....
6....Cooling / Fuel Systems....
7....RX-7 Wiring Harness Connector ID and Circuit Locations....
8....Electrical System Modifications By Circuit....